The making of pipe stems is one of those subjects that many smokers and collectors find interesting even if they have no desire to do it themselves. I suppose it's a subset of the fascination humans have in general for semi-obscure cultural objects and their origins that makes PBS's Antiques Roadshow so popular. Transform a common material into something delightful and unexpected with a dose of craftsmanship, a bit of art, and a dash of voodoo, and you have a winner. (It wasn't uncommon for Golden Age pipe makers and repairmen to put their benches at the front of their shop, near the sidewalk windows, for just that reason.)
Since there are precious few street-level, windowed shops left in the world, the best way to see how the sausage gets made these days is with close-up photographs and a running commentary.
Because I live and work alone, though, opportunities to document the process have been rare. But my luck recently changed: the owner of a pipe whose original stem was in the shop to be duplicated happened to live nearby and wanted to see how it was done. Plus, he knew his way around a camera. He asked if I'd mind working with an occasional flash going off, I said no, and this article is the result. I hope you enjoy it (or, if you repair pipes yourself, find something you can use.)
- - - - - - - - - - -
The patient is a 1939 Dunhill Root in the 472 (LB) shape, which is quite a desirable collectable. The original stem, though, had been thinned from use and (presumably) tooth-mark removal to where smoking it was risky for a clencher (the thickness behind the button was .0145"). For almost 30 years, an increasing fear of hearing that tiny, sharp "tick" sound during use had eventually spoiled the owner's desire to smoke the pipe at all, so except for a half-dozen smokes immediately after its purchase, it had just been parked in a rack. Admired, spoken to, and occasionally caressed to be sure (c'mon, admit it, you treat your favorites the same way), but always replaced without having tasted fire, and accompanied by a promise to one day find a replica "smoking stem" for it.
The number one rule when making such stems is that the shank of the pipe it is fitted to cannot be touched in any way. Number two is that the tenon must fit to exactly the same depth and with exactly the same insertion pressure as the original, so that the two stems remain interchangeable for the life of the pipe.
Those two musts make fabricating a duplicate somewhat more work than was expended on the original, but so it goes. Physics will not be denied.
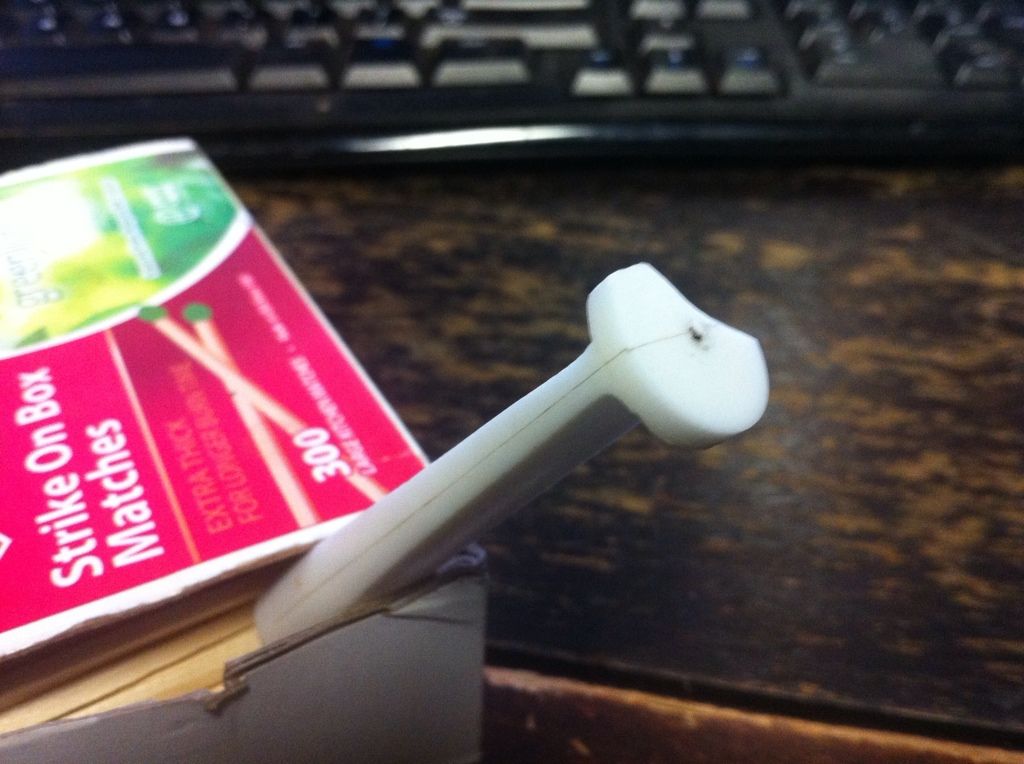
The first order of business is to cut a length of suitable material---in this case brindle (or so-called "bowling ball") vulcanite, square the ends to 90 degrees, and find the center on one end. Because of how the resulting cylinder will be held for shaping later, cut the section about 3/8" longer than the final stem's finished length so that there's room for a round "handle" on the button end. (Don't worry, the reason for it will be made clear in a later photo)


Next comes drilling the airway. But first, a word about tools.
Most pipe smokers think that a lathe is essential for making stems from rod stock. It is not. A drill press can be used, and though the process is quite different, it works well when properly set up. In fact, for repair work, a drill press is actually the better choice if you are limited to a single machine because of something that isn't a factor when making new pipes: the need for an adjustable (floating) center. (Though chucking an irregularly-shaped workpiece to any desired center is possible with a lathe, doing so is difficult and time-consuming.)
Brief explanation: while pipes are set up "on center" by definition when their fabrication begins, a finished pipe never is. Whether by accident (airways sometimes don't end up in the center of the tenon, for example), or by design (since the exterior of both the stem and shank are shaped after drilling, the location of the center of mass---and therefore the centerline---changes), it doesn't matter. The shift always occurs, and cannot be ignored in repair work.
The only way to handle it is by having the ability to re-center finished pipe components when working on them by using tooling that has a moveable, a.k.a "floating", center. The simplest off-the-shelf solution is to mount a machinist's cross slide table---think giant steel Etch-a-Sketch---to the table of a drill press, and have a way to clamp the work to it. In the case of pipe stems, they must be held upright at 90 degrees from the horizontal. (In case you are wondering, there is no such thing as a cross slide table that attaches to a lathe.)
Here is a real-world example:

Bolted to the the drill press table is the movable surface---the cross slide, or "x-y" table---and attached to it is a machinist's angle plate that has been modified to serve as a pipe stem vise. Studying the picture a minute while noting where the nuts and slots are (all of which can be loosened & tightened to allow the components great latitude in configuration), plus knowing that cranking the little L-handles will move the carriages they are attached to side-to-side and front-to-back, respectively), will explain how the system works better than words can.
As long as we're on the subject, know that a drill press used for pipe repair work must be both precise and extremely rigid. Drill presses are not designed to handle off-axis loads, and will flex with astonishing ease when subjected to them. And, sadly, yes, drum-style tenon cutting tools DO present enough off-axis loading to make small and/or Chinese-made drill presses unsuitable for the task. Small units because they are too flexible; and Chinese-made ones because they are too loose/sloppy. (I use and recommend a Swedish make called Arboga). Here's a larger shot of it for anyone interested:

So, on with the stem fabrication.
After finding and marking the center axis of the now cut-off-and-squared rod stock segment (the "two right angles" method is the easiest), clamp it vertically in the stem vise, align the center mark under a spotting bit with the x-y adjusters, and put a dimple in the material to keep the next bit from wandering. Then change the bit to a .125" (1/8") tapered one (Fuller is a good brand), and using a slow speed to avoid excessive heat build-up, drill the airway to between 5/8" and 3/4" short of completely through---I like to use a piece of tape around the bit as a depth marker. Be sure to clear the chip often!

Finally, change drill bits again to a smaller diameter .0625" (1/16") one, and finish drilling the hole.
When you are done, one end of the blank should look like this:

…and the other like this:

Cutting a slot into the button end of the blank (the small hole end) comes next, and is easy to do with a small "circular saw" style cutter chucked in a rotary tool. (The external motor, pedal-controlled models are much more versatile and give a better result than the "motor in the handpiece" ones, btw. Foredom is a good brand.)
WARNING: DO NOT attempt to cut the slot without bracing/supporting both the cutter and stem stock at right angles to each other. A simple piece of appropriate scrap lumber clamped to your work table will do the job just fine. Trying to do it freehand will result in a botched slot (guaranteed!) as well as possible injury to you.
Just remember to shim the blank to the proper height so that the slot will be centered in both directions.


The next task is to cut the tenon. Tricky business, this. Something that's subliminally counterintuitive when looking at a pipe is that such a casually-shaped wooden object can have areas of near-Swiss watch precision "inside" it, so most budding pipe carvers and repairmen are unprepared to deal with the cascade of difficulties encountered when they first attempt to fit stems to pipes. Many of which happen in a compound, domino-effect fashion.
But near-Swiss watch precision is what's required, and the best way to master the task of tenon cutting is to make every decision relating to the procedure---from what actions to take when actually doing the work, to selecting tools for the job in the first place---with that fact in mind. Close is not good enough, and a casual approach will fail every time.
There are several drum-type adjustable tenon cutters on the market. The best one in my experience is Tim West's "new model" cutter that has easier-to-use adjustment than the first one he offered (which was actually a purchased J. H. Lowe design). The keys to achieving a good result are mounting it with absolute side-to-side rigidity on a shaft that has low runout, and running it at low speed. Around 125 rpm for Lucite, and 250 rpm for vulcanite. As I said before, a typical home-shop, small frame, low-precision drill press will NOT work well. Attached to a quality lathe, horizontal boring machine (factory surplus adaptation or home built), or large-frame, high precision drill press, though, and it will work like magic. (My setup leaves all surfaces "final form" ready. No further filing, sanding, or polishing is necessary to achieve an excellent fit.) Remember that a lathe or horizontal boring machine will not allow a floating center, though.
Here are some photos of the tenon being shaped in real time. The first provides some scale, the second shows the preliminary "bulk removal" cut to approximate size with large ribbons of material flying away, and the third shows the final "trace" cut to exact size where only hair-fine strands are shaved off.


The next task is to rough in the stem's shape. It's the step that most stem makers enjoy the least because of how tedious it can be. Depending on the size and shape of the stem, doing it by hand with rasp-like tools can take many hours. I've seen several attempted solutions to the problem, from mill tables with angle jigs to hold the stock, to freehand cutting on a bandsaw. (The latter is EXTREMELY dangerous, and not recommended under any circumstances, btw. Round objects will try to roll/twist when off-center torque is applied, and if the cut gets pulled out of alignment the blade will bind. What happens then depends on several things, but none of the likely outcomes are good.)
French wheels and hardware-store belt sanders are much safer, but are limited in their usefulness because when making a pipe stem the button must be protected. You can't just grind a spear point shape and then add a button to it… the material that will later become the button must be there from the start, and stay there. It cannot be accidentally flattened, gouged, notched, or angled while doing the mass material removal. If any of those things happens, you must start over.
The only machine I've found that will remove large amounts of vulcanite or Lucite quickly, is easily controlled, and protects the button simultaneously is the style of belt grinder that knife makers use. What makes it different is the contact area between the workpiece and belt is easy to see and index by using the "light gap" from below, so endless iterations of grinding blind for a second, checking the result, grinding blind for another second, and checking the result, is never part of the process. With the best machines (I highly recommend the Burr-King model 960-272) the material removal is not only blindingly fast (when desired), but completely smooth and free of grabbing, galling, or loading. Touch lightly = material cleanly gone. That's it. No drama, no muss, no fuss… just gone, exactly where you want it gone, and nowhere else.
If you decide to get such a machine, be sure its belt speed is adjustable linearly during use from near zero to maximum rpm (best achieved by something called a variable frequency drive), and that it allows 1/2", 1", and 2" wide belts to be used. Pipe stem making demands both features. Any knife-design belt grinder that doesn't have them won't get much use in a pipe shop.
Here is what a Burr-King 960 looks like, by the way. (This one is pedestal-mounted, but it can be fitted to a work bench if you prefer.)

Before starting the roughing-in, there's an important bit of prep that can make the difference between a perfect stem and a ruined one. TAKE THE TIME TO DO THIS! YOU'LL BE HAPPY YOU DID!
Apply a 3/16" wide strip of masking tape over the slotted end of the blank, so that it is both centered and aligned exactly with the slot. Then run the tape exactly down the center of each side of the blank for its full length. The edges of the tape then become your guide, visually protecting the bite zone thickness (so you don't cut into the airway), and guaranteeing that the opposing sides of the emerging stem stay aligned relative to each other (EXTRA important when making saddle stems).
Like so:

After the guide tape is applied, wrap a couple turns around the button/slot end to remind yourself what NOT to cut, and wrap many turns around the tenon, to 1) protect it, 2) provide a diameter-adjustable "false shank" that gives you a something to grind to, and 3) provide a knob-like handle for your fingers to grab.
Finally, mark the EXACT distance from the stem shoulder to the base (inside crease) of the button. and you're ready to go.

By the way, the second picture of the next pair was taken from "underneath" to show how the workpiece need be held with only a light touch, and can be rolled by your fingers, or "cammed" by wrist movement (like the automatic stem-cutter seen in the "How It's Made" newsreel tour of the Dunhill shop) without being snatched away by belt friction. Again, high quality belt grinder + touch lightly = material disappears as if by magic.


After a couple minutes of grinding, the blank will look like this:

Then, slow the belt's surface speed and continue removing material, taking the stem as close to its finished dimensions as your skill allows. Remember, the big roll of tape over the tenon is a "shrinkable on demand" substitute shank... take advantage of it. As you get closer to the desired size, peel off the next couple wraps of tape, slow the machine another 200 rpm or so, and level the stem material again. Continue the process until it's time to shift gears to hand tools.

Using the appropriate hand tools, widen the slot, shape the button, and perform final shaping:
(The top two pics were obviously staged---taken out of sequence---when the stem was still rough. I can't even recall the reason, now. Doesn't matter, though, the work being demonstrated is correct.)


Here is the stem most of the way through the above steps. Note that a Dunhill white dot magically appeared when the camera's battery needed recharging, but there isn't much to making a round inlay, process-wise. (Drill hole, apply glue to rod, insert, cut off excess) My apologies for the omission, though.


And here is the finished stem alongside the original. There are some quality and efficiency tricks to the final shaping and polishing of a stem, but this post is already obnoxiously long. Maybe at some future time.


Finally, I realized after deleting the culled photos that I'd tossed every picture of the finished pipe, so I have no "grand completion" picture to offer. So, here is a picture of Daisy the Shopcat instead: