rustication techniques

rustication techniques
I was rusticating some estate pipes today and became curious about the preferred method of rustication used by you guys. A dremel seems fastest and easiest, yet I prefer the hand rustication with a cluster of sharpened concrete nails.Depending ont he nail size and quantity it can yeild some iteresting results and to me its much more natural than using a dremel. Chime in if you have a favorite rusticating tool or technique you would like to share.
-
baweaverpipes

- The Awesomer
- Posts: 947
- Joined: Tue Dec 19, 2006 8:07 am
- Location: Franklin, Tennessee
- Contact:

Re: rustication techniques
I love rusticated pipes, so Bruce is wrong.
To my eye, the problem with almost any dremel tooling is that because the tool is by nature circular, you are very limited to the types of cuts you can make, the shape of the resulting depression. So unless you're doing something really unusual, the result is a pretty uniform, and pretty boring rustication. Take the Savinelli Roma type of look as an example of this, or Peterson's current incarnations (Kapet pipes for example).
Hand carving allows all sorts of textures. The rustication on the new era Kaywoodie Thorn series pipes is incredible - deep, sharply detailed.... it's lovely. Even the old Sea Rock is pretty nice to look at and in the hand, but it's definitely fairly laborious.
I've gotten rock-like textures, bark-like textures, and textures that are simply... carved.
Not all blocks are up to smooth grade, not all blocks are gonna make a nice blast, so it's a way to highlight the best parts of a block and add some tactile interest to the pipe.

I use a 1/4" short bent gouge, a 3/8" straight gouge, and a 3/8" skew and have gotten lots of decent rustications out of them in various combinations.
To my eye, the problem with almost any dremel tooling is that because the tool is by nature circular, you are very limited to the types of cuts you can make, the shape of the resulting depression. So unless you're doing something really unusual, the result is a pretty uniform, and pretty boring rustication. Take the Savinelli Roma type of look as an example of this, or Peterson's current incarnations (Kapet pipes for example).
Hand carving allows all sorts of textures. The rustication on the new era Kaywoodie Thorn series pipes is incredible - deep, sharply detailed.... it's lovely. Even the old Sea Rock is pretty nice to look at and in the hand, but it's definitely fairly laborious.
I've gotten rock-like textures, bark-like textures, and textures that are simply... carved.
Not all blocks are up to smooth grade, not all blocks are gonna make a nice blast, so it's a way to highlight the best parts of a block and add some tactile interest to the pipe.
I use a 1/4" short bent gouge, a 3/8" straight gouge, and a 3/8" skew and have gotten lots of decent rustications out of them in various combinations.
ALL YOUR PIPE ARE BELONG TO US!
Re: rustication techniques
Sas,
I had always wondered if people used carving tools for rustication, or if it was an "accepted method". I've seen people use modified drill bits, phillips bits that had been cut and sharpened, all sorts of stuff. But I had never seen anyone use carving tools.
Myself, I've only used a Dremel thus far, and I see what you mean about the boring texture. The bits are, by default, round, and thus leave a rounded depression.
I had tried a group of nails sharpened and silver-soldered together, but as I wasn't working on briar at the time, it just wasn't working, at all. (Ebony is quite hard and dense)
Now that I've got a bit of briar, I need to expand my techniques, and see what others use is surely to help!
And I too love rusticated pipes, as well as blasted. Smooths, well, their just smooth, and how fun is that?
Re: rustication techniques
Lots of variants of the nail-group tool exist, and the main trouble with it is that it yields up basically an identical texture, which is to say, a lumpy Sea Rock type of rustication, basically no matter what.
I never tried actual carving tools until I saw some pictures of Luigi Radice carving an Underwood.
I never tried actual carving tools until I saw some pictures of Luigi Radice carving an Underwood.
ALL YOUR PIPE ARE BELONG TO US!
-
Spillproof
- Posts: 14
- Joined: Sat Jun 02, 2012 2:40 pm
Re: rustication techniques
Well first off that's a nice pipe Sas, looks quite familiar to me 
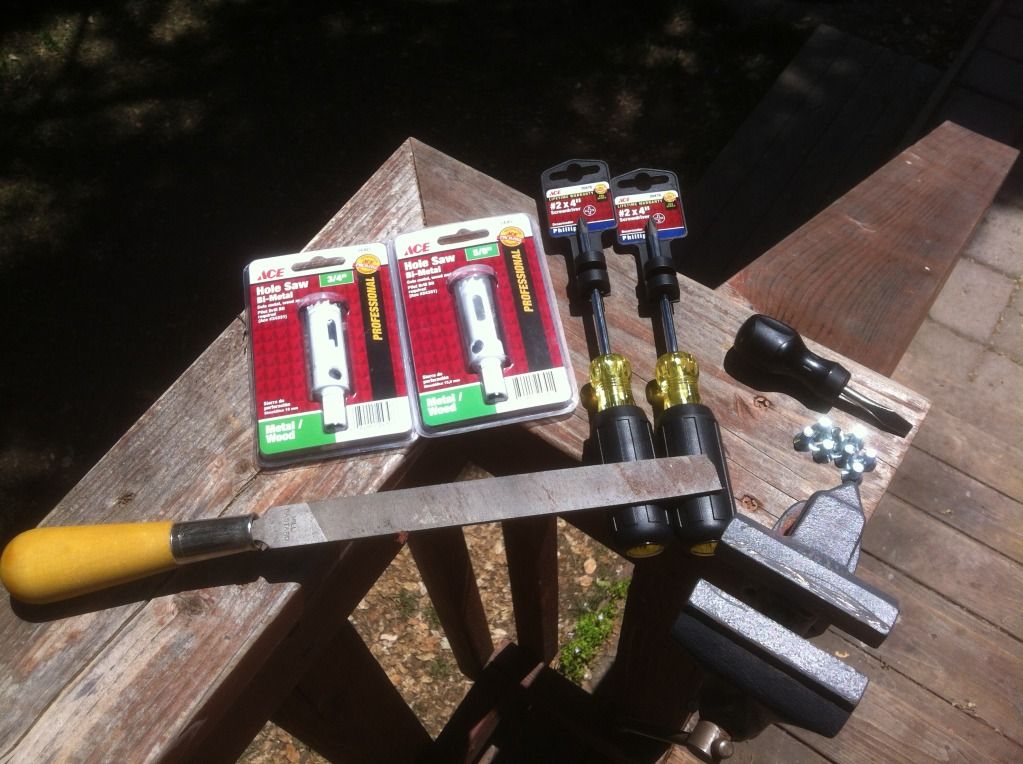
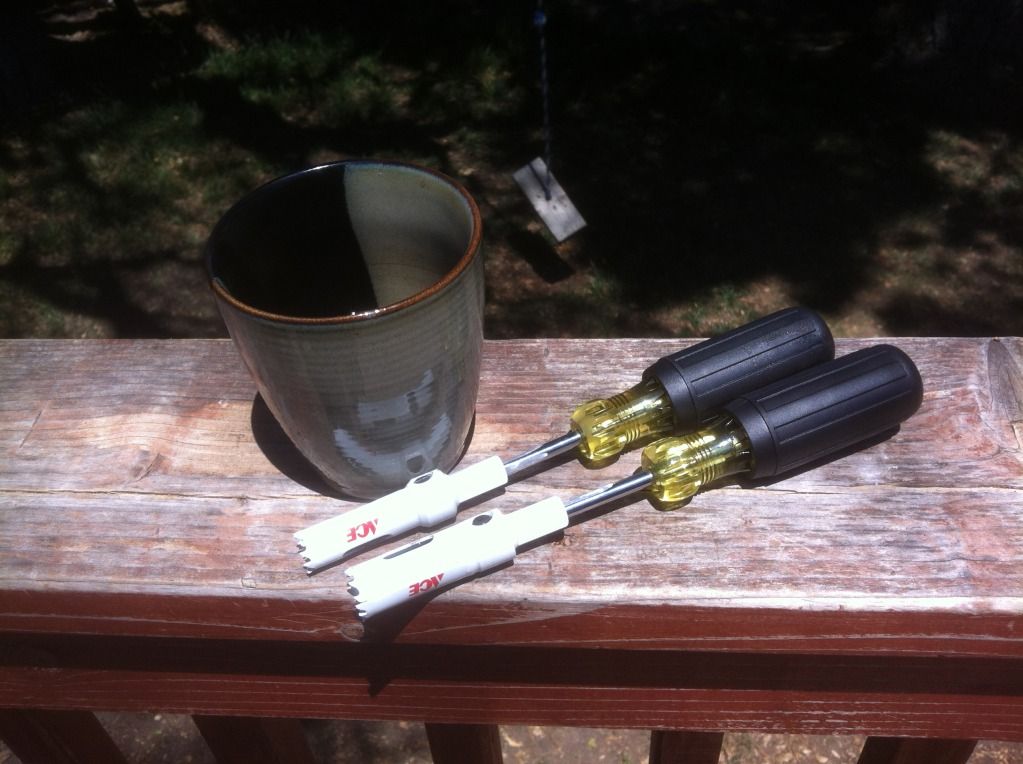
I have been experimenting with hand-rustication using a couple of tools I made on the advice of TaHarris.
I used this stuff:
http://i1154.photobucket.com/albums/p53 ... f1/RT1.jpg
To make these:
http://i1154.photobucket.com/albums/p53 ... f1/RT3.jpg
In combination with a Dremel and a wire brush, I'm finding a lot can be done. And they're cheap
Sasquatch wrote:Lots of variants of the nail-group tool exist, and the main trouble with it is that it yields up basically an identical texture, which is to say, a lumpy Sea Rock type of rustication, basically no matter what.
I never tried actual carving tools until I saw some pictures of Luigi Radice carving an Underwood.

Re: rustication techniques
Welcome, Spillproof, good to have you aboard.
:::::::::::::::::::::::::::::::::::::::::::::::::::::::::::::::::::::::::::::::::::::::::::::::::::::::::::::::::::::::::::::::::::::::::::::::::::::::::::::::
"Creativity is the residue of time wasted."
Albert Einstein, famous pipe smoker
"Creativity is the residue of time wasted."
Albert Einstein, famous pipe smoker
-
Spillproof
- Posts: 14
- Joined: Sat Jun 02, 2012 2:40 pm
Re: rustication techniques
Thanks Hudson. Good to have gotten the nod.Hudson wrote:Welcome, Spillproof, good to have you aboard.
-
The Smoking Yeti
- Posts: 1346
- Joined: Tue Jan 10, 2012 4:55 pm
- Contact:

Re: rustication techniques
I just use regular toenails... maybe my rustication would look better if I used yeti toenails....
Andrew
www.andrewstaplespipes.com
www.andrewstaplespipes.com
-
timothy thorpe
- Posts: 167
- Joined: Mon Jun 11, 2007 6:20 am
- Location: new jersey
- Contact:

Re: rustication techniques
One single blunted nail leaves a random pattern. Make sure the nail is blunted, otherwise you are just separating the wood fibers and they will close up later with moisture. The blunted nail crushes the fibers and the look will stay. Use a sort of rebound action with a small hammer and let the nail bounce to a new spot after each hammer blow. Go slow around the edges.
