flake or spray shellac for amateur maker
-
sandahlpipe

- Posts: 2106
- Joined: Mon Feb 04, 2013 8:49 pm
- Location: Zimmerman, MN
- Contact:
Re: flake or spray shellac for amateur maker
I have used pipe cleaners, but am now going back to foam brushes. I apply the last coat of stain just before buffing and the cleaner can scuff the surface. Pipe cleaners are more rigid, which has some advantages at times.
-
Joe Hinkle Pipes

- Posts: 804
- Joined: Tue Feb 15, 2011 1:39 am
- Location: Lafayette Indiana
- Contact:
Re: flake or spray shellac for amateur maker
I have recently been using a DNA soaked paper towel to wipe off the excess stain base coat. It is giving A more even contrast, A less muddy second stain, and makes sanding the base coat back A little easier because you arent loading the paper up with dried stain. Just be sure to wear gloves when doing this. My previous method was to apply the base stain until opaque, then buff with red compound, and then sand. I think I am achieving a better finish now by buffing only after the pipe is stained with both colors and a very thin layer of schellac.RobEsArt wrote:Question: I'm relatively new to this forum, and equally new to staining pipes.
I've noticed when experimenting with contrast staining that if alcohol based stain is used for both layers, I get a muddy color on my application/wiping cloth. So I've been discussing this with a luthier friend and he suggested (as many of you have) a water based stain for the top, which should eliminate the first stain app bleeding into the second. Ok, I think I understand the premise. However, if shellac is cut with DNA, will it effect the first (alcohol based) stain applied?
-
sandahlpipe
- Posts: 2106
- Joined: Mon Feb 04, 2013 8:49 pm
- Location: Zimmerman, MN
- Contact:
Re: flake or spray shellac for amateur maker
Can you show an example of what the finish looks like, Solomon_pipes?
-
Joe Hinkle Pipes
- Posts: 804
- Joined: Tue Feb 15, 2011 1:39 am
- Location: Lafayette Indiana
- Contact:
Re: flake or spray shellac for amateur maker
You probably saw this one on IG, but the contrast in the grain on this pipe seemed to be much greater than the previous method.
BTW ignore the giant cavern at the bottom of the pipe.
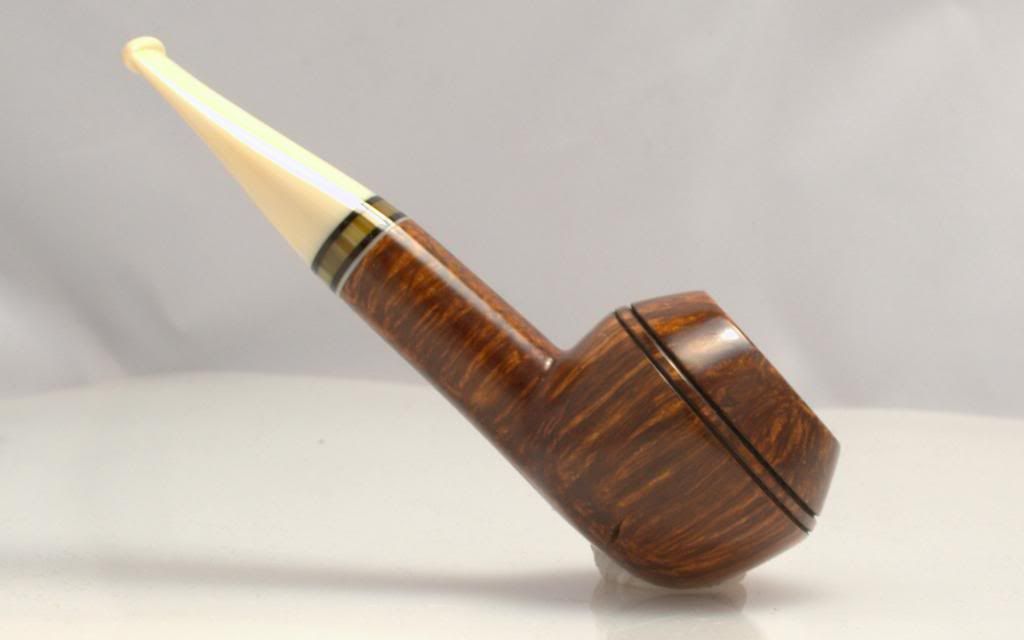
BTW ignore the giant cavern at the bottom of the pipe.

-
E.L.Cooley
- Posts: 363
- Joined: Thu Feb 13, 2014 3:36 pm
- Location: Colorado Springs, Co
Re: flake or spray shellac for amateur maker
Solomon_pipes, let me understand this better. After applying the base color, you then lift the light areas using DA soaked paper towels? Then you apply the top color after sanding the base like usual?
Sent from my banana phone.
Sent from my banana phone.
-
Joe Hinkle Pipes
- Posts: 804
- Joined: Tue Feb 15, 2011 1:39 am
- Location: Lafayette Indiana
- Contact:
Re: flake or spray shellac for amateur maker
yes.
It is a little messier. But after removing most of the darker stain, it is actually less time sanding. Instead of working your way through the stain you are just removing scratches. (from 400 to 600. ) then when you apply the lighter stain you get a better contrast because there is less dark stain laying on the surface to mix with the light stain. Im not recommending anyone else do this, its just what works for me.
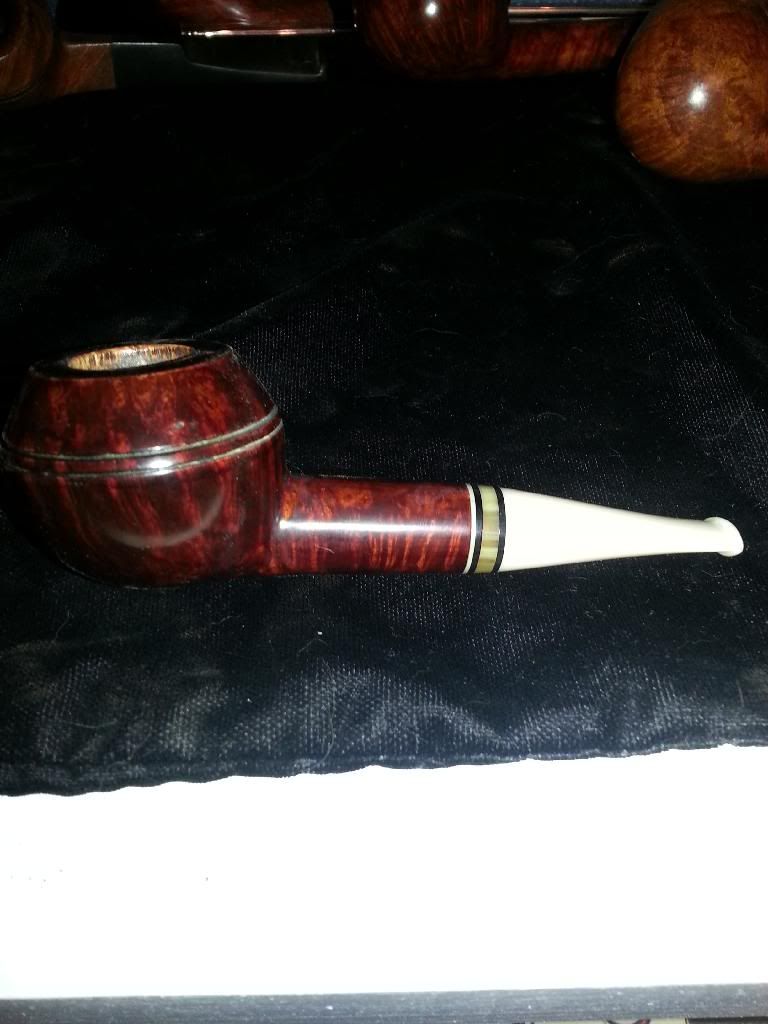
this is the same pipe with my old process
It is a little messier. But after removing most of the darker stain, it is actually less time sanding. Instead of working your way through the stain you are just removing scratches. (from 400 to 600. ) then when you apply the lighter stain you get a better contrast because there is less dark stain laying on the surface to mix with the light stain. Im not recommending anyone else do this, its just what works for me.
this is the same pipe with my old process

-
sandahlpipe
- Posts: 2106
- Joined: Mon Feb 04, 2013 8:49 pm
- Location: Zimmerman, MN
- Contact:
Re: flake or spray shellac for amateur maker
I may have to give that a try.
Re: flake or spray shellac for amateur maker
I have tried the method outlined by Joe, and agree that it works well.
I'm using Fiebings black for the first/contrast step. However, I've tried aniline dye (both; with water and with alcohol) and I am not getting fantastic results with them.
Breakdown:
Sand to 220 - apply black, wait an hour or two
Wipe off excess, wait 30 mins
Sand to 320 - re-apply black, wait an hour or two
Wipe off excess, wait 30 mins
Sand to 400 - apply second color, wait an hour, wipe off excess, 30 mins sand to 600
Re-apply second color, wait 30 mins minimum, regular buffing schedule. (trip, wd, carnauba)
This week I tried using a 1lb cut of shellac, applied with an airbrush, before buffing, but I may have applied too many coats. As I was buffing, I created granny skin on the bottom of a volcano, which was smooth. I stripped off the surface shellac with alcohol, let it rest and re-applied the top color. Waited an hour and went back to the regular buffing schedule. (Unfortunately, the CT demon reared it's head, my hands were numb and I lost hold of the pipe during the final clean wheel buff, and the pipe bounced on the lathe bed, creating lots of neat little scratches and dings... Needless to say I was less than happy.)
So... Is a wipe on method with the cut shellac a more appropriate application method? (daniel-san...wipe on - wipe off)
I realize that I don't want a clear coat. I want to "lock" the stain in. I have noticed on some pipes, I've stained earlier - without the use of a seal coat, that there is a remarkable lightening of color, particularly where I handle the pipes. Is this due to lack of a seal coat, or perhaps the use of aniline dyes?
I've used Transtint dyes for intarsia art pieces, and really like the way they work (airbrushed or brushed). They are touted as being much more lightfast than anilines. But will they "rub off" without a seal coat?
Lots of rambling... I apologize.