homemade drill bits
homemade drill bits
Now that I have decided to take the next step of buying a drill press need to start thinking about bits. The main one I am concerned about is the chamber bit. Like many pipemakers I plan on making my own chamber bit. I am very curious as to what methods are best for getting the best possible chamber bit. Also if there are any pics out there of finished bits. Any information would be very useful. As you can probably tell from any of my previous posts I am pretty green when it comes to pipe making but you've got to start somewhere. Thanks in advance.


I used a bench grinder as well. I started with these:
Grind a little bit at a time, dunking them in water to keep the metal from getting too hot and soft. To check my symmetry I traced the bit, and then flipped it and traced again. When the tracings are the same the bit is even.
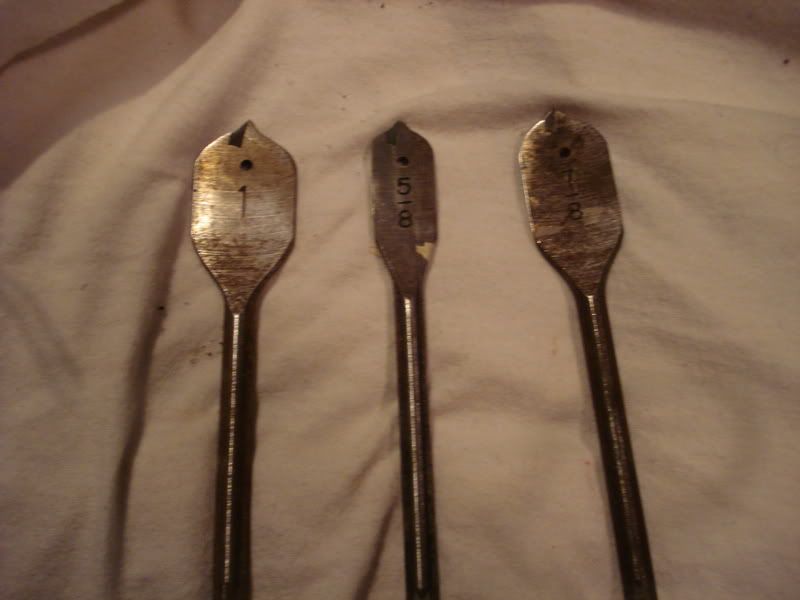
(I may have left too much of a point on the 1 incher)
The 5/8ths bit is tiny, and only good for those tiny blocks like the ones pimo sells for $3.50.
If you don't have the grinder pimo and JHLowe sell them. I don't think one could make them by hand. Or at least, it would take a far mightier hand than mine
Grind a little bit at a time, dunking them in water to keep the metal from getting too hot and soft. To check my symmetry I traced the bit, and then flipped it and traced again. When the tracings are the same the bit is even.
(I may have left too much of a point on the 1 incher)
The 5/8ths bit is tiny, and only good for those tiny blocks like the ones pimo sells for $3.50.
If you don't have the grinder pimo and JHLowe sell them. I don't think one could make them by hand. Or at least, it would take a far mightier hand than mine

There are a couple (or more) ways to grind a Silver & Deming bit, if you have the equipment. Kurt's method is to spin the bit in the lathe chuck and grind the taper with an angle grinder. I can't vouch for it, but the same should be possible using a drill press if you don't have a lathe. Someone else grinds their bits on a belt grinder/sander while spinning the bit in a hand drill. I'm guessing you have to grind a relief angle along the flutes after you've ground the taper.
Here are some illustrations of various chamber bits: http://pipedia.org/index.php?title=Pipe ... s_and_Bits
For those of you who do grind your own Silver & Deming bits, what are your thoughts on grinding a 4 flute, ball end mill? Four legs good, two legs.... ummm, I mean 4 flutes better than 2, perhaps? I'm toying with the idea of giving it a try. They're not all that expensive at Enco: http://www.use-enco.com/CGI/INSRIT?PART ... A=321-6520
Regards,
Frank.
------------------
Grouch Happens!
People usually get the gods they deserve - Terry Pratchett
Frank.
------------------
Grouch Happens!
People usually get the gods they deserve - Terry Pratchett
-
KurtHuhn

- Site Admin
- Posts: 5326
- Joined: Thu Nov 23, 2006 8:00 pm
- Location: United States/Rhode Island
I don't actually suggest anyone do what I do - in fact I actively discourage it. However, if you're going to do it anyway, I've found that Hitachi makes some really nice S&D bits that take this particular form of abuse rather well.
I don't know about ball end mills. I took a look at one a couple years a back, and decided that the S&D bits would be easier to work with. Not for any particular reason, though - just a feeling I had.
I don't know about ball end mills. I took a look at one a couple years a back, and decided that the S&D bits would be easier to work with. Not for any particular reason, though - just a feeling I had.
Call me a lame but I have to ask: these bits are so to say ready-to-roll? Like, I just take them and drill the tobacco chamber? Or these have to be ground round? I'm something less than a beginner in this...
Got thoughts? http://grandiflorum.net

I use a 2 flute ball nose end mill. Even with the 2 flutes it gets choked with chips pretty quickly, by their nature there is little room for them, in some ways this is good as it means the bit is very sturdy and wont flex at all. As long as you remove and clear frequently i find it to be a an excellent bit ofr drilling the chamber, and best of all its ready to go when you buy it. So far i only have one size 20mm, as larger sizes in these can be pretty pricey if you want a quality bit, for larger bowls im working on some modified spade bits which also work great, just take a little time to grind properly as i like to grind proper cutting faces on them and then sharpen them aswell, takes longer to make but saves loads of sanding later on
Ball end milling bits are "ready to roll", if you want a chamber that has vertical (parallel) sides, such as for a billiard. Many freehand shapes, such as a horn, benefit more from a bit that is tapered. You won't find tapered bits "off the shelf" in a hardware store, so you either have to have them specially ground to a taper or grind them yourself.tritrek wrote:Call me a lame but I have to ask: these bits are so to say ready-to-roll? Like, I just take them and drill the tobacco chamber? Or these have to be ground round? I'm something less than a beginner in this...
These router bits will also work as-is: http://www.mlcswoodworking.com/shopsite ... _core.html
Regards,
Frank.
------------------
Grouch Happens!
People usually get the gods they deserve - Terry Pratchett
Frank.
------------------
Grouch Happens!
People usually get the gods they deserve - Terry Pratchett

I use spade bits ground to profile on a belt grinder, then sharpened on a stone. I do not leave any point at all, but rather use a pilot hole to keep the jiggliness down. The pilot is a forstner bit the same size as the large diameter on the spade, so that the walls of the chamber serve to keep things lined up. That avoids the usual spade bit problems with chipping out the edges of the chamber.This can leave a little step in the chamber if I go too deep with the forstner, but it's nothing a sanding drum on the dremel can't deal with.
I drill the airway first and stuff a Q-tip in there to let me know when I hit the right spot. When the sawdust suddenly blows a wad of cotton fluff out the top, it's done!
Pull the Q-tip and a few turns by hand to clean up the bottom of the chamber lest there still be a channel at the bottom.
I have also used a 3/4" core box router bit in the lathe if I have the milling attachment hooked up. That works pretty well, but does load up fast. I'd do it all on the lathe, but I have yet to build one of those nifty pipemaking chucks.
It's not an absolute necessity. If your 4 jaw chuck is large enough, it will still work using 2 of the jaws. So far, I've had perfect hole alignment every time with mine. An inexpensive laser level is great for aligning things.Alan L wrote:I'd do it all on the lathe, but I have yet to build one of those nifty pipemaking chucks.
A short time ago there was a post from a guy in South America who uses a standard 3 jaw chuck with 1 jaw removed. Necessity is the mother.... yadda, yadda.
Regards,
Frank.
------------------
Grouch Happens!
People usually get the gods they deserve - Terry Pratchett
Frank.
------------------
Grouch Happens!
People usually get the gods they deserve - Terry Pratchett
I tried it with my 4-jaw minus two jaws once. Once.  That smiley is what I looked like trying to duck a briar block as it whizzed off the back wall and parted my hair on its way to the other end of the shop, no doubt its way of telling me my jaws aren't quite big enough to hang onto something that size...
It's a 5-inch chuck, jaw height is about 1.5 inches, with the tapered contact area to allow grabbing small rods. If I ground 'em flat and waffled the faces they'd probably hold, but I do like the ability to grab small rods with it.
Does Buffalo sell individual replacement jaws for those things? If they did I could weld on some larger pads and add pins like the Lamb chuck.
Then again, the thought just struck me that I might be able to turn the jaws around and use the inside grip backwards, as long as I leave enough room to account for the inevitable grab marks those nasty thread would leave. Hmmm. Experimentation may be in order...

I've actually been using the tall side, I was thinking the inside jaws might actually have a "grippier" surface.
One of these days when I'm feeling competent I'll probably just weld some plates onto a set of jaws and see what happens. The plain jaws gripped fine using the crossfeed and tool holder cutters, but the minute a handheld chisel hit the block, KABOOM PING RATTLE RATTLE CLANG whap wobbawobbawobbawobba (cue settling dust).
Hi, my name's Alan and I'm afraid of my lathe...
I still intend contacting him to make a pair for me, but life keeps interfering with my finances, like a $381 fine for running a red light. Yep, you're welcome to kick my arse for that stupid trick.JHowell wrote:I think my machinist friend Mark Yingling.....
Regards,
Frank.
------------------
Grouch Happens!
People usually get the gods they deserve - Terry Pratchett
Frank.
------------------
Grouch Happens!
People usually get the gods they deserve - Terry Pratchett
-
pierredekat
Just a couple things to add about the spade bits.
When I grind mine, I chuck them in a hand drill and spin them backwards (counterclockwise) against the wheel on my bench grinder.
What ends up happening is the leading edge gets rounded off and the trailing edge winds up being considerably sharper. So you want them turning backwards when you grind.
That way, when you're using them -- turning the correct direction -- the edge that you really you want to be the sharp one ends up being the sharp one.
After grinding on the bench grinder, finish up with a whetstone. You want them sharp enough to scrape a little material off of your fingernail. That's how I test mine, anyway.
Next. Go down to your local hobby/drafting/art supply store and buy yourself a circle template with several circles in the 3/8 to 1-inch range.
Then, mark 2-3 concentric circles leading up to, and including, your final diameter on the top of the block, prior to drilling.
This will give you some guidelines as you're drilling, because these bits will definitely want to wander on you, particularly if you're drilling at some angle other than perpendicular to the top of the block.
Re:
RadDavis wrote:I use silver and demming bits from Ace Hardware, and I grind the profile that I want on a bench grinder.
Rad
I know this is an old topic but does anyone have some example pictures they could post? I like the idea of using these bits. I have no idea what the tip should look like. No point at all? Is any other sharpening required after shaping? Also in another thread some talked about putting the (spade) bit in a hand drill and spinning it (backwards) to get even shaping. Is this recommended? I have a bench grinder and a belt sander so I assume either could be used.
Thanks!
Bob
-
Vermont Freehand

- Posts: 526
- Joined: Sat Mar 22, 2008 5:31 pm
- Location: Dorset, Vermont, USA
- Contact:
Re: Re:
you'll have to cut a relief behind the cutting egde and hone the cutting edge after you shape. It can be done many ways, but the grinder/drill method is a little sketchy, just hard to keep everythiong true. Mark it good enough on both sides and check with a test cut will tell you if it's true or not, easy to adjust til its rightBobR wrote:I know this is an old topic but does anyone have some example pictures they could post? I like the idea of using these bits. I have no idea what the tip should look like. No point at all? Is any other sharpening required after shaping? Also in another thread some talked about putting the (spade) bit in a hand drill and spinning it (backwards) to get even shaping. Is this recommended? I have a bench grinder and a belt sander so I assume either could be used.
Thanks!
- Attachments
-
- df.JPG (91.94 KiB) Viewed 3400 times