Page 1 of 1
replacing entire shank
Posted: Thu Jul 09, 2015 7:09 pm
by calsbeek
In the wake of several errors, I find myself wondering what I can learn with my pile of mistakes.
I have a good start on a brandy but the shank is complete crap. I just cut it off very near the bowl.
Do I have an option for using something else to replace a short shank entirely (other than bamboo)?
I was thinking of squaring the small bit I have left of the original shank, then turning an integral tenon on something like cocobolo. but I understand that that is probably toxic?
Just how much of a shank can be replacement material?
Re: replacing entire shank
Posted: Thu Jul 09, 2015 7:24 pm
by PremalChheda
calsbeek wrote:In the wake of several errors, I find myself wondering what I can learn with my pile of mistakes.
I have a good start on a brandy but the shank is complete crap. I just cut it off very near the bowl.
Do I have an option for using something else to replace a short shank entirely (other than bamboo)?
I was thinking of squaring the small bit I have left of the original shank, then turning an integral tenon on something like cocobolo. but I understand that that is probably toxic?
Just how much of a shank can be replacement material?
You can do bamboo or some sort of shank extension as long as you have at least about 3/4" distance from where the airway meets the tobacco chamber. It will be a learning experience and take more time than making a new pipe if you do not have experience.
Re: replacing entire shank
Posted: Thu Jul 09, 2015 7:29 pm
by calsbeek
How close can delrin get to the tobacco chamber?
What if I turn an integral tenon, does that change the answer depending on material?
Re: replacing entire shank
Posted: Fri Jul 10, 2015 2:18 pm
by pipedreamer
Premal is right.When I've done this, it gets bamboo and aluminum or stainless.Don't put delrin into the fire!
Re: replacing entire shank
Posted: Sat Jul 11, 2015 3:28 am
by caskwith
Use stainless steel and you can get as close to the chamber as you want. I prefer to avoid aluminium, seen too many corroded stingers and I don't like to think of that happening in my pipes.
Re: replacing entire shank
Posted: Tue Jul 14, 2015 5:42 am
by BrianMadsen
Ditto on the stainless steel!
Re: replacing entire shank
Posted: Tue Jul 14, 2015 11:56 am
by andrew
Part of the danger in getting too close to the chamber is possible loosening of the stainless tenon due to heat breakdown of the epoxy. You can run the stainless right up to the chamber, but you risk longer term failure in the joint. Make sure you abrade the stainless tubing.
Re: replacing entire shank
Posted: Thu Dec 17, 2015 11:39 pm
by DocAitch
I just dealt with a similar problem yesterday and today. I posted a bit of this on the general forum today and no body thought it was a good idea.
Just remember, as a pipe maker, you get to smoke your mistakes, so go for it.
I just was working on a bowl from a box of stuff from 40 years ago. for some reason the shank was gone(bad flaw, snapped off or something) and I apparently intended to replace the whole shank, because I had drilled out the entire shank into the tobacco chamber.
Because I am relearning skills, I decided to take that on.
I turned a piece of scrap briar and fitted it to the hole in the bowl.
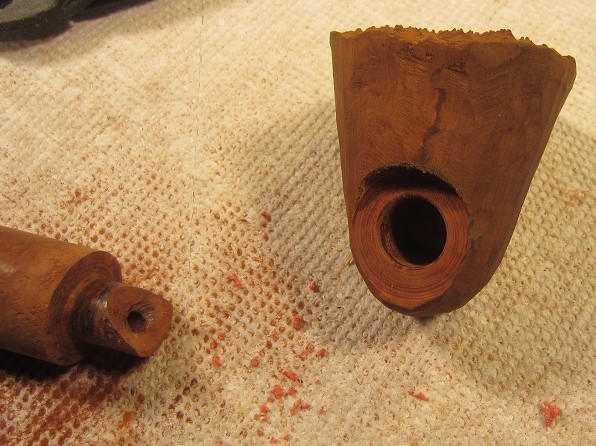

The end in the tobacco chamber was shaped with the sander then with a sanding finger on a drill after insertion into the bowel. I may do a little more here but since this is for me, I may not. these irregularities should cake over, just like a corn cob

the char is from the sanding finger
I glued it with hardware store epoxy- no glue entered the chamber.
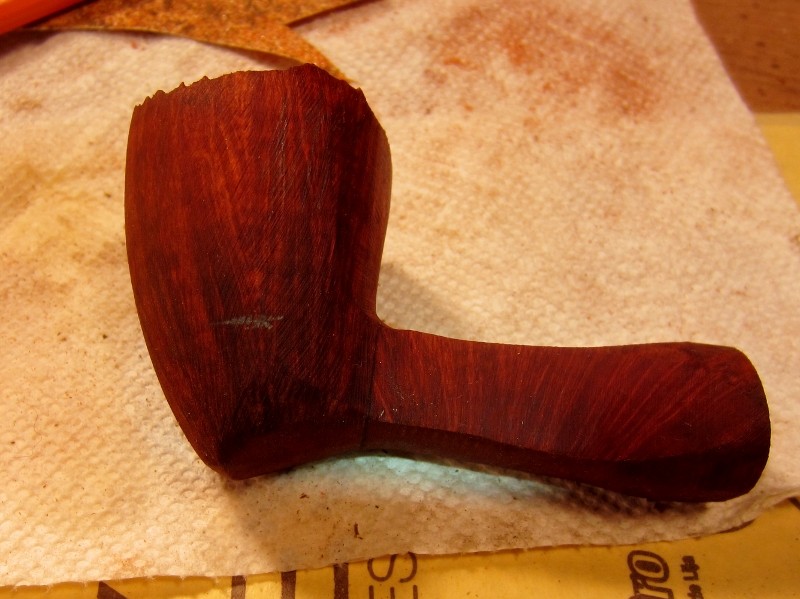
You can see why I thought the bowl was worth saving. (I wet the bowl to show the grain).
This is the join line-not too bad for a first time and no counter bore bit. I was able to rotate the shank to orient the grain is the same direction as the bowl.
I am pleased so far and if I don't screw it up, I am going to have a nice pipe to smoke. I will post more when I get back next week.
Good luck with your project.
DocAitch
Re: replacing entire shank
Posted: Tue Jan 05, 2016 9:19 am
by Revelation
Looking good Doc!
1. What is a counter bore?
2. Are you able to make the seams disappear by shaping the stem to the with no tolerance?
Re: replacing entire shank
Posted: Thu Jan 07, 2016 11:37 pm
by DocAitch
A counter bore is a cylindrical bit with cutting surfaces on the face and sides. It looks like a fat cylindrical drill bit with a flat bottom. It has a hole for a pilot in the face and pilots of different diameter can be inter changed. When cutting , it rides the pilot into a pre drilled pilot hole and produces a nice flat face which is perpendicular to the pilot hole. It is nice for facing the shank for a flush fit stem.( I have a picture of the hole one makes in a posting on "Another FrankenPipe"
viewtopic.php?f=9&t=10912 ). Enco tools has them available.
To make the above recess, I used a turned cylinder of oak with an ebonite pilot and a piece of sandpaper glued to the face-that worked OK, you can see the result in the first picture.There is a picture of the dowel in this post
viewtopic.php?f=15&t=10879 (There is also a picture of the above pipe after completion )
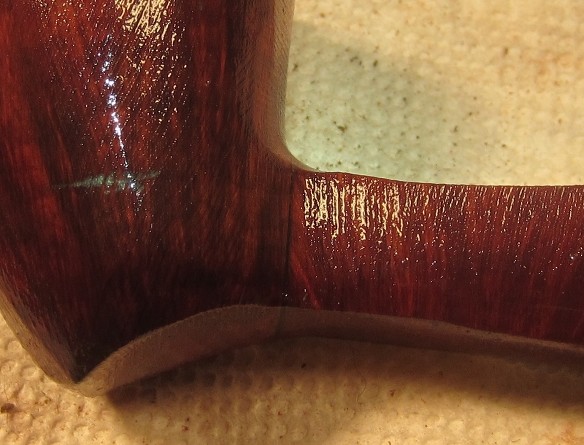
Unfortunately, the seams will always be visible. With a really good join, they are small, but the grain pattern changes at the join. In "Another Frankenpipe", the second piece of briar is of a slightly different color.
DocAitch
Re: replacing entire shank
Posted: Fri Jan 08, 2016 6:07 pm
by Revelation
Thanks Doc!
Re: replacing entire shank
Posted: Thu May 25, 2017 7:43 pm
by geek33
This is good for me I am doing a poker, but had no excess from the bowl.