The bottom line looks better. It's close, still not flat...but you get the idea.
The top of the bowl/shank junction looks okay. Before you touch it (the top of the shank) again you need to tighten up the sides of the shank where it meets the bowl. (most easily seen from the top view) You don't want a crease but there should be a clear delineation between the bowl and shank. The way it is now they just kinda melt into each other. Use the same round file that you used to define the top of the shank.
Need Help Defining The Chin Area
-
scotties22
- Posts: 1767
- Joined: Mon Jun 11, 2012 9:43 pm
- Location: Missouri
- Contact:
Re: Need Help Defining The Chin Area
Am I Calamity Jane or Annie Oakley??...depends on the day.
www.ladybriar.com
www.ladybriar.com
-
scotties22
- Posts: 1767
- Joined: Mon Jun 11, 2012 9:43 pm
- Location: Missouri
- Contact:
Re: Need Help Defining The Chin Area
Here is a billiard of mine. You can see from the profile that the cheeks are well defined. From the top view you can see that the shank runs right into the bowl. It doesn't flare out on the sides when it gets close to the shank. The radius at the junction is the same on the top as it is on the sides.
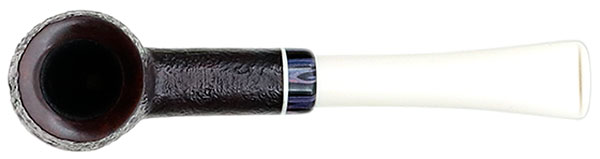
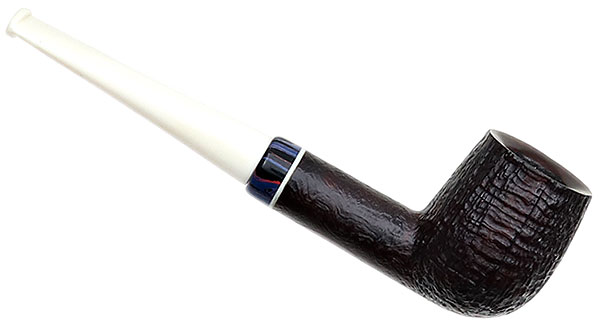
Am I Calamity Jane or Annie Oakley??...depends on the day.
www.ladybriar.com
www.ladybriar.com
Re: Need Help Defining The Chin Area
Thanks Scottie, Once again I've copy/pasted it into my chin/billiard file and printed it off.
Will work on it some more in the meantime and post more pics.
Gorgeous billiard!
Will work on it some more in the meantime and post more pics.
Gorgeous billiard!

Re: Need Help Defining The Chin Area
Holy hell that's a good looking billiard Scottie.
Chronicling my general ineptitude and misadventures in learning pipe making here: https://www.instagram.com/rustynailbriars/
Re: Need Help Defining The Chin Area
A bit more sanding and filing, a few more pics


-
scotties22
- Posts: 1767
- Joined: Mon Jun 11, 2012 9:43 pm
- Location: Missouri
- Contact:
Re: Need Help Defining The Chin Area
The bowl/shank junction looks a lot better. Flatten out the two areas on the bottom you have highlighted. Then repeat the "straightness" process with the top line of the shank. After that I would start final sanding and see what's what. Take a good look at it when you get to 220. 220 is still aggressive enough to make any minor shape changes you need to without the fear of wrecking the pipe it you get a bit too over zealous.
Also at 220 I like to put a coat of stain on and resand at 220. It will help you make double sure that you have removed all the tool marks and scratches before you get into your finishing grits. This coat of stain isn't there for color, but more to highlight anythings that needs a bit more love before you move up the grits.
Also at 220 I like to put a coat of stain on and resand at 220. It will help you make double sure that you have removed all the tool marks and scratches before you get into your finishing grits. This coat of stain isn't there for color, but more to highlight anythings that needs a bit more love before you move up the grits.
Am I Calamity Jane or Annie Oakley??...depends on the day.
www.ladybriar.com
www.ladybriar.com
Re: Need Help Defining The Chin Area
Awesome! Thank you Scottie for the advice and new tips on getting rid of all the tooling marks.
Will do that this morning and post again.
One question concerning the flat file process. To maintain the roundness of the shank, do I just go around it with the flat file or should I use a small round file?
Will do that this morning and post again.
One question concerning the flat file process. To maintain the roundness of the shank, do I just go around it with the flat file or should I use a small round file?
-
scotties22
- Posts: 1767
- Joined: Mon Jun 11, 2012 9:43 pm
- Location: Missouri
- Contact:
Re: Need Help Defining The Chin Area
Stick with the flat file. I like to start at the bowl and run the file towards the stem. Turn the shank a hair and repeat. It's a painstaking process if you are shaping it all by hand. At this point, don't go for "perfectly" round, just get it close. The more pipes you make the more round you will be able to get the shank...and faster too.
This is all about training your eyes and hands to work together. If I were you (based on the pics) I would just knock the high spots off the top line of the shank and not worry about how round it is. You can apply what you have learned here from the beginning on the next pipe and work on keeping the shank round and straight from the beginning.
This is all about training your eyes and hands to work together. If I were you (based on the pics) I would just knock the high spots off the top line of the shank and not worry about how round it is. You can apply what you have learned here from the beginning on the next pipe and work on keeping the shank round and straight from the beginning.
Am I Calamity Jane or Annie Oakley??...depends on the day.
www.ladybriar.com
www.ladybriar.com
Re: Need Help Defining The Chin Area
I can't thank you enough for all your help! I will incorporate all of this into this one as well as the next iteration.
Thank you again!
Thank you again!
Re: Need Help Defining The Chin Area
Definitely looking better and heading in the right direction. Good job!
Re: Need Help Defining The Chin Area
Just an update. Scottie, I'm following your advice to the letter. I don't think I can make the shank any more round at this point and I have stained once and sanded with 220. And re-stained. Still have some of those pesky shop bears. Man, I think I will go to Home Depot and see if they have any shop bear traps but I think if I asked; they would call the police and say their was a crazy person in the store. What a learning curve! Awesome. That big crack/split in the rim is nasty but I will finish it just for the learning experience and smoke it. I will post some pics when all is said and done.