Want to show you work to the world? Want a place to post photos of your work and solicit the opinions of those that have gone before you? Post your work here.
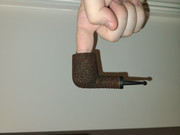
I appreciate anyone checking this out and giving some feedback. For my first "completed" pipe, I tried for a billiard, which turned out rather stubby since I ran out of ebonite rod. I know my stem work/finishing definitely needs some work and more time put into it on this one.
I'm looking forward to posting more in the future.
Most importantly, make sure to include dead-on-square profile shots from both sides. Top and bottom are usually helpful, too.
Oblique views are mostly good for selling. They're glamorous, but contain surprisingly little information when it comes to pipe MAKING.
If you plan on doing the Pipe Thing more-or-less seriously for a while, try to set up a small light box or stage for the purpose. You can also buy small ones (which is all a pipe needs) for modest money on Amazon. Once kinda rare, they're now in demand because of the Etsy and Ebay boom. Lots of small stuff being made & offered electronically these days---jewelry, carvings, knives, pens, and so forth.
UFOs must be real. There's no other explanation for cats.
LatakiaLover wrote: ↑Sat Apr 30, 2022 12:35 am
A critique can only be as good as the photos.
Most importantly, make sure to include dead-on-square profile shots from both sides. Top and bottom are usually helpful, too.
Oblique views are mostly good for selling. They're glamorous, but contain surprisingly little information when it comes to pipe MAKING.
If you plan on doing the Pipe Thing more-or-less seriously for a while, try to set up a small light box or stage for the purpose. You can also buy small ones (which is all a pipe needs) for modest money on Amazon. Once kinda rare, they're now in demand because of the Etsy and Ebay boom. Lots of small stuff being made & offered electronically these days---jewelry, carvings, knives, pens, and so forth.
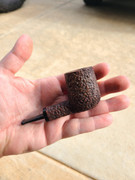
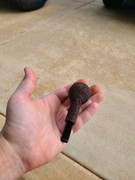
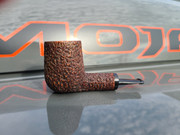
So, for what I am able to critique based off of your photos, here's what I got. Rustication is pretty ok. Reminds me of a Savinelli Roma. It would greatly benefit from a finish. Try a heavily thinned shellac mix on rustication. Say 70/20 with denatured alcohol. I like to use on of those little craft paintbrushes to apply it. For an early pipe, your stummel shaping doesn't look bad at all. Though you could have a bit more curve to your lines towards the top/rim and also around the bowl/shank junction (but just slightly there. Try to imagine what that line would look like if it curved to meet the line of the bottom of the the bowl, if that makes any sense). I'll not comment on your stem. Get some more ebonite and make a proper length stem.
You've got some good things going for you. Keep at it.
"No reserves, no retreats, no regrets"
"When you're dumb...you've got to be tough." - my dad
This is a pretty good effort. The stummel, shank and rustication are good. I can’t see the bowl well enough to comment on JMG’s observations
To add to George’s comments, Premal Chheda has a sticky at the beginning of the Gallery indicating which shots are most helpful for evaluation of your work. I don’t know what camera device that you are using, but larger, more detailed pictures are also better.
To add to John Michael’s comments, after a bit of shellac, powdered carnauba applied with a toothbrush then melted over a heat gun followed by a brushing with a stiff bristled brush makes a nice shiny finish. (I use a fingernail brush with bristles cut to 1/2 length). If you get gray/white blobs of wax deep, re heat and brush vigorously while warm.
I second the advice about obtaining a larger piece of ebonite and replacing that stem- Mask the shank when working a stem replacement.
You could do some more sanding. For the blade and behind the button, sandpaper folded over an eraser (rectangular art eraser- Staedtler) works well- start at a grade that will remove file marks (150), move up the grades to 600-800. For the inside of the button- smooth out those cut marks with small needle files (Otto Frei has some nice ones) and the use tightly folded sand paper-4 thicknesses- to sand the inside of the funnel- I start with 150 and go up to 600.
DocAitch
"Hettinger, if you stamp 'hand made' on a dog turd, some one will buy it."
-Charles Hollyday, pipe maker, reluctant mentor, and curmudgeon
" Never show an idiot an unfinished pipe!"- same guy
excellent! thank you guys for the feedback and tips, i'll definitely apply those to practice.
I'm definitely getting those blobs in the rustication. I tried a hair dryer but that wasn't enough - I'm looking into a heat gun for sure. I also need to grab some spray shellac. I've got some flake on the way.