Need rustication advice please

Sanding, rusticating, sandblasting, buffing, etc. All here.
Post Reply
User avatar
flix
Posts: 522
Joined: Thu Nov 23, 2006 8:00 pm

Need rustication advice please

Post by flix »

Hi All,

Cruising along with the latest, and hit a huge sand pit and some other flaws. I'd like to know your opinion on how much this stummel needs rustication, all, just the sand pit, or the sand pit and selected areas to cover the minor flaws.

Here are the pictures most pertinent to the issue, thanks in advance!

Image

Image

Image

--Michael
alexanderfrese
Posts: 317
Joined: Thu Nov 23, 2006 8:00 pm
Location: Bochum, Germany
Contact:

Post by alexanderfrese »

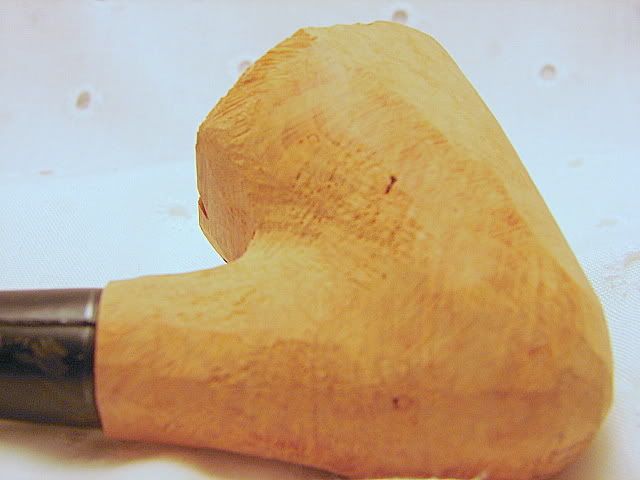
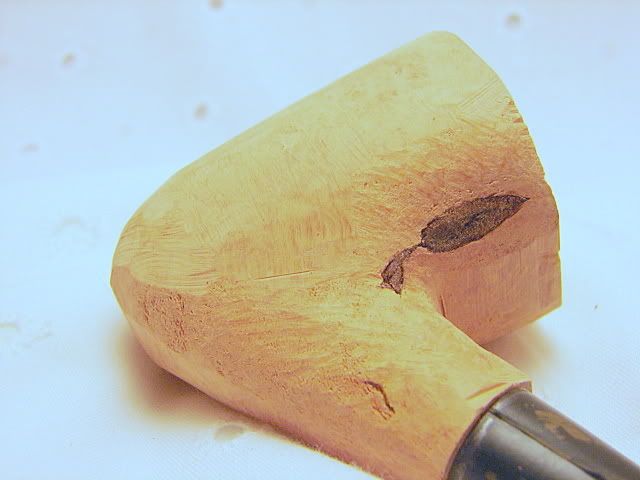
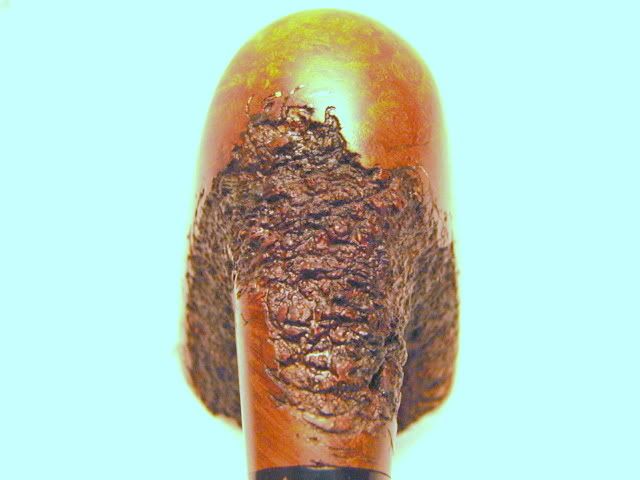
Never hit a big one like that on the back. So there might be others to tell if it is worth the effort at all, or if this size causes other issues than the look that would be "hidden" by the rustication.
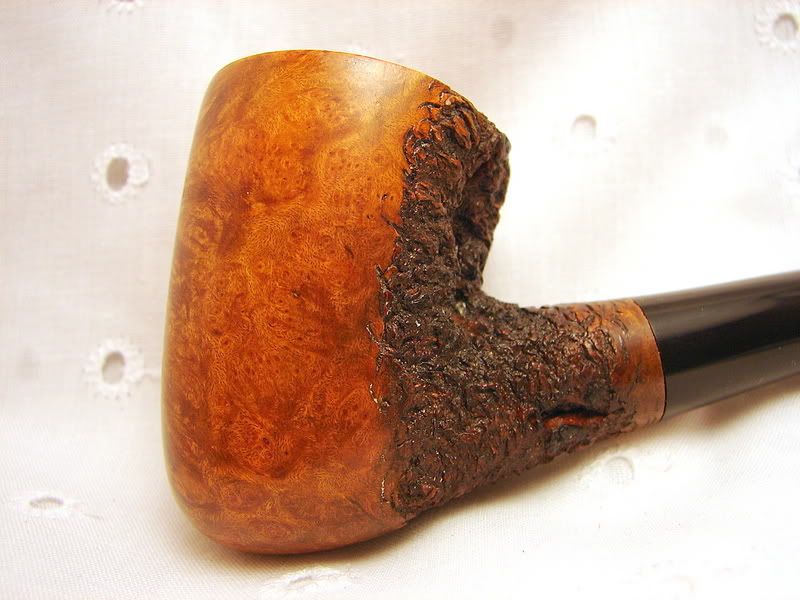
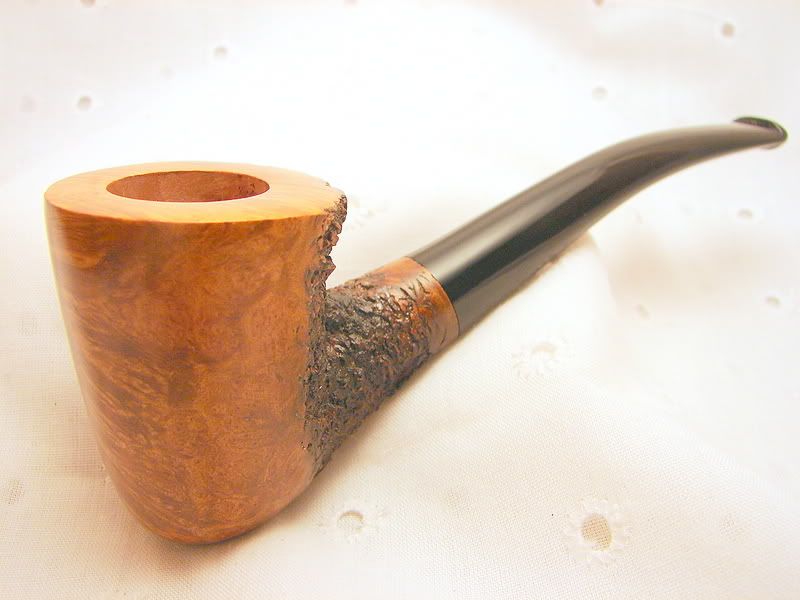
As a matter of taste, I don't like pipes with small rustications just on and around some smaller flaws. Partial rustication like that tells just that there was a flaw. It's like plastering some dings on your car's hood without spraying the whole thing with new paint. I have seen some pipes like that when restoring estates. Rather nice shapes, but with these mini rusticated areas. Quite ugly, I think.
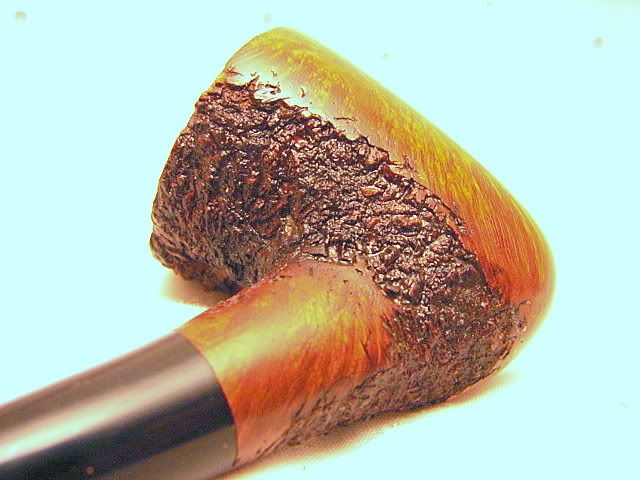
Partial rustication of larger areas is a completely different thing. Those areas can bring contrast, shape and lines to the overall appearance that relly add somthing to it.
I have never tried partial rustication. I don't go for alcohol free alcoholic drinks either. It is either beer (mayber harder stuff, depending on the situation 8) ) or sparkling water (if I have to drive). But I never drank some alcohol free beer yet. I am not that much for the "in-betweens", allthough they can be interesting, as I said before. I tend to decide to go the one or the other way. Call me stubborn for neglecting the shades in between…
I would rusticate it completely.
Alexander Frese
www.quarum.de
User avatar
ckr
Posts: 386
Joined: Thu Nov 23, 2006 8:00 pm
Location: Newport, Rhode Island USA

Post by ckr »

Michael,

When you hit a pit you don't fool around. It looks big enough that it goes right on through to the chamber? Does it?

As to whether to partial or full, well I think that would be entirely up to you and what you want (as I do believe it is a keeper).

From the shots I do not notice any striking grain pattern to preserve although it could be due to it only being rough sanded at this point. So, if it were me I would do a total rust and probably jet black stain/dye on top of a bright understain to bring out somewhat and maybe a band or inlay between shank and stem for some eye interest.
Fumo in pace :pipe:
User avatar
RadDavis
Posts: 2693
Joined: Thu Nov 23, 2006 8:00 pm
Location: united states/Alabama
Contact:

Post by RadDavis »

Holy Cow, Flix! That's a big 'un!

I would take a sharp instrument of some sort and dig all the loose stuff out to see how deep it goes. If it gets too close to the inside bowl wall, it may be a lost cause.

If you *can* save it, then I would rusticate all over. Partial rusication is fine. Spot rustication looks like a Grabow. :D

Rad
User avatar
flix
Posts: 522
Joined: Thu Nov 23, 2006 8:00 pm

Post by flix »

Turns out it was some kind of root fragment! I dug it out while partially rusticating (some of the pipe's grain looked interesting and unique-enough to save) so it left a HUGE gouge in the side of the bowl.

The gouge didn't make it very close to the bowl, since the bowl thickness is around 8mm. I think it will look just ok partially rusticated, not because it should be fully done, but because the gouge is a little off-putting. I'll post what comes of it. I'll be using dark walnut stain on the whole pipe, black over the walnut stain on the rusticated parts. It should look pretty cool...

Thank you guys for the help!!

--Michael
User avatar
flix
Posts: 522
Joined: Thu Nov 23, 2006 8:00 pm

Post by flix »

"Idiot, idiot, idiot!!!!"

Ever say that to yourself after dropping a nearly finished pipe? Here's some pictures of what might have been the above pipe finished:

scratches on the side of the bowl, left side:

Image

chunks taken out of the rim, near the front of the bowl:

Image

three more to show what it looks like otherwise:

Image

Image

Image

this is after dropping it not once, but three times. Arrggghhh!!!

Let me know if you have any ideas on recovering it. Thanks!!

--Michael
User avatar
KurtHuhn
Site Admin
Posts: 5326
Joined: Thu Nov 23, 2006 8:00 pm
Location: United States/Rhode Island

Post by KurtHuhn »

For the top, I would sand the rim of the bowl down. It will make the pipe a touch shorter from top to bottom, but not too much. For the dents on the sides, you could use the soldering iron trick.

The soldering iron trick:
Heat up a soldering iron of at least 30W (this needs to be hot, hot, hot). I have a variable temp soldering iron that I use for electronics assembly, but any decent Radio Shack iron will do.
Dampen the corner of a paper towel, and fold it over so that you have two layers. Lay this over the dents.
Apply your, now scorching hot, soldering iron to the top of the paper towel over where a dent is. When it stops sizzling, remove the iron and PT, and check on the dent. If it's still evident, move the PT to a fresh spot and do it again.

What you're doing is forcing steam into the fibers of the wood, which will "pop" the dents back out. The hotter the soldering iron, and the better it holds it's heat during the process, the better your results will be.

Note: you *will* need to sand some, but it won't be anywhere near what you would have had to do if you didn't pop those dents back out.
Kurt Huhn
AKA: Oversized Ostrogoth
artisan@k-huhn.com
User avatar
Nick
Posts: 2171
Joined: Thu Nov 23, 2006 8:00 pm
Location: United States/Connecticut

Post by Nick »

Nice looking pipe bud. I'd just rusticate the whole thing.
User avatar
ckr
Posts: 386
Joined: Thu Nov 23, 2006 8:00 pm
Location: Newport, Rhode Island USA

Post by ckr »

Michael,

Sounds like you work on a concrete floor.

Ever consider placing a rug on the floor of your work area, might save some grief and agrivation in the future. If that seems too much like a dust catcher maybe a sheet of 1/4 inch plywood.
Fumo in pace :pipe:
User avatar
KurtHuhn
Site Admin
Posts: 5326
Joined: Thu Nov 23, 2006 8:00 pm
Location: United States/Rhode Island

Post by KurtHuhn »

I use the cushy 1 foot square foam puzzle pieces that are made for workshop floors. Pipes now bounce instead of going *clunk*.
Kurt Huhn
AKA: Oversized Ostrogoth
artisan@k-huhn.com
User avatar
marks
Posts: 735
Joined: Thu Nov 23, 2006 8:00 pm
Location: United States/North Carolina

Post by marks »

If you have a copy of the winter 2005 issue of P&T, look at the picture of my pipe on page 16 (the square pipe as Chuck S called it). (It is also pictured on page one of my website). That pipe had dents from being ripped out of my hands during the final buff and slung into the hardest thing on my workbench (isn't that always the case?).

Here's how I got rid of them:

I set up my wife's iron and turned it to the hottest setting. I dampened a towel, and put it between the pipe and the iron and essentially steamed them out. (As you steam out the moisture in the towel, you will have to move it around to get to another moist spot.) Most of the dents completely came out. One dent on a corner did not come out completely, but it almost did. I sanded a little at the corner, and no more dent.

The steaming process washed out the finish on the spots I steamed, so I resanded, restained, rewaxed, and rebuffed the entire pipe. There is no indication that the pipe was ever slung off the buffer.

This was the first pipe I ever sold, and it sold at the 2004 CORPS show in Richmond. I got a chance to speak with the owner at this year's Richmond show, and he is still completely happy with the pipe.

I also have cheap indoor/outdoor carpet on my workshop floor, the kind with the padding already attached, so if I drop a pipe, no harm no foul.

Good luck getting out the dents.
User avatar
flix
Posts: 522
Joined: Thu Nov 23, 2006 8:00 pm

Post by flix »

All,

Thank you very much for the help! I've got a soldering iron and will try that first. If that doesn't work, then try the clothes iron.

I sure like the grain on this one and would rather not rusticate the whole enchilada. Thanks for the suggestion though, it is logical!

I'll post what I come up with, like the pipe other than the damage. Then I'll investigate something to cover my concrete garage floor. Just makes me mad to think of how I ended up flinging the thing 3 times. Argh!

--Michael
User avatar
mahaffy
Posts: 196
Joined: Thu Nov 23, 2006 8:00 pm
Location: Vermont
Contact:

Post by mahaffy »

Michael, I have read somewhere that one should always keep one finger in the tobacco chamber when buffing. I think one of the things that makes this work is the fact that you have to actually think about how you're holding the pipe, instead of concentrating only on the finish.
User avatar
flix
Posts: 522
Joined: Thu Nov 23, 2006 8:00 pm

Post by flix »

Hi John,

Yeah, after I fixed the problem I did do that. It's cold here in Spokane making it harder to hold anything!

--Michael
User avatar
mahaffy
Posts: 196
Joined: Thu Nov 23, 2006 8:00 pm
Location: Vermont
Contact:

Post by mahaffy »

Ah . . . you've got a workroom like mine --- a walk-in freezer during the winter, eh? I hear you talkin'. More and more, I find, I'm not the only one with that problem. In fact, it seems a majority of the guys here are in the same boat. Maybe someday soon I'd better quit witchin' about it.
alexanderfrese
Posts: 317
Joined: Thu Nov 23, 2006 8:00 pm
Location: Bochum, Germany
Contact:

Post by alexanderfrese »

mahaffy wrote:Michael, I have read somewhere that one should always keep one finger in the tobacco chamber when buffing. I think one of the things that makes this work is the fact that you have to actually think about how you're holding the pipe, instead of concentrating only on the finish.
In fact, the visible outcome of a pipe that's been knocked away by a buffing wheel (I have seen all those dents and even broken shanks) tell me strictly not to have any part of my body in the tobacco chamber. It simply is a force too big not to break any bone (not so sure about the upper thigh bone…) when it grabs on to an edge.
You are perfectly right about the concentration. They fly away only, when you make it a quick and dirty "come-on-I'm-hungry-my-neck-is-hurting-me-wanna-get-out-of-the-workshop-polish" It is all about a meticulous concentrated work. If you always polish towards the edges and never against them, they hardly fly off. And if – they won't take parts of your finger with them…
Alexander Frese
www.quarum.de
User avatar
marks
Posts: 735
Joined: Thu Nov 23, 2006 8:00 pm
Location: United States/North Carolina

Post by marks »

Since I launched my P&T contest pipe, I have always used latex gloves when buffing (cheapies, $2 for two pair). They provide a much better grip than bare fingers. I have made 26 pipes since the contest pipe, and I have not launched a single one. I can't remember who gave me that tip, but it was someone that posted on this board.

YMMV
User avatar
bluesmk
Posts: 383
Joined: Thu Nov 23, 2006 8:00 pm
Location: Bethlehem,Pennsylvania,USA.
Contact:

Post by bluesmk »

LOL, I know the feeling well ! I turn on the space heater, and won't start working untill it's at least 50 *.......during the winter holidays, the shop doubles as a walk-in cooler for our large meals !
Dan
Gabrieli Pipes
User avatar
flix
Posts: 522
Joined: Thu Nov 23, 2006 8:00 pm

Post by flix »

Yeah, it's cold allrighty! I think we had a week that didn't get above 20 during the day. Suck!

I did start wearing a pair of goalie gloves. Thin leather treated with some gummy stuff that made them pretty grippy. The stuff has been permeated with briar and stem dust, need to figure a way to safely clean them. They're the way to go if you just have a space heater in your ice-box shop!

Thanks guys for the tips.

BTW, here's the final product after "steaming" the dents out:

Image

Image

Image

Image

--Michael
Post Reply