Making some progress...

For discussion of the drilling and shaping of the stummel.
Post Reply
ScoJo
Posts: 278
Joined: Thu Nov 23, 2006 8:00 pm
Location: United States/Indiana

Making some progress...

Post by ScoJo »

Okay, keep in mind that I haven't made a pipe for about a year. This one may take me some time, but I wanted to post some progress pics and get some input as to how to start making my pipes a little more, I don't know, graceful. Here is what I have so far:

Image
Image
Image
Image

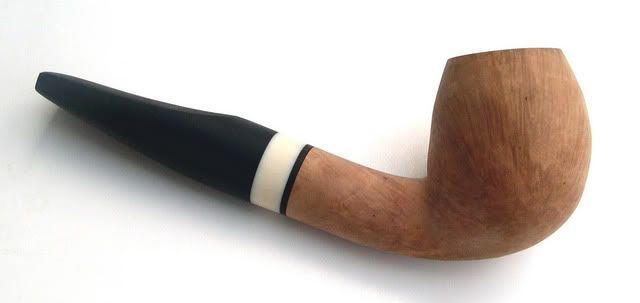
Okay, as you can see I have a great deal of stem shaping to do - I am thinking half saddle this time. About a year ago I tried my second handcut stem and I tried something more complicated than a simple taper or saddle, and got frustrated with it and didn't know what to do with it - so it is sitting in a drawer, stummel still attached. To be frank, it is probably a good part of the reason I put down pipe making for almost a year.

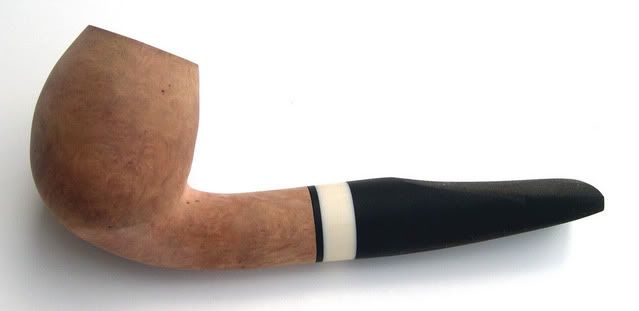
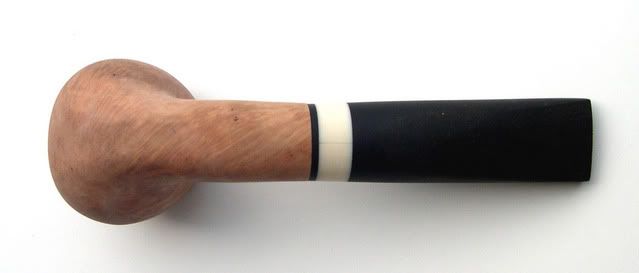
Anyway, as you can start to see from the picture of the left side of the bowl, I am wanting to cut in underneath the bowl - kinda make it look like the shank is extending underneath the bowl and supporting it. But I'm not exactly sure what to do this shaping with. I started with a small sanding drum on my dremel, but being limited to the radius of the drum I find awkward. Any suggestions before I start slicing into that area with a knife? I'll probably lose a finger. I wanted the bowl to be more round, but I cut too much off of the back with the bandsaw, so now I will probably end up with something a little more flattened on the front and back, and wider on the sides. I am hoping by cutting into the bottom of the back of the bowl I can make it look - rounder, I guess.

Any tips or advice?
User avatar
Frank
Posts: 1341
Joined: Thu Nov 23, 2006 8:00 pm
Location: Southern California

Post by Frank »

You're right, the side of the bowl next to the shank needs to curve inwards (away from the shank) to make it look more symetrical to the front of the bowl.

You might want to go at it by hand with a round file so as to maintain a radius between the bowl & shank.

The white inlay looks very nice.
Regards,
Frank.
------------------
Grouch Happens!
People usually get the gods they deserve - Terry Pratchett
magruder
Posts: 418
Joined: Thu Nov 23, 2006 8:00 pm
Location: Norfolk
Contact:

Post by magruder »

Hi,

I like the white ring too. I can related to removing too much from the back of the bowl and
having to compensate. ( Jody Davis says pipemaking is fixing problems)

I am not too sure you can pull off the bowl resting on the shank treatment. Do a lot of
mental cutting and shaping, until you have a good image of what you want to do in your mind.
Be sure to check out (mentally) how changing one line will affect the rest of the pipe.
Draw pencil lines to reinforce your mental shaping.
I also suggest you spend some time online looking at Rainer Barbi pipes and Kurt Balleby pipes. These guys are masters of the shape you are going for on the bottom.

Good luck and keep us up to date.
Glad you are back at it.
Best,
Steve Morrisette
pierredekat

Re: Making some progress...

Post by pierredekat »

ScoJo wrote:To be frank, it is probably a good part of the reason I put down pipe making for almost a year.

....

Any tips or advice?
If a pipe had me stumped to the point where I gave up pipemaking for a year, I'd have bailed on it a long time ago and gone on to the next pipe.

Go back to vulcanite stems for awhile. That's my advice. Make a few pipes that you feel comfortable with -- some plain old straight billiards or whatever.

Nothing wrong with building a few classics until you get back into the swing of things.

And while you're doing those, maybe mull this one over just a little. If it suddenly hits you how to finish this pipe, then go ahead and finish it.

Otherwise, maybe this pipe just wasn't meant to be.

Something you need to consider is the fact that we can't all be perfectly adept at making every single pipe design there is.

Maybe this pipe just isn't in you. But maybe there are other great pipes in there, pipes that only you can make.

Those are the pipes that you need to be making.

That's my .02 worth.
User avatar
Nick
Posts: 2171
Joined: Thu Nov 23, 2006 8:00 pm
Location: United States/Connecticut

Post by Nick »

I think it looks great Scott. The stemwork looks very good. I always have to remember to be more agressive on the stems. if I'm not i usually end up with somthing fat and clunky. The bowl/shank treatment looks neat. Try using a half round file to cut into the curve. Power tools are over rated for us hobbiest. I mean its not like we have to be efficient or anything. Take your time. Side to side it definately looks fat, but you could shape this up I'm sure. Great looking profile. Round out the bowl and you'll have a real winner. Steve had some great advice too about thinking the cuts through. I need to do more of that!!

Keep it up buddy. Nice pics too!
User avatar
souljer
Posts: 168
Joined: Thu Nov 23, 2006 8:00 pm
Location: Los Angeles, Ca USA
Contact:

Post by souljer »

Hi,

If you are trying to keep everything in proportion, reduce the left and right side to match the front and back. Then thin out the shank and stem to be in proportion to the smaller bowl. It doesn't look that bad now and you definitely have some material left there to work with (at least that's how it looks to me in these pix). I often use a half-round and rat tail file for shapes and angles like what you mention. It's not over if you don't quit. Oh, yeah, definitely follow Steve's advice on mentally picturing what you want to do and drawing lines on the wood to help you visualize without cutting anything. I do this a lot when working on a block.

Regarding your comment on quitting for a year because your second attempt at hand-cutting a stem did not work out as you planned ... well, I find that rather amazing. If you are going to take it so seriously and personally, perhaps pre-made stems would be a better deal for you. I don't mean that sarcastically. It's based on my own experience. I've been working on my hand-cut stems for about a year and I've just begun to get my stems looking like what I want. There have also been many frustrating moments on the stummel side of things. If you keep taking year long breaks at every frustrating hurdle, it's going to be a LONG road for you. Remember that it's okay to make mistakes if you pay attention and learn from them. Do you think you'll be a master at stem making after your first year? Did you really think you'd be a master at it on your first or second attempt? Enjoy the learning process; laugh at your mistakes. You might not get better faster, but at least you will be smiling and having fun. That's the whole point.
www.TotemStar.com - Some of my pipe related art
ScoJo
Posts: 278
Joined: Thu Nov 23, 2006 8:00 pm
Location: United States/Indiana

Post by ScoJo »

Wow. Believe it or not, this pipe still looks exactly like the pictures. I am FINALLY getting back to making some pipes - starting with finishing this one. My father has moved to my area, and he's going to be working on pipe making with me in the garage. I can't wait!
User avatar
Tyler
Site Supporter
Posts: 2376
Joined: Thu Nov 23, 2006 8:00 pm
Location: Farmersville, TX
Contact:

Post by Tyler »

ScoJo,

Good to see you back at it again. Have fun with the pops!

I didn't see this post the first time around, but my suggestion on the shank supporting the bowl, STOP where you are! It looks good like it is. Round things out and even them up, but if you try to make the shank extend any further under the bowl I think you'll regret it.

My $0.02.

Tyler
User avatar
bscofield
Posts: 1641
Joined: Thu Nov 23, 2006 8:00 pm
Location: United States/Illinois
Contact:

Post by bscofield »

ScoJo wrote:Wow. Believe it or not, this pipe still looks exactly like the pictures. I am FINALLY getting back to making some pipes - starting with finishing this one. My father has moved to my area, and he's going to be working on pipe making with me in the garage. I can't wait!
Who the hell are you? :lol:
ScoJo
Posts: 278
Joined: Thu Nov 23, 2006 8:00 pm
Location: United States/Indiana

Post by ScoJo »

bscofield wrote:
ScoJo wrote:Wow. Believe it or not, this pipe still looks exactly like the pictures. I am FINALLY getting back to making some pipes - starting with finishing this one. My father has moved to my area, and he's going to be working on pipe making with me in the garage. I can't wait!
Who the hell are you? :lol:
Infidel! I am the crafter of war clubs at PMF!
User avatar
Nick
Posts: 2171
Joined: Thu Nov 23, 2006 8:00 pm
Location: United States/Connecticut

Post by Nick »

Warclubs! Hehehe! Heya Scott! I hope everything is well. You know what I really like to do? I like to work on my pipes over lunch. I have this cigar box full of sandpaper, files and god knows what else. But you can get a good bit done working on it for an hour a day. Pipe looks good. Bring in the sides would be my tip. The bowl looks great front to back, but kind of hippy side to side. Kinda reminds me of my mother-in-law!

Great to see you back!
User avatar
LexKY_Pipe
Posts: 875
Joined: Thu Nov 23, 2006 8:00 pm
Location: Lexington, Kentucky USA

Post by LexKY_Pipe »

Glad to see you back into the thick of it!!!!
Craig

From the heart of the Blue Grass.
Lexington, KY

loscalzo.pipes@gmail.com
User avatar
bscofield
Posts: 1641
Joined: Thu Nov 23, 2006 8:00 pm
Location: United States/Illinois
Contact:

Post by bscofield »

ScoJo wrote:
bscofield wrote:
ScoJo wrote:Wow. Believe it or not, this pipe still looks exactly like the pictures. I am FINALLY getting back to making some pipes - starting with finishing this one. My father has moved to my area, and he's going to be working on pipe making with me in the garage. I can't wait!
Who the hell are you? :lol:
Infidel! I am the crafter of war clubs at PMF!
I forgot that your pipes were once used as weapons on a battle field. I take it back.... sir.
Post Reply