Well... lets give it a go...

Want to show you work to the world? Want a place to post photos of your work and solicit the opinions of those that have gone before you? Post your work here.
Post Reply
Zirkus
Posts: 5
Joined: Tue Dec 21, 2010 8:13 pm
Location: North Carolina

Well... lets give it a go...

Post by Zirkus »

So me and a few friends have recently gotten into smoking pipes. For the lack of a better phrasing we were looking for a classier way to smoke, and also stay away from the chemical minefield that cigarettes contain. My friends all went out and i with them to the pipe shop nearby which caused a bit of weird looks from the staff. I guess they don't see all that many 18-20 year olds buying pipes, much less 4-5 at once. I on the other hand decided i wanted to find out how to carve mine after looking at them for a bit. This might not seem odd, but to my friends it was pretty bizarre. I have never worked with power-tools or constructed anything in my life. Thankfully both my grandfathers are carpenters on a hobby scale, one in particular has a shop full of woodworking tools that's larger than the house i currently live in so that was just further inspiration to my endeavor.

Sorry for the rambling =P

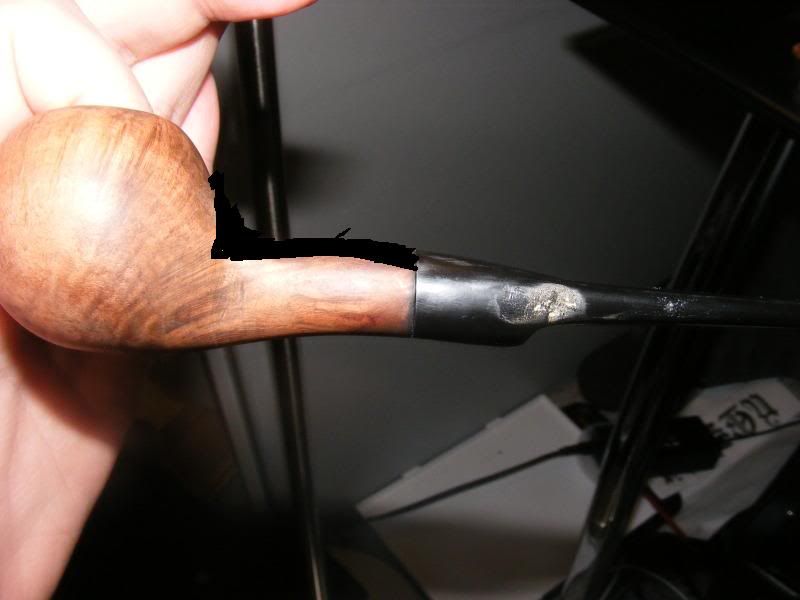
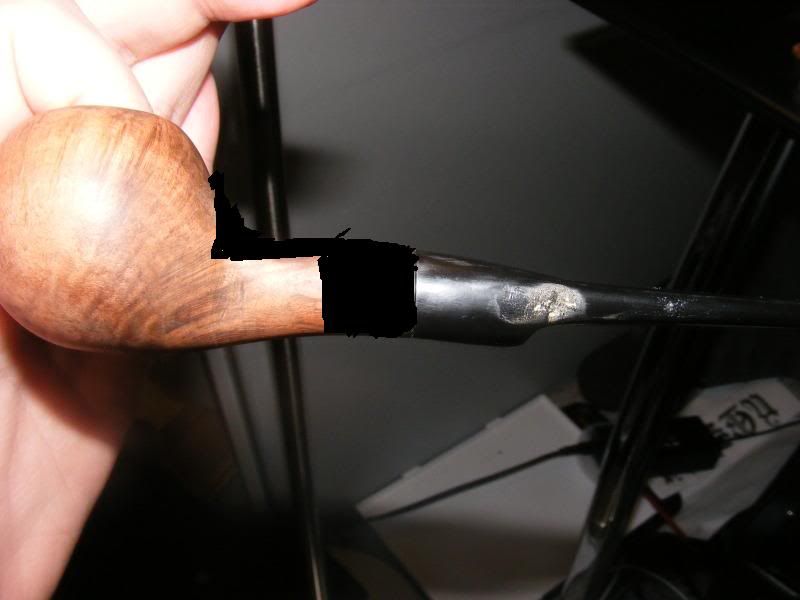
So here is my first go at it. I completely decimated the stem which caused me much duress and i am hoping i can figure out how to fix it. I am also aware that it needs more sanding due to i can see scratches all over it, in particular there is a pretty bad gash that i have not yet gotten out which you can see in the third picture. I would love any and all feedback and help on how to repair my stem would be loved even if its simply "Buy a new freaking stem". I also think i am going to thin the pipe down where the bowl meets the shank so that the bowl seems a bit rounder on the back. Once again thanks for any and all feedback.

Posted this in general the first time, thank god for a delete button and being the only person on at 3am to save my embarrassment. :oops:

Image
Image
Image
User avatar
maxmil
Posts: 833
Joined: Sun Dec 12, 2010 5:46 pm
Location: La Coruña - Galicia - Spain
Contact:

Re: Well... lets give it a go...

Post by maxmil »

I agree with what you say.
To finish, you need to read:

http://www.santambrogiopipe.com/en/finissaggi.php

Greetings.
Felix
User avatar
Abi Natur
Posts: 401
Joined: Sat Feb 20, 2010 7:45 am
Location: Montenegro- Bar
Contact:

Re: Well... lets give it a go...

Post by Abi Natur »

Welcome and enjoy your stay :wink:
This is a start and every start is a mixture of creativity,uncertainty and a thriving mind that has brought you out here because you have something to share and develop your talent through it .
This pipe is still unfinished but the shape you want is recognizable,you could define more the shank - bowl transition and get a better flow of the overall shape.The voluptuous line from the cheeks to the rim could also be more round flowing - less is more sometimes.
I can't tell you much about the stem as the photos are a bit in the dark ,but there is some overall sanding ahead of you on the stem - shank junction .
I believe you will find most of your questions answered on this forum,you can search also the topics which keep the huge practical knowledge of experienced pipe carvers at hand.
That is a good start for your first pipe and no previous experience to it,so keep it on as it is always a great joy to have young people in this trade !

Best,
Abi
" Keep it simple until it gets complicated "

http://www.canaanpipes.com/
User avatar
ND Pipes
Posts: 812
Joined: Fri Jul 16, 2010 7:21 am
Contact:

Re: Well... lets give it a go...

Post by ND Pipes »

Abi Natur wrote:Welcome and enjoy your stay :wink:
This is a start and every start is a mixture of creativity,uncertainty and a thriving mind that has brought you out here because you have something to share and develop your talent through it .
This pipe is still unfinished but the shape you want is recognizable,you could define more the shank - bowl transition and get a better flow of the overall shape.The voluptuous line from the cheeks to the rim could also be more round flowing - less is more sometimes.
I can't tell you much about the stem as the photos are a bit in the dark ,but there is some overall sanding ahead of you on the stem - shank junction .
I believe you will find most of your questions answered on this forum,you can search also the topics which keep the huge practical knowledge of experienced pipe carvers at hand.
That is a good start for your first pipe and no previous experience to it,so keep it on as it is always a great joy to have young people in this trade !

Best,
Abi
Abi, very nice said... :) could not write anything better but agree on this post...... :)
"URTEILE NICHT ÜBER DINGE, VON DENEN DU NUR ECHO UND SCHATTEN KENNST !"

http://tnd-pipes.com/
Zirkus
Posts: 5
Joined: Tue Dec 21, 2010 8:13 pm
Location: North Carolina

Re: Well... lets give it a go...

Post by Zirkus »

Image

I was not paying attention while shaping the stem and created some dips in it that are vexxing. Was wondering if theres any way to fill these and sand back down and achieve a decent effect(the white is my own blunder and is easily removed). I changed the stem from the shape it originally had because i ended up making the pipe smaller than the stem diameter was and i really liked the idea of the top flowing over since while sanding i fell in love with the slight curve.

Thank you all very much for the feedback ^_^
User avatar
ND Pipes
Posts: 812
Joined: Fri Jul 16, 2010 7:21 am
Contact:

Re: Well... lets give it a go...

Post by ND Pipes »

sand the shank and mouthpiece from both sides until you reach the bottom of what you removed by accident and story finished :) the easiest way to do it...
...
but be careful to sand with moutpiece attached to the shank...
"URTEILE NICHT ÜBER DINGE, VON DENEN DU NUR ECHO UND SCHATTEN KENNST !"

http://tnd-pipes.com/
BriarWorldNick
Posts: 63
Joined: Mon Nov 29, 2010 12:42 am
Location: Murfreesboro, TN
Contact:

Re: Well... lets give it a go...

Post by BriarWorldNick »

If you were to search the internet for videos of pipe making or "first pipes" you might see just how far ahead your ingenuity has taken you. I have seen things as bizarre as people gluing sheets of plywood together and carving from them, very strange indeed for a very many reasons.

Your pipe is definitely a great first go, and the first one is just going to begin to open the doors to things you realize you want to learn, from there it is a time pit in the greatest way i.e. (video games produce nothing at the end, making a pipe gives you a world of knowledge you sometimes won't even realize you are acquiring.)

The stem on that pipe is among the favorites of what I have seen, I love the curvature. Most people wouldn't dare to mess with any sort of curve on the first pipe, so WAY TO GO!

All of that being said, sand er' down as fine as you can and try out your first polish.

Then show your friends, they are going to be your best salesmen, as they all most likely doubt their own abilities(hence they reason they would rather purchase than create.) and I definitely hope to see more from you.
There is nothing like being left alone again, to walk peacefully with oneself in the woods. To boil one's coffee and fill one's pipe, and to think idly and slowly as one does it.

~ Knut Hamsun
MrChurchwarden
Posts: 71
Joined: Sun Oct 24, 2010 5:44 pm

Re: Well... lets give it a go...

Post by MrChurchwarden »

Hey man, send me a pm, fellow young pipe smoker here. That is a really good start but you can easily make it a great start by taking away some more material on the back there.
Zirkus
Posts: 5
Joined: Tue Dec 21, 2010 8:13 pm
Location: North Carolina

Re: Well... lets give it a go...

Post by Zirkus »

tNd wrote:sand the shank and mouthpiece from both sides until you reach the bottom of what you removed by accident and story finished :) the easiest way to do it...
...
but be careful to sand with moutpiece attached to the shank...
This actually is a pretty good idea. Was so simple i didn't think about it haha.
BriarWorldNick wrote: The stem on that pipe is among the favorites of what I have seen, I love the curvature. Most people wouldn't dare to mess with any sort of curve on the first pipe, so WAY TO GO!

All of that being said, sand er' down as fine as you can and try out your first polish.
Thank you for the kind words. I kinda figure this as one of a few "test" pipes. If i mess them up, no big deal, but even then i do get heavily emotionally invested in such work.
MrChurchwarden wrote:Hey man, send me a pm, fellow young pipe smoker here. That is a really good start but you can easily make it a great start by taking away some more material on the back there.
I totally agree. I really want to give the bowl more shape on its on rather than flowing straight into the shank like it does.
MrChurchwarden
Posts: 71
Joined: Sun Oct 24, 2010 5:44 pm

Re: Well... lets give it a go...

Post by MrChurchwarden »

Zirkus wrote: I totally agree. I really want to give the bowl more shape on its on rather than flowing straight into the shank like it does.
Yeh, but at the same time the stem should be thinner, which is fine since you need some serious sanding on the stem
so maybe thin it out a bit like this..
Image

Then you see the shank is long enough to look odd, so you would need to shorten it maybe a half inch if I'm judging it right.
Image

My paint skills on my laptop touch pad a re a little iffy :lol: :lol: But I hope that helps, even if you choose to ignore it, because in the end you are smoking it!
User avatar
TimGeorge
Site Supporter
Posts: 111
Joined: Tue Aug 11, 2009 1:13 pm
Location: Waxahachie, TX

Re: Well... lets give it a go...

Post by TimGeorge »

Good start. Just keep sanding. The bowl in particular has a nice (if still unfinished) shape for a first pipe. Mine ended up about as square as the briar block, which is pretty common. Anyway, best of luck.
Regards,
Tim
Zirkus
Posts: 5
Joined: Tue Dec 21, 2010 8:13 pm
Location: North Carolina

Re: Well... lets give it a go...

Post by Zirkus »

MrChurchwarden wrote:
Zirkus wrote: I totally agree. I really want to give the bowl more shape on its on rather than flowing straight into the shank like it does.
Yeh, but at the same time the stem should be thinner, which is fine since you need some serious sanding on the stem
so maybe thin it out a bit like this..

Then you see the shank is long enough to look odd, so you would need to shorten it maybe a half inch if I'm judging it right.

My paint skills on my laptop touch pad a re a little iffy :lol: :lol: But I hope that helps, even if you choose to ignore it, because in the end you are smoking it!
Haha. I have to say flat out i am not going to be able to do the shortening of the shank seeing as i do not know how to drill the proper mortis and tenon holes and really don't want to mess up my first pipe with doing it wrong. In turn i do not want to thin the shank as it would look terrible odd as you mentioned. I simply want to take a bit off the junction at the base of the bowl and the shank so that its a bit rounder.

If anyone has a good guide they be kind to share about lathe shaping i would owe you greatly. There's a lathe in my grandfathers workshop that's had the same piano leg that he turned in it for a couple years. I would kill to be able to use this for a truer roundness. Also a mortise and tenon drilling guide would be immensely loved. I plan on looking today, but i figure there are some hidden gems that people on this site may know.
Zirkus
Posts: 5
Joined: Tue Dec 21, 2010 8:13 pm
Location: North Carolina

Re: Well... lets give it a go...

Post by Zirkus »

TimGeorge wrote:Good start. Just keep sanding. The bowl in particular has a nice (if still unfinished) shape for a first pipe. Mine ended up about as square as the briar block, which is pretty common. Anyway, best of luck.
Thank you kindly. I tried forever to get the bowl very very round, and my friends have all said its as good as they can see it getting, but i am very critical and the slight wobble in places still eats at me a bit.
Post Reply