I understand how extensions work and all but I don't understand how these shank caps are executed and perfectly rounded. Please, if this question has already been answered than I apologize.
Amazing pipe by the way.
Thank you for your time.
Dave
If your mortise is the same diameter as the hole in the cap, do you end up with just a face to face connection with no tenon of briar into the shank cap??Sasquatch wrote:I do that kind of thing by drilling the cap material at two different diameters - say, 1/2" half way through, and 3/8" all the way through. This creates a little step. Then I cut a matching shape on the end of the pipe (on the lathe) and epoxy it on. When the epoxy sets, I round out the extension and drill the mortise out (presumably at the same diameter as the hole in the cap).

Gotcha. That's what I thought.Sasquatch wrote:Only if I put it on backwards.
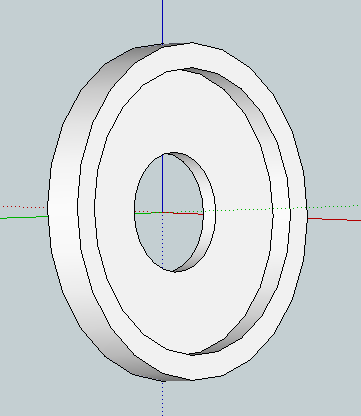
Here's a little drawing of the situation. The end of the pipe needs a little "tenon" to fit into the little mortise, the stepped part inside the shank cap.

Man, that shank needs a lot of refinement still. It needs to flow to the FRONT of the pipe more cleanly, and it needs to not have any taper (the taper will really show funny on a pipe like that). Also, your pipe needs more pronounced cheeks.Sasquatch wrote:Only if I put it on backwards.
Here's a little drawing of the situation. The end of the pipe needs a little "tenon" to fit into the little mortise, the stepped part inside the shank cap.
Still better than anything you have made!SimeonTurner wrote:Man, that shank needs a lot of refinement still. It needs to flow to the FRONT of the pipe more cleanly, and it needs to not have any taper (the taper will really show funny on a pipe like that). Also, your pipe needs more pronounced cheeks.Sasquatch wrote:Only if I put it on backwards.
Here's a little drawing of the situation. The end of the pipe needs a little "tenon" to fit into the little mortise, the stepped part inside the shank cap.
Well, duh. I'm a fantastic critiquer, and a terrible pipe maker. That's why I can charge so much for my pipes. People pay extra for paradoxical stuff.caskwith wrote:Still better than anything you have made!


Fine on large shanks but you may not have room for two tenons on small shanks, plus its easier to screw up.jogilli wrote:Good idea.. I normally work them as two different pieces... I'll try that next time
james
jogilli wrote:Roger that.. I figured that out a while ago... my tenons are 7mm (90% of the time) and the the shank caps are normally 10 .. gives me 1.5mm around the stummel ring .. makes it easier to glue in place ..I'm using Standard (not mm) size forstner bits for the caps... and just cant remember the size... but I'm standardizing where I can..
as for the two pieces.. their worked together.. just never glued them together before turning..I have a box of scraps with premade rings from different material with similar diameters... but what you say makes sense after I think about it.. I've just never been in a crunch for time...and only have worked horn and ebonite as as single piece...
got thrown for a loop thow last week.. a customer wants a nosewarmer w/an ivory cap... so I had to increase the mortise up to the 10 mm to hold the tenon with and 12mm diameter in the cap... and a 14mm mortise on the stummel to hold the cap in place .. it's coming out nice, but I have very little tolerance w/the filter canal and the top of the shank.....
who said math wasn't important.
tks
james
For strength, yes - joinery comes down to 2 principles - one is physical strength, which this offers - it's much less likely to dislodge from a sideways tap, for instance, because there's briar in the way.Growley wrote:So Sas, when you're making that step are you doing it for strength or some other reason? Also do you mind attaching a pic of the drill bit you're using to cut those steps in your cap?
SimeonTurner wrote:Man, that shank needs a lot of refinement still. It needs to flow to the FRONT of the pipe more cleanly, and it needs to not have any taper (the taper will really show funny on a pipe like that). Also, your pipe needs more pronounced cheeks.

You got most of your answers regarding the mounting of the end cap, but in terms of the above it's actually pretty simple. Turn it on a lathe.hawky454 wrote: I understand how extensions work and all but I don't understand how these shank caps are executed and perfectly rounded. Please, if this question has already been answered than I apologize.