
we want pictures, we want pictures, we want pictures, we want pictures, we want pictures, we want pictures, we want pictures, we want pictures...
Full pipe making pictorial, from block to finished pipe.
Re: Full pipe making pictorial, from block to finished pipe.
where is the next set of pic's ...
we want pictures, we want pictures, we want pictures, we want pictures, we want pictures, we want pictures, we want pictures, we want pictures...
we want pictures, we want pictures, we want pictures, we want pictures, we want pictures, we want pictures, we want pictures, we want pictures...

Re: Full pipe making pictorial, from block to finished pipe.
Sorry guys, been a busy week! You may have to wait a couple more days... 

Re: Full pipe making pictorial, from block to finished pipe.
The suspense is killing me!meathod wrote:Sorry guys, been a busy week! You may have to wait a couple more days...
Ok, we'll wait, but we don't have to like it.
Re: Full pipe making pictorial, from block to finished pipe.
meathod wrote:Sorry guys, been a busy week! You may have to wait a couple more days...
no problem my friend...
Re: Full pipe making pictorial, from block to finished pipe.
Sorry for the delay...
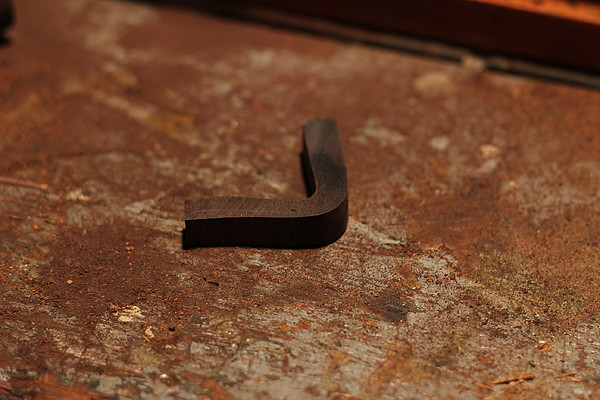
Turning the African blackwood plug for the bottom of the pipe


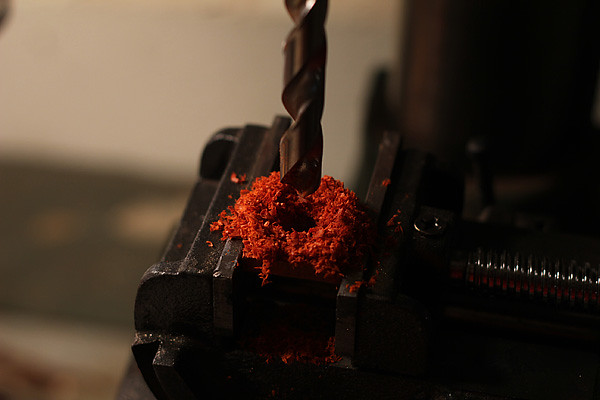
Drilling the hole for the inlay

Filling the base of the hole with packed sawdust

Juice break...

Quartz crushed with a hammer on the anvil


Placed the best quartz fragments into the inlay with tweezers, with a piece of mussel shell and added gold dust to fill the cracks


I put a drop of liquid glue onto the inlay, and let it dry


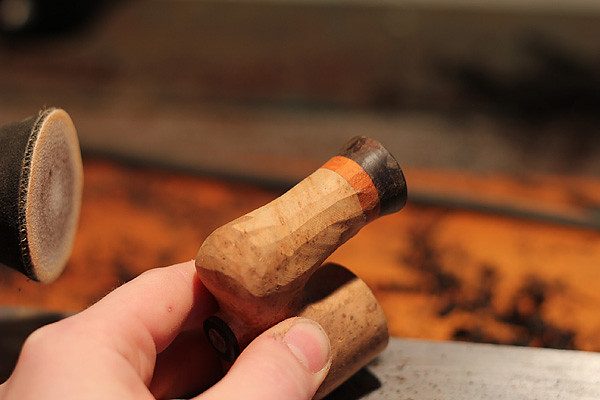
After sanding on the disc sander to reveal the inlay, then sanding up to 1200 grit. Used a micro file to shape the plug to fit seamlessly.

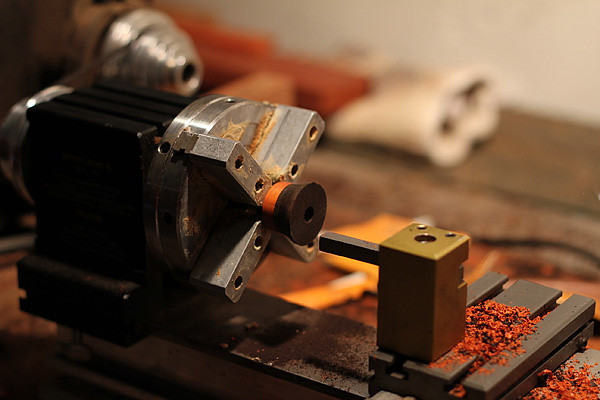
Turning and drilling the accent for the base of the stem


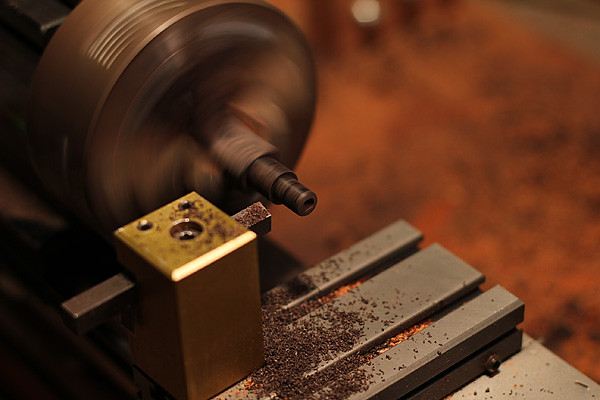
Drilling some padauk. A sharp drill bit is your best friend here.

After gluing and turning the padauk

Cut off with a handsaw, turned around, and clamped into the self centering chuck
After some work with some detail turning tools. High lathe speed and sharp tools get you a nice smooth surface without sanding.

Ready to be glued

I used wood glue, and then clamped it in the vice

While that dries I start working on the bowl lid

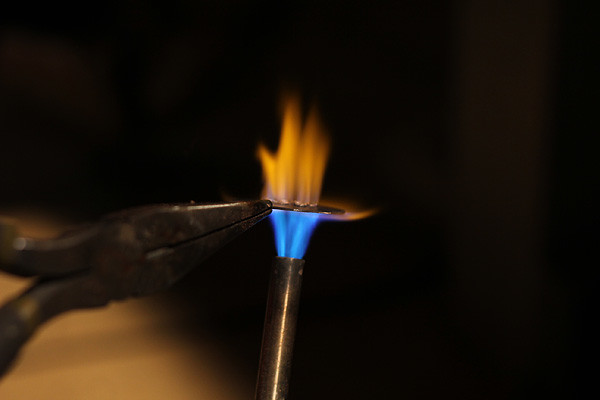
Here is the hot working process. I just heat it in the torch and hammer it out.


Drew an approximate circle on the copper, cut it out, and sanded it down on the disc sander


Hammered it out a bit, then drew another circle as a guide for sanding

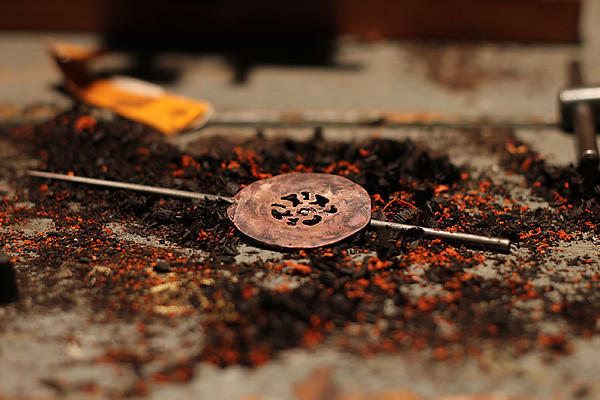
Drilling the vent holes


Annealing the copper
Using a needle file to carve the vent holes

A little more hammering and filing

Using the vise to help hammer out a dome shape


Then refining the dome on the anvil

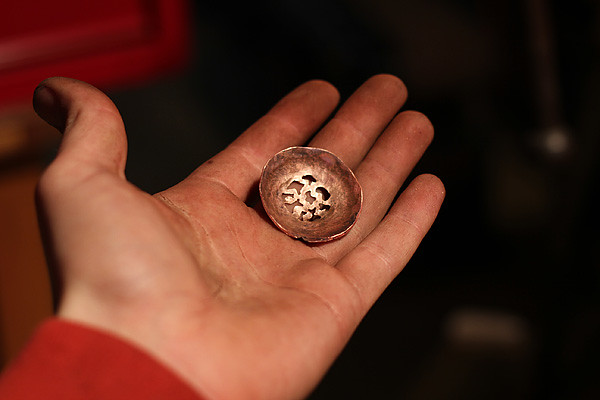

Another guideline for sanding
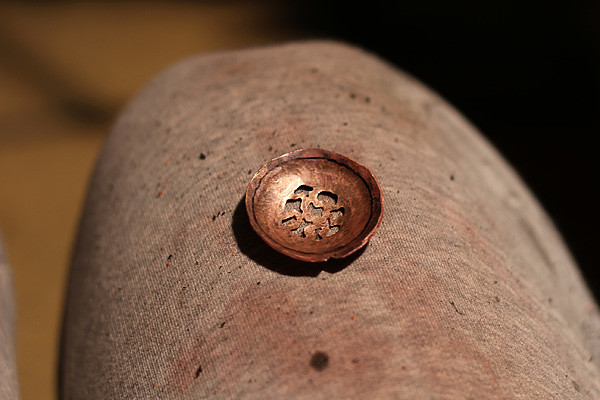
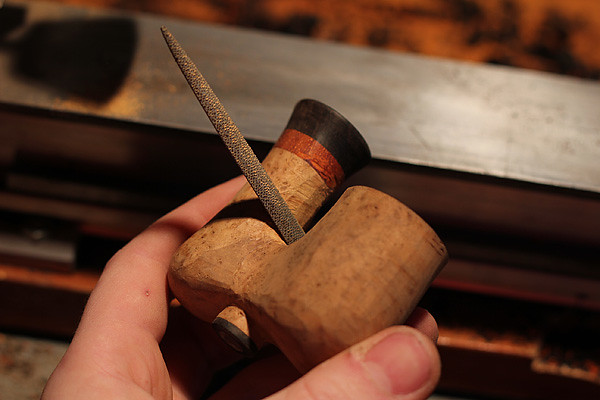
After some hand filing it fits


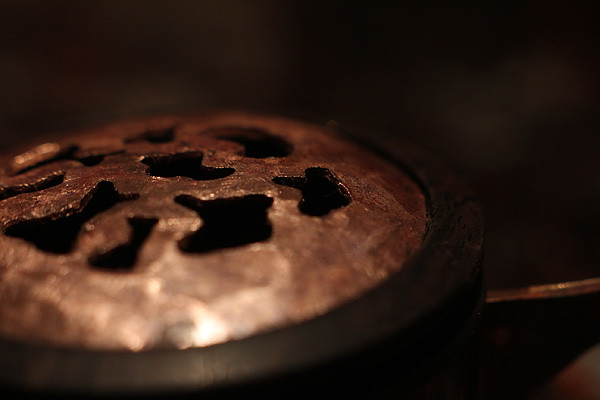

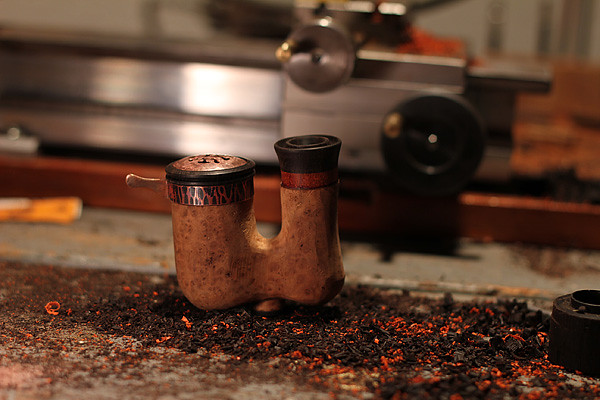

Favoring part of today was making this...

More tomorrow!
Turning the African blackwood plug for the bottom of the pipe
Drilling the hole for the inlay
Filling the base of the hole with packed sawdust
Juice break...
Quartz crushed with a hammer on the anvil
Placed the best quartz fragments into the inlay with tweezers, with a piece of mussel shell and added gold dust to fill the cracks
I put a drop of liquid glue onto the inlay, and let it dry
After sanding on the disc sander to reveal the inlay, then sanding up to 1200 grit. Used a micro file to shape the plug to fit seamlessly.
Turning and drilling the accent for the base of the stem
Drilling some padauk. A sharp drill bit is your best friend here.
After gluing and turning the padauk
Cut off with a handsaw, turned around, and clamped into the self centering chuck
After some work with some detail turning tools. High lathe speed and sharp tools get you a nice smooth surface without sanding.
Ready to be glued
I used wood glue, and then clamped it in the vice
While that dries I start working on the bowl lid
Here is the hot working process. I just heat it in the torch and hammer it out.
Drew an approximate circle on the copper, cut it out, and sanded it down on the disc sander
Hammered it out a bit, then drew another circle as a guide for sanding
Drilling the vent holes
Annealing the copper
Using a needle file to carve the vent holes
A little more hammering and filing
Using the vise to help hammer out a dome shape
Then refining the dome on the anvil
Another guideline for sanding
After some hand filing it fits
Favoring part of today was making this...
More tomorrow!
Re: Full pipe making pictorial, from block to finished pipe.
man - you are crazy (in a very positive way)....
to be honnest - i will have to steal some of your ideas my friend... they are to good not to use them... hope this is o.k. with you...
(i am thinking on the idea of using quartz to fill parts of the pipes - very nice idea that i was thinking about for some time)......
....
to be honnest - i will have to steal some of your ideas my friend... they are to good not to use them... hope this is o.k. with you...
(i am thinking on the idea of using quartz to fill parts of the pipes - very nice idea that i was thinking about for some time)......
....
Re: Full pipe making pictorial, from block to finished pipe.
I have revealed too many secretes! hahah.

Re: Full pipe making pictorial, from block to finished pipe.
I have revealed too many secretes! hahah.
Maybe so, but I think you've gained a lot of respect for your style of making pipes. I've always admired your results, but it really does add a lot to see what goes into making one of your pipes.
Keep up the good work.
Ryan Alden
http://www.aldenpipes.com
http://www.aldenpipes.com
Re: Full pipe making pictorial, from block to finished pipe.
So impressed by how involved this work is. Very nice.
"No reserves, no retreats, no regrets"
"When you're dumb...you've got to be tough." - my dad
"When you're dumb...you've got to be tough." - my dad
Re: Full pipe making pictorial, from block to finished pipe.
meathod wrote:I have revealed too many secretes! hahah.
...
related those fillings with glue and quartz... for the glue - are you using a cyanoacrylate glue or epoxy ...? from what i can see it is cyanoacrylate but i wonder can it be sanded and polished to a nice shine???
-
bandkbrooks

- Posts: 586
- Joined: Sat Aug 09, 2008 12:37 pm
- Location: Georgetown, KY
Re: Full pipe making pictorial, from block to finished pipe.
I really don't know what to say. Amazing.
Brandon Brooks
__________________________________
"The voices in my head won't let me have any imaginary friends"
Brandon Brooks
Brandon Brooks Pipes
http://www.brandon-brooks.com
__________________________________
"The voices in my head won't let me have any imaginary friends"
Brandon Brooks
Brandon Brooks Pipes
http://www.brandon-brooks.com

Re: Full pipe making pictorial, from block to finished pipe.
That is a wonderfully detailed description,keep your great work runnin' man,i liked it from the start on!
Best,
Abi
Best,
Abi
Re: Full pipe making pictorial, from block to finished pipe.
Lets continue...
Sanding down the stem with sanding discs ranging from 100 grit to 400 grit


Using a hand cut rasp to fine tune the inside of the bend a bit
Sanded to 600 grit

Turning some red palm on the lathe for the stem


Turning it around and using the self centering chuck to turn the other end

Red palm is the most difficult wood I have ever turned, to reduce chipping I coated it with glue that will soak into the wood fibers

Using a small parting tool to cut some decorative grooves

Checking the fit. After seeing it with the rest of the pipe I tossed this stem into the garbage because I thought it looked horrible. Failure is a common practice in my shop, haha.


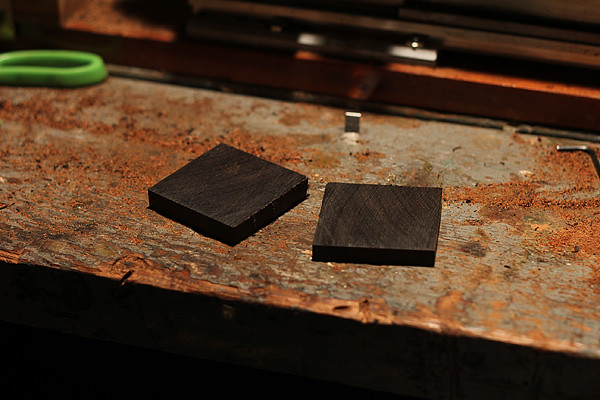
I decide to leave that part of the stem for later. I start work on the bent part of the stem by cutting some African blackwood squares on the chop saw
Drawing a guide for the hole

I use a cutting bit on the drill press to cut a groove along my guide


Final groove, all cleaned up

After cutting out the rough shape

Refining the shape


I line up the grain patterns for a seamless look later on, and glue the two halves together

When dry, I roughly cut out the other half and then sand it down again


More refining of the shape, getting ready for turning
Some weird turning here. I used a wooden wedge which is temporarily glued onto my chuck to help securely hold the stem. Often I have to customize my tools slightly throughout the crafting process in order to adapt to difficult situations like this. An enjoyable aspect of making one of a kind pieces.

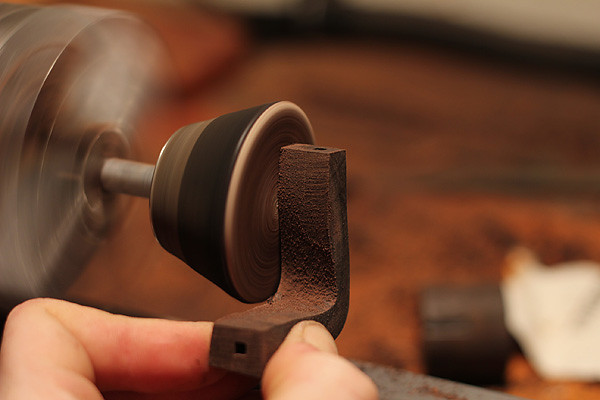
Carefully turning the stem in very small increments


Turned it around and did the same thing on the other end

Done, phew

After some rough sanding I added a padauk accent to the top of the stem


Using a couple files to round out the shape a bit more

Taking a look at what I've got so far, contemplating what to do for that damn stem

I decided that purple heart would be a nice compliment to the golden yellow/orange colour of the amboyna... and it also goes well with black

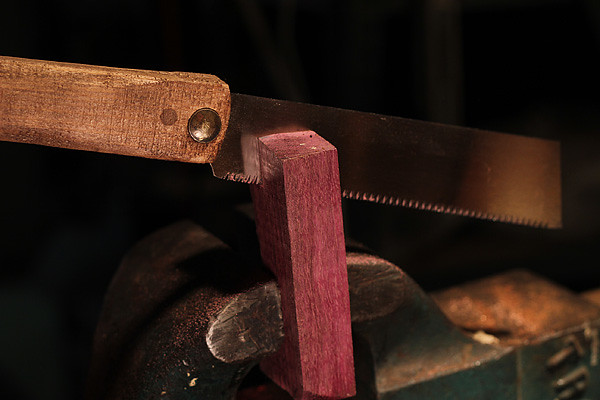
Cutting it out
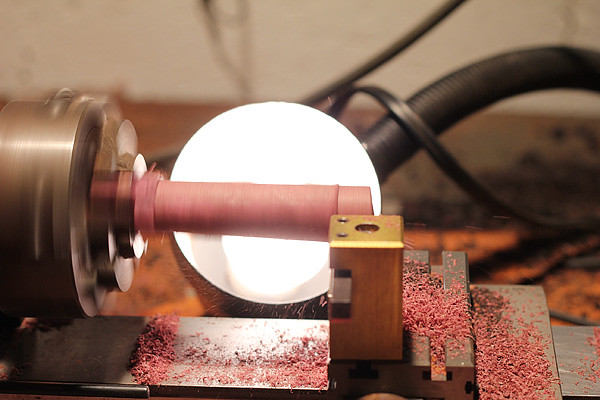
Onto the lathe


Checking the fit, visualizing the shape

Sharp tools are essential for avoiding chipping while turning small details in purple heart

Coming along

Drilling the air hole

Drilling the mortise that will fit the bent part of the stem

Drilling a hole in vegetable ivory (tagua nut) for the stem accent


A bit of sanding for a perfect fit

Gluing it all together

After using a few files, and sandpaper wrapped around a foam block


Still needs a mouthpiece, hinge assembly, and a couple accents, but it's coming along nicely I think!


Let me know what you guys think so far! Any suggestions?
Sanding down the stem with sanding discs ranging from 100 grit to 400 grit
Using a hand cut rasp to fine tune the inside of the bend a bit
Sanded to 600 grit
Turning some red palm on the lathe for the stem
Turning it around and using the self centering chuck to turn the other end
Red palm is the most difficult wood I have ever turned, to reduce chipping I coated it with glue that will soak into the wood fibers
Using a small parting tool to cut some decorative grooves
Checking the fit. After seeing it with the rest of the pipe I tossed this stem into the garbage because I thought it looked horrible. Failure is a common practice in my shop, haha.
I decide to leave that part of the stem for later. I start work on the bent part of the stem by cutting some African blackwood squares on the chop saw
Drawing a guide for the hole
I use a cutting bit on the drill press to cut a groove along my guide
Final groove, all cleaned up
After cutting out the rough shape
Refining the shape
I line up the grain patterns for a seamless look later on, and glue the two halves together
When dry, I roughly cut out the other half and then sand it down again
More refining of the shape, getting ready for turning
Some weird turning here. I used a wooden wedge which is temporarily glued onto my chuck to help securely hold the stem. Often I have to customize my tools slightly throughout the crafting process in order to adapt to difficult situations like this. An enjoyable aspect of making one of a kind pieces.
Carefully turning the stem in very small increments
Turned it around and did the same thing on the other end
Done, phew
After some rough sanding I added a padauk accent to the top of the stem
Using a couple files to round out the shape a bit more
Taking a look at what I've got so far, contemplating what to do for that damn stem
I decided that purple heart would be a nice compliment to the golden yellow/orange colour of the amboyna... and it also goes well with black
Cutting it out
Onto the lathe
Checking the fit, visualizing the shape
Sharp tools are essential for avoiding chipping while turning small details in purple heart
Coming along
Drilling the air hole
Drilling the mortise that will fit the bent part of the stem
Drilling a hole in vegetable ivory (tagua nut) for the stem accent
A bit of sanding for a perfect fit
Gluing it all together
After using a few files, and sandpaper wrapped around a foam block
Still needs a mouthpiece, hinge assembly, and a couple accents, but it's coming along nicely I think!
Let me know what you guys think so far! Any suggestions?
Re: Full pipe making pictorial, from block to finished pipe.
Dan my friend - i was happy to see the next part of the photo essay...
she is progressing nicely...
love to see how you are working... very nice
she is progressing nicely...
love to see how you are working... very nice

Re: Full pipe making pictorial, from block to finished pipe.
I've never quite seen anyone with a process like this. It's definitely not normal, but it obviously takes some skill, some artistic flair, and a little crazy. Still, this is turning out very well. I can't wait to see the finished product.
Re: Full pipe making pictorial, from block to finished pipe.
Very cool work man, and far from the mainstream 
I'm curious about using handheld turning tools with your metal lathe. Is it common to mount a bar in your tool post and use that as a rest ? I would really love to do the same, just curious what others thoughts are. I have a Jet 920, I guess I'm wondering if its a bad idea to do the same with a bigger machine.
I'm curious about using handheld turning tools with your metal lathe. Is it common to mount a bar in your tool post and use that as a rest ? I would really love to do the same, just curious what others thoughts are. I have a Jet 920, I guess I'm wondering if its a bad idea to do the same with a bigger machine.
Ryan Alden
http://www.aldenpipes.com
http://www.aldenpipes.com
-
archaggelosmichail

- Posts: 188
- Joined: Thu Jul 14, 2011 11:11 am
- Location: Paros, Greece
- Contact:
Re: Full pipe making pictorial, from block to finished pipe.
Wow, your pipes are very unique, you've found your own style.
I like it better with the pink shank, really creative.
Since you began I had the same question, are all those exotic woods "smokable"?
I like it better with the pink shank, really creative.
Since you began I had the same question, are all those exotic woods "smokable"?
Re: Full pipe making pictorial, from block to finished pipe.
Edward, I don't see why you couldn't do this with your jet, But the bar would have to either be very short (few inches), or thick enough so that It won't bend at all. In a small setup like mine, this isn't much of an issue.
And the woods that I use are safe to smoke out of. I use African blackwood for all of my bowls. I've tested it against briar, and in my opinion it is an excellent pipe wood.
And the woods that I use are safe to smoke out of. I use African blackwood for all of my bowls. I've tested it against briar, and in my opinion it is an excellent pipe wood.

Re: Full pipe making pictorial, from block to finished pipe.
It is still amazing
the amount of work you put in
but i reckon a man with a thumb like that could perform minor miracles
regards
dave
the amount of work you put in
but i reckon a man with a thumb like that could perform minor miracles
regards
dave
"Omne ignotum pro magnifico" - everything becomes common place by explanation :- sherlock holmes
Re: Full pipe making pictorial, from block to finished pipe.
Edward you can most certainly apply the same technique on your jet lathe, just get yourself a nice thick and sturdy piece of steel and mount it in your tool post slightly below the centre line, it will work a treat, i have done it myself.