Stumpy 2.0

Want to show you work to the world? Want a place to post photos of your work and solicit the opinions of those that have gone before you? Post your work here.
Post Reply
Massis
Posts: 938
Joined: Thu Aug 26, 2010 9:05 am

Stumpy 2.0

Post by Massis »

A while ago I got my hands on about 600 extra small ebauchons, all precut to become straight pipes.

A few weeks ago, I decided to tackle on of them just to see what would become of it. The result was Stumpy 1.0, a square-shanked nosewarmer, smaller than a Big Ben pipo:
Image

The grain was worthless, the staining and finish even worse.But my fellow smokers at the dutch pipesmokers forum seemed to rather enjoy it's funny size and shape, and one of them decided to order a stumpy for himself.

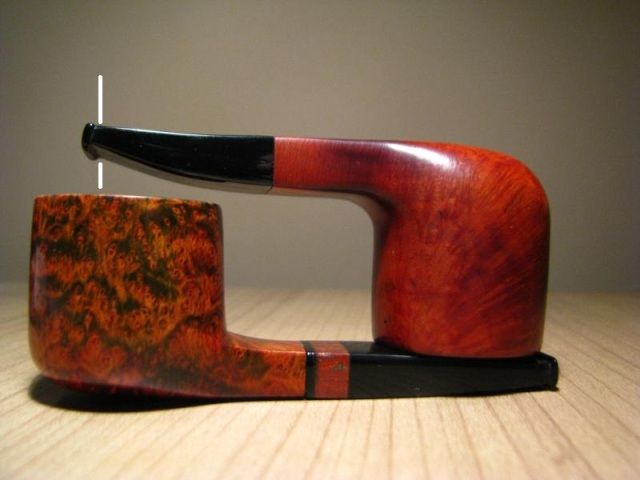
This is Stumpy 2.0, basicly the first pipe I've ever sold:
Image

Image

Image

Image

Image

Image

Image

It's not completely done yet, but I'm a bit stuck on how to solve some of the problems, so I was hoping for some tips from the experienced makers here.

The main problem I want to solve is the connection between shank and stem, which has a considerable gap.
I don't have lathe to perfectly square everything, and the "sandpaper with a hole in it"-trick always seems to end up with rounded corners on the edges. The main cause for this gap by the way is the fact angle of the hole in which I inserted the delrin tenon is a few degrees off which left a tiny gap, which got worse when polishing...

The second "problem" I'm going to solve is the thickness of the mouthpiece, which I'm going to refine after I solve problem 1.

And yes, there's also a sort of wave in the shank/stem line, but I'm going to leave that as is, because there's not enough material left to even this out.
User avatar
Sasquatch
Posts: 5147
Joined: Tue Jan 13, 2009 1:46 am

Re: Stumpy 2.0

Post by Sasquatch »

Rub a pencil on the should of the stem, the part that hits the end of the shank. Insert the stem and it will mark the shank where it touches. Take a small file and remove the mark. Repeat until the whole thing touches at once.
ALL YOUR PIPE ARE BELONG TO US!
User avatar
R.H.
Posts: 47
Joined: Fri Apr 08, 2011 9:02 pm
Location: Zaragoza (Spain)

Re: Stumpy 2.0

Post by R.H. »

Massis wrote:...the "sandpaper with a hole in it"-trick always seems to end up with rounded corners on the edges.
I'm not a experienced pipemaker (in any way), but it will work better if you stick the sandpaper on a thin piece of cardboard.


Or what Sas said,....maybe that works :lol: :lol: :lol: :lol:
Greetings,

Ramón
_______________________________________________________
There are two things you need to reach happiness and peace: a swiss knife and masking tape
User avatar
SchmidtN
Posts: 306
Joined: Thu Jul 28, 2011 7:18 pm
Location: Prompt Critical

Re: Stumpy 2.0

Post by SchmidtN »

Sasquatch wrote:Rub a pencil on the should of the stem, the part that hits the end of the shank. Insert the stem and it will mark the shank where it touches. Take a small file and remove the mark. Repeat until the whole thing touches at once.
I use a half round jeweler's file... it's a pain getting that face flat with hand tools. Well it's always a pain for me at least, but I'm a chump hobbyist so I got nothing but time. :lol:
Hello, I'm #1312.
That's a really big number.
User avatar
staffwalker
Site Supporter
Posts: 391
Joined: Thu Nov 23, 2006 8:00 pm
Location: USA, texas

Re: Stumpy 2.0

Post by staffwalker »

Massis wrote:The main problem I want to solve is the connection between shank and stem, which has a considerable gap.
I don't have lathe to perfectly square everything, and the "sandpaper with a hole in it"-trick always seems to end up with rounded corners on the edges.
Take something like a plastic credit card but flat with no numbers imprinted. I steal the motel key cards which never have numbers, cut a peice of sandpaper to fit and super glue the sandpaper to the card. Drill a hole in the center, use this to turn the gap. Try not to flex the card as you turn. I use one finger as if I were turning the propeller on a model airplane. This will do away with the rounded corners. bob gilbert
Massis
Posts: 938
Joined: Thu Aug 26, 2010 9:05 am

Re: Stumpy 2.0

Post by Massis »

Now there's a hint worth trying!
Sas, I've tried yours and it's much better now, but still not to my liking. Tonight I'm trying the credit card!
User avatar
maxmil
Posts: 833
Joined: Sun Dec 12, 2010 5:46 pm
Location: La Coruña - Galicia - Spain
Contact:

Re: Stumpy 2.0

Post by maxmil »

For me, the nozzle lip is too thick.
Best regards.
Félix

Para mí, el labio de la boquilla es demasiado grueso.
Saludos.
Félix
Massis
Posts: 938
Joined: Thu Aug 26, 2010 9:05 am

Re: Stumpy 2.0

Post by Massis »

What exactly do you mean with the nozzle lip Félix? Do you mean the thickness of the bit compared to the stem? Or just the stem itself?
Anyways: I agree, that's why I've sanded it down some more yesterday. It still looks thick to the eye now, because it doesn't get narrow towards the edges. But the thickest part isn't any thicker than my only Winslow, which has the most comfortable mouthpiece of all my pipes.
User avatar
maxmil
Posts: 833
Joined: Sun Dec 12, 2010 5:46 pm
Location: La Coruña - Galicia - Spain
Contact:

Re: Stumpy 2.0

Post by maxmil »

The above area is usually about 4 mm for comfortable viewing.
Best regards.
Félix

La zona señalada suele tener unos 4 mm para que resulte cómoda.
Saludos.
Félix

Image
Massis wrote:What exactly do you mean with the nozzle lip Félix? Do you mean the thickness of the bit compared to the stem? Or just the stem itself?
Anyways: I agree, that's why I've sanded it down some more yesterday. It still looks thick to the eye now, because it doesn't get narrow towards the edges. But the thickest part isn't any thicker than my only Winslow, which has the most comfortable mouthpiece of all my pipes.
Massis
Posts: 938
Joined: Thu Aug 26, 2010 9:05 am

Re: Stumpy 2.0

Post by Massis »

Well Félix, I think you underestimate just how small these pipes are :-)

For your information: These pipes weigh about 22-24grammes each, and the longest one is still under 9cm. The bit on the top one measures 3mm, on the lower one it's 4mm. So like I said: they look really thick because they don't get narrower to the side like a normal oval bit, but in fact they're quite comfortable.

I've added the dimensions to the picture for info:

Image
User avatar
maxmil
Posts: 833
Joined: Sun Dec 12, 2010 5:46 pm
Location: La Coruña - Galicia - Spain
Contact:

Re: Stumpy 2.0

Post by maxmil »

Now I understand.
Thank you.
Best regards.
Felix

Ahora lo entiendo.
Gracias.
Best regards.
Félix
Massis wrote:Well Félix, I think you underestimate just how small these pipes are :-)

For your information: These pipes weigh about 22-24grammes each, and the longest one is still under 9cm. The bit on the top one measures 3mm, on the lower one it's 4mm. So like I said: they look really thick because they don't get narrower to the side like a normal oval bit, but in fact they're quite comfortable.

I've added the dimensions to the picture for info:

Image
Post Reply