Page 1 of 1
canted Dublin
Posted: Tue Apr 07, 2020 10:31 am
by jasonpatrick
Re: canted Dublin
Posted: Tue Apr 07, 2020 7:02 pm
by DocAitch
I posted my comments FB.
Other than the sharp chin and bottom, this is a nicely done pipe.
DocAitch
Re: canted Dublin
Posted: Tue Apr 07, 2020 8:27 pm
by wdteipen
There's still more material that needs to be taken off the top and bottom of the stem. That's one of the toughest part when you first start making handmade stems- determining when to stop removing material. Too soon and you have a stem that bulges. Too late and you cut into the airway. It takes practice and a good eye. Your side to side symmetry on your stem is close but could be dialed in a bit more. Again, takes practice. All that being said, it's far better than my first handmade stem.
Re: canted Dublin
Posted: Tue Apr 07, 2020 9:22 pm
by LatakiaLover
Re: canted Dublin
Posted: Wed Apr 08, 2020 12:08 am
by jasonpatrick
Thanks gents! I appreciate you taking the time to post feedback.
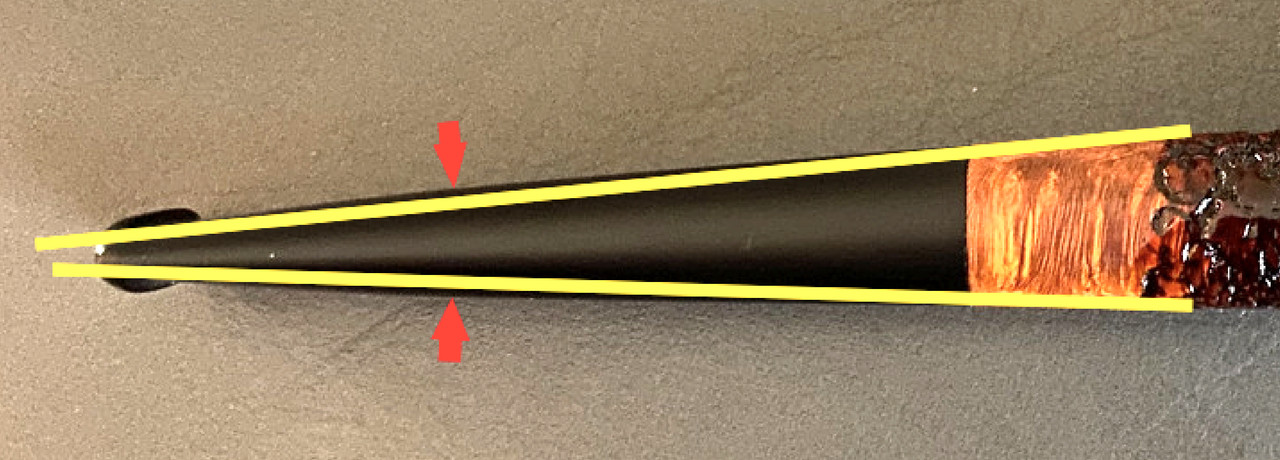
With the material on the stem that needs to be removed, I was concerned with the bottom/top line of the pipe continuing its taper, but I was starting to run out of material in the shank to do that. As it is, the straight line continues through the stem until it's about 2/3rds the way back and then breaks the line toward the button. The best case would have enough material to continue the line all the way down...but here I am. As things sit now, is it better to remove the material on the stem and have a line break at the shank/stem junction or to leave it as is and plan better next time? Or was I mistaken to have the line run from the bowl all the way back?
Re: canted Dublin
Posted: Wed Apr 08, 2020 12:11 am
by jasonpatrick
Actually I just checked again after looking at the image. It's only the bottom line that continues into the stem, the top line breaks at the stem/shank junction as it is.
I kind of love and kind of hate this hobby.
Re: canted Dublin
Posted: Wed Apr 08, 2020 1:02 am
by LatakiaLover
Lower high spots by sanding sideways, not lengthwise.
Such shape-tuning is easiest using those cushioned nail boards. Use the smoother side of a black one to start, move on to a pink one when ALMOST there, and when everything is straight---but not before---work your way up through 400, 600, and 800 sanding lengthwise. Than hit it with a wheel to get some shine happening.
Then HEAT the entire stem with a hot air gun, and when cool sand again with 1000. (Removes "zombie" scratches)
Buff through the compound grades and you're done. It'll look like glass and be as stright as a string if you did everything correctly.
Re: canted Dublin
Posted: Wed Apr 08, 2020 8:42 am
by jasonpatrick
Thanks George!! I’m about 10 hours into your videos. I watch them while I’m sanding and sanding and sanding........
Re: canted Dublin
Posted: Wed Apr 08, 2020 9:44 am
by miscoipipes
LatakiaLover wrote: ↑Wed Apr 08, 2020 1:02 am
Lower high spots by sanding sideways, not lengthwise.
Such shape-tuning is easiest using those cushioned nail boards. Use the smoother side of a black one to start, move on to a pink one when ALMOST there, and when everything is straight---but not before---work your way up through 400, 600, and 800 sanding lengthwise. Than hit it with a wheel to get some shine happening.
Then HEAT the entire stem with a hot air gun, and when cool sand again with 1000. (Removes "zombie" scratches)
Buff through the compound grades and you're done. It'll look like glass and be as stright as a string if you did everything correctly.
Do you heat and sand ALL stems to remove "zombie" scratches? I thought you need to do it just after you bend the stem...
Re: canted Dublin
Posted: Wed Apr 08, 2020 10:04 am
by wdteipen
The taper of a stem does not have to follow the taper of the shank. It should be a gradual taper. In fact, tapered stems look best if the taper doesn't start sharply directly at the junction of the stem and shank. Carry the line of the shank taper a bit into the stem then start a more drastic taper to the button. Also, make the area approximately 1 cm or so leading up to the button almost flat for comfort.
Re: canted Dublin
Posted: Wed Apr 08, 2020 10:06 am
by wdteipen
Look at your taper from shank to stem in the top down view. You did a nice job following the taper of the shank into your stem there then started your flare. Think of that concept when tapering the top and bottom of the stem.
Re: canted Dublin
Posted: Wed Apr 08, 2020 11:48 am
by LatakiaLover
miscoipipes wrote: ↑Wed Apr 08, 2020 9:44 am
Do you heat and sand ALL stems to remove "zombie" scratches? I thought you need to do it just after you bend the stem...
The zombie thing is more dramatic with bents but applies to straights as well. The nearest anyone can figure is "material-removal-class" sanding of ebonite causes a small amount of compression to the surface layer in a microscopic furrow pattern. Compression that's released (in the same way tooth dents are) by heat.
Delicate final sanding with 1000 or 1200 probably still causes them, but ones that are below the "buffing compound threshold." Meaning small enough they polish away.
Whether the above explanation is literally true is unknown as far as I've been able to track down. A materials scientist might just laugh upon reading it. It's a useful way to
THINK about the situation, though, because it is
FUNCTIONALLY true in a practical shop sense. If approached that way you'll achieve the desired result every time; try to simply sand away the zombies without heat and they'll re-appear eventually every time.
Re: canted Dublin
Posted: Wed Apr 08, 2020 12:33 pm
by miscoipipes
LatakiaLover wrote: ↑Wed Apr 08, 2020 11:48 am
miscoipipes wrote: ↑Wed Apr 08, 2020 9:44 am
Do you heat and sand ALL stems to remove "zombie" scratches? I thought you need to do it just after you bend the stem...
The zombie thing is more dramatic with bents but applies to straights as well. The nearest anyone can figure is "material-removal-class" sanding of ebonite causes a small amount of compression to the surface layer in a microscopic furrow pattern. Compression that's released (in the same way tooth dents are) by heat.
Delicate final sanding with 1000 or 1200 probably still causes them, but ones that are below the "buffing compound threshold." Meaning small enough they polish away.
Whether the above explanation is literally true is unknown as far as I've been able to track down. A materials scientist might just laugh upon reading it. It's a useful way to
THINK about the situation, though, because it is
FUNCTIONALLY true in a practical shop sense. If approached that way you'll achieve the desired result every time; try to simply sand away the zombies without heat and they'll re-appear eventually every time.
I always had a problem to remove this tiny micro scratches

Never thought about a HEAT thing for a straight stem.. I will try this for my next stem. Brilliant information as always! Thanks a lot!
Re: canted Dublin
Posted: Wed Apr 08, 2020 3:35 pm
by jasonpatrick
wdteipen wrote: ↑Wed Apr 08, 2020 10:06 am
Look at your taper from shank to stem in the top down view. You did a nice job following the taper of the shank into your stem there then started your flare. Think of that concept when tapering the top and bottom of the stem.
That's helpful. thanks!
Re: canted Dublin
Posted: Wed Apr 08, 2020 9:19 pm
by n80
George, any idea if the heat and sand thing works with or is useful with acrylic?
Re: canted Dublin
Posted: Wed Apr 08, 2020 9:28 pm
by LatakiaLover
I've never had any trouble getting acrylic to shine quickly and easily, so have never tried the heat thing.
That said, I NEVER use the snappy, chippy, crumbly economy crap that gave acrylic a bad name early on. The best formulations of plastic are so vastly superior that I can't believe the other shit survives at all, never mind is common. Cost accountants crawling around looking for fractions of a penny, no doubt.