
Vermont Freehand wrote: and have never owned a really nice pipe.
2009-2010 Pipe In The Hat trade
Re: 2009-2010 Pipe In The Hat trade

Re: 2009-2010 Pipe In The Hat trade
Wow Steve! Thanks a lot man! That definitively was the best review I everVermont Freehand wrote:I received Eder's pipe today...
had about any of my pipes. I'm immensely glad that you've like it so much
What else can I tell you!!??
Here are my little tricks...
- The chamber was manually sanded till 800-grit. Actually, I use regular wood drills...
exactly these ones: Ring Auger Bit - Made in Japan
no spoon drills or any drilling machine. So, I've a lot of work to have the chamber well
rounded and well finished. Basically, after the regular drill, I carve the chamber with a
Dremel bit, later on I use a rounded sandpaper bit that I made on my own. Once it gets
perfect, I apply several sandpaper grits till it gets very smooth. - The rustification was made with another Dremel bit. The result on your pipe was only
archived because I also applied sandpaper on the rustification. - The silver ring was a hard word! I made a special tool only for that. I attach a toothed
metal ring in a rubber cylinder that has a screw inside. As much you screw it, more the rubber
cylinder opens and grabs the ring. With that, I opened a ring hole that fits perfectly the silver ring.
This tool looks like a ring saw. - About the stem... Actually, for your pipe, I made two stems. The first one was a shorter and
also had narrow lips. But I applied too much sandpaper till a point that its air hole was almost in
the limit of the acrylic. So, I decided to make a new one that would be more reliable. - The velvet pouches are made by my fiance's mother... the family also has to have its contribution!

- I could say that the shipping wasn't cheap... actually, it was very expensive! But, good that
it worked as it always should!
the most important part... a smoking device has to do what it was created for!
Cheers,
eder.
• • •
 Eder Mathias
http://mrhydepipes.com

Re: 2009-2010 Pipe In The Hat trade
I received my little guy from Beat just the other day. I've kicked the tires taken him for a drive and am very pleased. Below is the critique I sent:
Beat Tadpole
The pipe I received from Beat was very well represented from his pictures. My initial impression of the shape is that of a whale or tadpole. As the pipe is quite small, I lean toward the tadpole moniker. Beat has told me that this is his third pipe, and as such, an excellent point at which to receive some hands on constructive criticism.
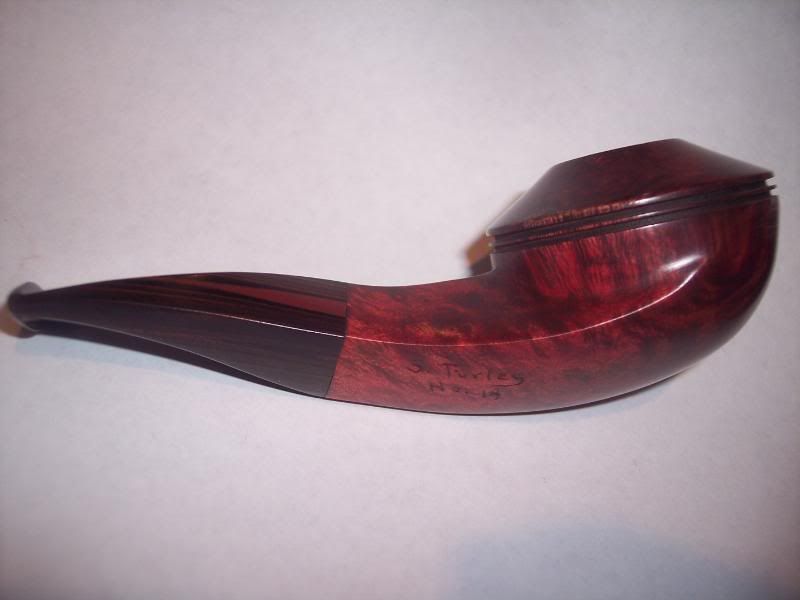
The pipe is quite beefy and very sturdy looking. Its friendly in the hand, and despite its girth, has a nice balance in the teeth. This is a pipe of clear purpose. One to grab for a short smoke or when packing light is necessary. The grain is nice, with a nice coating of birds eye on the right and left hand sides and a streak of straight grain running down the left hand side of the bottom and top. The bowl ¾ of an inch wide and about 1 ¼ inches deep. Overall, the pipe is a hair under 4 inches long, 1 ½ inches wide and 1 5/8 inches tall.
In profile, the pipe has an unconventional jauntiness to it. It makes me think of Santa and his belly jiggling as he laughs. The bowl is very organic. Well shaped. Looking at it from the top though I note that the stem does not follow the line of the bowl. Where the stummel has a gentle curving to it, the stem is very flat and straight. Upon looking more closely at the profile, I can note a similar issue with the top of the stem, i.e. whereas the stummel has a gentle curve to it, the stem is abruptly straight. Though this point is much more slight than the sides, and only becomes apparent on close inspection.
My advice to address on this point is to continue the curve of the bowl into the
stem, and make a fishtail stem instead of a straight stem. I've tried to illustrate this below:

The bowl/stem junction is very well done. Better than many of my pipes to be honest. Great job Beat. I can see the barest sliver of light between bowl and stem. The stem is handcut, and a damn fine job for only your third pipe. If I remember correctly, my first few hand cut stems were disasters. Again, very well done. The button is well shaped and very symmetrical. It’s a bit fatter than I like from the front to back aspect, but that's just my preference. Top to bottom, the bit is nice and slim. Perhaps a hair could be shaved off of it, but there is nothing wrong with it as it is. Without and negative connotations, the bit thickness is average. The stem bend is a slight bit abrupt. This can happen when we don't take the time to heat the stem fully. A bit more patience would have improved this.
The slot is nicely cut with no chamfering, i.e. the entrance to the slot is at 90 degrees to the button face. I prefer slots that are trumpeted, but this, again is just preference. There are a few jagged edges to the slot. A bit more patience in shaping will alleviate this. As near as I can tell, the V of the slot is less than ¼ inch deep. This may be well within the range of some pipes. However, in my eyes, one of the hall marks of a well done hand made stem is a deep slot. There are any number of ways to achieve this. What has worked best for me is taking the blade of a scroll saw and snipping it in half. One then uses this saw blade to cut a nice deep slit in the material. The cut will be quite narrow and should be opened up with small files or a dremel fitted with a 1/16th inch drill bit. Using file, make sure to work all the way to the outside of the cut so that the slot is uniform in height. Using the dremel, make sure to use a slow slow speed and work the bit up and down as you cut sideways. One last note on using the scroll saw blade: I have had the best luck with leaving the cut a bit short on either side. In cutting the fill length of the slot with the blade, you may find yourself with marks on the outside of the slot from the blade that are hard to get rid of unless you make you slot even longer.
I noted several sanding marks on the stem, most prominently on the button face, but also on the stem itself. I found one or two sanding marks on the bowl as well, but these only became visible when the pipe was examined under a strong light. The staining is good; however I do note a drip mark that was not buffed out properly on the bowls underside. In some spots on the briar the staining seems patchy; however I attribute this to the briar itself and not the maker. Inside the bowl, there is a thin line of stain around the upper most portion of the bowl. Overall, my advice is to slow down on your sanding. Spend more time on each grit, especially the higher ones. Certainly, this is advice I could take myself.
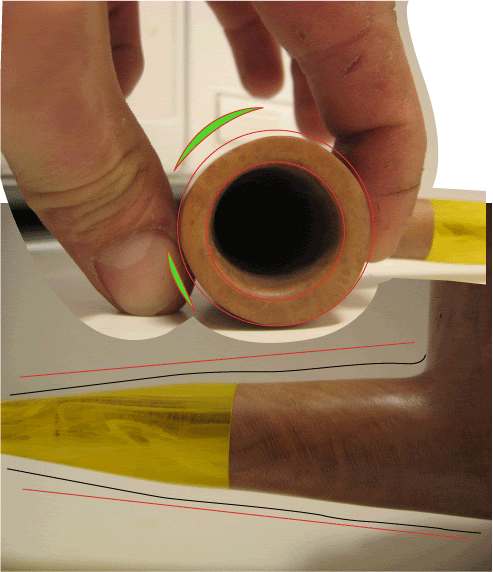
The drilling of the pipe is fine. It looks as though a bit much force was used, as a plug of briar popped out preceding the drill bit into the bowl. Slow down. Let the bit do the work for you. Bents can some times be tricky in that if drilled as one thinks they ought to be, some times your draft hole can end up a shade high – as this one seems to be. In a straight pipe, if the draft hole is lined up properly, the bit will push trough right at the bottom of the bowl in the center. In a bent pipe however, the angle of the drilling means that if you drill the same way, your bit will come through the bowl wall higher than you want, while still terminating dead center. To correct for this, one needs to drill the bowl a bit shallower than you might think. Not a whole lot, but just a bit. It's always better to be too shallow than too deep. I've illustrated this below:

One way to make sure you get this right is to drill your draft hole first, and then drill your bowl. Also, this eliminated the possibility of a plug popping out ahead of the draft hole bit.
All in all, this is a great pipe. All the points I have made are finer points. And I have no doubt that you will get better with time, practice and patience. Great job!
Nick
Beat Tadpole
The pipe I received from Beat was very well represented from his pictures. My initial impression of the shape is that of a whale or tadpole. As the pipe is quite small, I lean toward the tadpole moniker. Beat has told me that this is his third pipe, and as such, an excellent point at which to receive some hands on constructive criticism.
The pipe is quite beefy and very sturdy looking. Its friendly in the hand, and despite its girth, has a nice balance in the teeth. This is a pipe of clear purpose. One to grab for a short smoke or when packing light is necessary. The grain is nice, with a nice coating of birds eye on the right and left hand sides and a streak of straight grain running down the left hand side of the bottom and top. The bowl ¾ of an inch wide and about 1 ¼ inches deep. Overall, the pipe is a hair under 4 inches long, 1 ½ inches wide and 1 5/8 inches tall.
In profile, the pipe has an unconventional jauntiness to it. It makes me think of Santa and his belly jiggling as he laughs. The bowl is very organic. Well shaped. Looking at it from the top though I note that the stem does not follow the line of the bowl. Where the stummel has a gentle curving to it, the stem is very flat and straight. Upon looking more closely at the profile, I can note a similar issue with the top of the stem, i.e. whereas the stummel has a gentle curve to it, the stem is abruptly straight. Though this point is much more slight than the sides, and only becomes apparent on close inspection.
My advice to address on this point is to continue the curve of the bowl into the
stem, and make a fishtail stem instead of a straight stem. I've tried to illustrate this below:
The bowl/stem junction is very well done. Better than many of my pipes to be honest. Great job Beat. I can see the barest sliver of light between bowl and stem. The stem is handcut, and a damn fine job for only your third pipe. If I remember correctly, my first few hand cut stems were disasters. Again, very well done. The button is well shaped and very symmetrical. It’s a bit fatter than I like from the front to back aspect, but that's just my preference. Top to bottom, the bit is nice and slim. Perhaps a hair could be shaved off of it, but there is nothing wrong with it as it is. Without and negative connotations, the bit thickness is average. The stem bend is a slight bit abrupt. This can happen when we don't take the time to heat the stem fully. A bit more patience would have improved this.
The slot is nicely cut with no chamfering, i.e. the entrance to the slot is at 90 degrees to the button face. I prefer slots that are trumpeted, but this, again is just preference. There are a few jagged edges to the slot. A bit more patience in shaping will alleviate this. As near as I can tell, the V of the slot is less than ¼ inch deep. This may be well within the range of some pipes. However, in my eyes, one of the hall marks of a well done hand made stem is a deep slot. There are any number of ways to achieve this. What has worked best for me is taking the blade of a scroll saw and snipping it in half. One then uses this saw blade to cut a nice deep slit in the material. The cut will be quite narrow and should be opened up with small files or a dremel fitted with a 1/16th inch drill bit. Using file, make sure to work all the way to the outside of the cut so that the slot is uniform in height. Using the dremel, make sure to use a slow slow speed and work the bit up and down as you cut sideways. One last note on using the scroll saw blade: I have had the best luck with leaving the cut a bit short on either side. In cutting the fill length of the slot with the blade, you may find yourself with marks on the outside of the slot from the blade that are hard to get rid of unless you make you slot even longer.
I noted several sanding marks on the stem, most prominently on the button face, but also on the stem itself. I found one or two sanding marks on the bowl as well, but these only became visible when the pipe was examined under a strong light. The staining is good; however I do note a drip mark that was not buffed out properly on the bowls underside. In some spots on the briar the staining seems patchy; however I attribute this to the briar itself and not the maker. Inside the bowl, there is a thin line of stain around the upper most portion of the bowl. Overall, my advice is to slow down on your sanding. Spend more time on each grit, especially the higher ones. Certainly, this is advice I could take myself.
The drilling of the pipe is fine. It looks as though a bit much force was used, as a plug of briar popped out preceding the drill bit into the bowl. Slow down. Let the bit do the work for you. Bents can some times be tricky in that if drilled as one thinks they ought to be, some times your draft hole can end up a shade high – as this one seems to be. In a straight pipe, if the draft hole is lined up properly, the bit will push trough right at the bottom of the bowl in the center. In a bent pipe however, the angle of the drilling means that if you drill the same way, your bit will come through the bowl wall higher than you want, while still terminating dead center. To correct for this, one needs to drill the bowl a bit shallower than you might think. Not a whole lot, but just a bit. It's always better to be too shallow than too deep. I've illustrated this below:
One way to make sure you get this right is to drill your draft hole first, and then drill your bowl. Also, this eliminated the possibility of a plug popping out ahead of the draft hole bit.
All in all, this is a great pipe. All the points I have made are finer points. And I have no doubt that you will get better with time, practice and patience. Great job!
Nick
-
smokindawg
- Posts: 417
- Joined: Thu Nov 23, 2006 8:00 pm
- Location: Missouri
- Contact:
Re: 2009-2010 Pipe In The Hat trade
I received my pipe from Briarfox a few days ago and have to say, it's a beauty. I have done the test run with the pipe and will send my thoughts to him after I've had a chance to smoke it a few more times.
Thanks again Briarfox for such a nice nosewarmer and for the opportunity to get in on such a great trade and learning experience.
Thanks again Briarfox for such a nice nosewarmer and for the opportunity to get in on such a great trade and learning experience.
Pipe Maker in the Making!

Re: 2009-2010 Pipe In The Hat trade
Glad you like it smokindawg. I look forward to getting your review!

Re: 2009-2010 Pipe In The Hat trade
I have received my little nosewarmer from pierredekat. It is a truly beautiful pipe. I am looking forward to gently break it in with some Three Nuns and will follow with a review.
Thank you Robert for such a wonderful pipe and thank you everyone for the pipe in the hat experience.
Craig Houser
Thank you Robert for such a wonderful pipe and thank you everyone for the pipe in the hat experience.
Craig Houser
Re: 2009-2010 Pipe In The Hat trade
Hey Craig,
You can be sure that it found a good home. Yesterday I received your cute pipe...
Very well done work! The wood has an excellent grain, it's 99% spots free. You really
chose a very good piece of briar. The top of the bowl is perfectly circular and has a
very flat surface. The finishing is so smooth that it slides in the hands.
I already smoked it and the first smoke was very easy.
I would have some little remarks, but most probability you already know them...
for instance, the lip slot and that difficult curve between the top part of the shank and
the bowl. Both could receive some special care. But those do not impact the smoking
quality and the other attributes of the little OldnGrey.
I consider myself a lucky guy for receiving your pipe.
Thanks Craig.
Cheers,
eder.
• • •
Eder Mathias
http://mrhydepipes.com
You can be sure that it found a good home. Yesterday I received your cute pipe...
Very well done work! The wood has an excellent grain, it's 99% spots free. You really
chose a very good piece of briar. The top of the bowl is perfectly circular and has a
very flat surface. The finishing is so smooth that it slides in the hands.
I already smoked it
I would have some little remarks, but most probability you already know them...
for instance, the lip slot and that difficult curve between the top part of the shank and
the bowl. Both could receive some special care. But those do not impact the smoking
quality and the other attributes of the little OldnGrey.
I consider myself a lucky guy for receiving your pipe.
Thanks Craig.
Cheers,
eder.
• • •
Eder Mathiashttp://mrhydepipes.com
Re: 2009-2010 Pipe In The Hat trade
OK - I've been holding back on this until I could actually smoke it. . .
I received pennsyscot's pipe last week and it's been setting on my desk since then waiting for it's maiden smoke. She smokes great. Fit and finish are great. The button is nice & thin, but wider than I've ever had. Once I got used to it though the extra width provided a nice degree of stability in the clench that I actually like. The airway is open with a nice long taper at the button. Nice fit on the delrin tenon. The stain is pretty, but some of it rubbed off when I wiped the pipe down (with a dry cloth) the first time. Not a big deal, but probably not something you want to happen with a customer. Also, the shaping from the side view is a bit off - not horrible, but just a bit. I've seen pictures of the pipe Scot made right after this one and it looks better.
I'm very happy with it Scot. In fact, I'd buy it if offered for sale. Perhaps the highest compliment(s) came (separately) from my wife & one of my daughters. They said, “I like it. You should make one like that.”
"Cut your own wood and you warm yourself twice." - Henry Ford
-
staffwalker

- Site Supporter
- Posts: 391
- Joined: Thu Nov 23, 2006 8:00 pm
- Location: USA, texas
Re: 2009-2010 Pipe In The Hat trade
I had told Fred that I would send him a critique of his little pipe by PM but now I see that most are doing it here so why not? It's a great little pipe 114mm, about 4.4 inches. I don't really consider it a nose warmer but rather a small pipe. I suspect, however, that's one of those judgment calls, that there are no hard and fast rules. My idea of a nose warmer is pretty much a normal size pipe that's just short with a heavy shank and stem. This one is a perfectly shaped pipe in miniature but still sports about a size 4 bowl. It's really beautiful. I've smoked it everyday at least once a day for the past two weeks. It smokes really great and does something amazing--it smokes perfectly dry. I have yet to produce one drop of moisture either at the stem/shank junction or in the bow with several different tobaccos. How the heck did you do that Fred?? Where did you get this block?
I can find nothing major wrong with this pipe. There are a couple of small items, The draft hole is drilled a couple of mm high which in this case doesn't appear to hurt anything, I've already commented on how dry it smokes. It will still accept a large pipe cleaner to the bottom four out of five times and with a twist five out of five. The bit is comfortable in the teeth with a good button, nice wide slot, well done. No tool marks except for a couple of small scratches by the button on the top of the bit. Everything nice and shiny, nice grain and well buffed. The upper bowl walls are slightly out of sync, a little thinner at the back of the bowl when compared to the front, not much perhaps .5 to 1 mm, not enough to notice unless you look very closely. That's about it Fred, hell of a job and thanks for a great pipe. I really enjoy it. bob
I can find nothing major wrong with this pipe. There are a couple of small items, The draft hole is drilled a couple of mm high which in this case doesn't appear to hurt anything, I've already commented on how dry it smokes. It will still accept a large pipe cleaner to the bottom four out of five times and with a twist five out of five. The bit is comfortable in the teeth with a good button, nice wide slot, well done. No tool marks except for a couple of small scratches by the button on the top of the bit. Everything nice and shiny, nice grain and well buffed. The upper bowl walls are slightly out of sync, a little thinner at the back of the bowl when compared to the front, not much perhaps .5 to 1 mm, not enough to notice unless you look very closely. That's about it Fred, hell of a job and thanks for a great pipe. I really enjoy it. bob

Re: 2009-2010 Pipe In The Hat trade
hello,
i recieved t3p´s pipe yesterday and i´m really confused how i should "proceed".
if i give the pipe a proper critique, i´ll be stamped "asshole".
It´s easier to me to believe, that you rushed with the pipe wanting to be the first to finish the "pitch pipe",
and that you didn´t give your best at all.
i´ll be willing to post a better/more specific critique (if i can even call this one a critique) of the pipe if you wish.
daniel
-
KurtHuhn

- Site Admin
- Posts: 5326
- Joined: Thu Nov 23, 2006 8:00 pm
- Location: United States/Rhode Island
Re: 2009-2010 Pipe In The Hat trade
Keep in mind, Daniel, that the critique should be honest but supportive. Identify successes, offer suggestions for improvement, and above all, keep in mind that your shit doesn't smell like roses. What you notice in the pipe you received may well be the same criticism that the recipient of your pipe noticed but has decided to proceed more tactfully. People want honest feedback, but nobody wants their work or themselves insulted - insults make people shut down and get angry, which I don't want to see.
Critique lacking in tact might accomplish the same goals of helping someone look at their work with a more critical eye - but at the same time that person lacking tact looks like an asshole. Perhaps compose your critique with an eye on how you might feel if you got the same crappy review. Just remember, the person that made that pipe is very proud of their accomplishments.
Another thing to keep in mind is that, to my knowledge, there's only one person who took part in this that makes pipes as a large portion of their income - me. Everyone else is trying to LEARN HOW to make pipes, or at least MAKE BETTER pipes. Keep in mind that your critique should be designed to help someone learn, not air your grievances - whether real or perceived.
-
pennsyscot
- Posts: 223
- Joined: Thu Jun 26, 2008 5:03 pm
- Location: pennsylvania USA
Re: 2009-2010 Pipe In The Hat trade
Fred, thanks for your kind remarks. Sorry about the stain. I suspect that my numerous reworkings and refinishings are the cause of that. I just couldn't get that shank right.
Re: 2009-2010 Pipe In The Hat trade
wow,
that makes really sense, and i didn´t realize all the possible precautions.
I quess i "stamped" myself anyway.
t3p, i´m sorry if my post offended you, but i really thought or still think that you must have rushed with the pipe.
I have done the same many times and once in a while I still have to tell myself to sit back and think more,
especially with shapes like the billiard witch easily looks unbalanced if not done right.
If you didn´t rush, i suggest you keep always the stem attached to the pipe while you work in the shank area.
There is no step/gap between the shank and the stem, which is really good considering you swapped the stem
when the pipe was already done. the thing is that, the shank goes first at an angle, lets say15 degrees, for 1 cm,
then the taper suddenly stops and continues at 20 degrees til it meets the stem, the stem goes on with slightly different angle and starts the tapering again in different angle. This is easily prevented by sanding with the pieces together, sanding from the
point where the shank comes out of the bowl to about the half of the stem (with single straight draws).
When you do symmetric "straight" bowls, its easier to get the bowl symmetric by looking the drilling of the bowl, and following
the curve it makes. It also helps if you stick your finger in the bowl and another finger on the outside the bowl and "feel" it.
this way makes it really easy to detect bulges etc. other asymtries.
i hope this picture reveals what i mean.
the finish on he pipe is done well and there are no sanding marks on the pipe,
plus it smokes well.
Last edited by daniel on Thu Feb 18, 2010 4:31 pm, edited 3 times in total.

Re: 2009-2010 Pipe In The Hat trade
Kurt is quite sensible. We are really privileged to have the master moderator saint as admin/host here.daniel wrote:wow,
that makes really sense

Re: 2009-2010 Pipe In The Hat trade
Daniel. not offended at all. Just sorry it wasn't a good pipe that you got. For the stem, no excuse, just poor workmanship and attention to detail  . on the bowl, you described my biggest problem that I am still working on. I do feel bad, and will PM you (after band practice) with an idea to off -set it some.
Re: 2009-2010 Pipe In The Hat trade
hello,
you said that it´s your biggest problem, that you are still working on, thats enough.
don´t feel bad, ill try to think an way to make it easier to get it symmetric for you.
you said that it´s your biggest problem, that you are still working on, thats enough.
don´t feel bad, ill try to think an way to make it easier to get it symmetric for you.
-
KurtHuhn
- Site Admin
- Posts: 5326
- Joined: Thu Nov 23, 2006 8:00 pm
- Location: United States/Rhode Island
Re: 2009-2010 Pipe In The Hat trade
In truth, that's a really small thing to get worked up over. This is a newbie KITH after all. Not that it isn't important, but...
The best way to ensure a symmetric and round bowl top is to practice. In the meantime, try using a circle template or compass to draw a circle, and shape to that. Patience really plays a major part in getting that done, because without a lathe to give a starting shape, you've really got to develop a good eye and intimate familiarity with your tools.
For a pot, one circle might be enough, but for a billiard you'll want two of them, actually. One for the major diameter of the bowl, and one for the minor diameter up at the rim. I don't use the circle method, so hopefully someone who does can offer guidance on the ratios/sizes to use - but I might start with 1.25" and 1.5" and see where that takes you. I never measure the outside diameter of my pipes, I just go by how they look.
For the shank, that looks typical of what you might see when replacing a stem. You really want to avoid that at all costs. On the rare occasion where I've replaced a stem on a pipe, I use a very thin cellophane tape on the end of the shank to act as a sacrificial protector while shaping and sanding the stem. Done right you can make the difference in size undetectable, and only have to do some minor re-staining right near the shank face.
The best way to ensure a symmetric and round bowl top is to practice.
For a pot, one circle might be enough, but for a billiard you'll want two of them, actually. One for the major diameter of the bowl, and one for the minor diameter up at the rim. I don't use the circle method, so hopefully someone who does can offer guidance on the ratios/sizes to use - but I might start with 1.25" and 1.5" and see where that takes you. I never measure the outside diameter of my pipes, I just go by how they look.
For the shank, that looks typical of what you might see when replacing a stem. You really want to avoid that at all costs. On the rare occasion where I've replaced a stem on a pipe, I use a very thin cellophane tape on the end of the shank to act as a sacrificial protector while shaping and sanding the stem. Done right you can make the difference in size undetectable, and only have to do some minor re-staining right near the shank face.
Re: 2009-2010 Pipe In The Hat trade
I started using a compass last month for the top, made a major improvement. Haven't figured out a good way to get the major diameter, so I still get bulges.
-
SimeonTurner

- Site Supporter
- Posts: 750
- Joined: Wed Dec 24, 2008 7:46 pm
- Location: Denver, Colorado
- Contact:
Re: 2009-2010 Pipe In The Hat trade
One trick you could try is to draw a whole bunch of bisecting lines on the sides of the block, and do your tapering such that the highest point of any round surface is "centered" on the lines. In this way, if you draw your lines nice and symmetrical, you should have a pretty approximate symmetry to the whole rounded shape.T3pipes wrote:I started using a compass last month for the top, made a major improvement. Haven't figured out a good way to get the major diameter, so I still get bulges.
Does that make any sense?
"It is noble to be good; it is still nobler to teach others to be good - and less trouble."
Turner Pipes Website:
http://www.turnerpipes.com
Of Briar and Ashes:
http://turnerpipes.wordpress.com
Turner Pipes Website:
http://www.turnerpipes.com
Of Briar and Ashes:
http://turnerpipes.wordpress.com
-
pennsyscot
- Posts: 223
- Joined: Thu Jun 26, 2008 5:03 pm
- Location: pennsylvania USA
Re: 2009-2010 Pipe In The Hat trade
was very pleased when I learned that I would be recieving a pipe from Charl. I've been admiring Charl's work posted on this forum for some time. My package from South Africa arrived last week. The package contained not one, but two finely crafted pipes. The pipes came with nice deer skin embossed socks. The nosewarmer was made from blackwood. The workmanship is excellent. The drilling is pertfect and the bit is very thin and comfortable. The delrin tenon has a very nice fit. The pipe is highly polished. I have smoked both pipes frequently since I have recieved them. They provided an easy draw and very dry smoke. I really like the appearance of the rough checked sapwood rim. The Blackwood did not produce any unusual flavors. Although, It is a dense hardwood and is very heavy. The bonus pipe was an olivewood. I'm very pleased with my pipes. Thank you.
http://1.bp.blogspot.com/_yPMJ9XWa0vA/S ... 140166.JPG
http://1.bp.blogspot.com/_yPMJ9XWa0vA/S ... 140166.JPG