nosewarmer stack

Want to show you work to the world? Want a place to post photos of your work and solicit the opinions of those that have gone before you? Post your work here.
Post Reply
User avatar
Joe Hinkle Pipes
Posts: 804
Joined: Tue Feb 15, 2011 1:39 am
Location: Lafayette Indiana
Contact:

nosewarmer stack

Post by Joe Hinkle Pipes »

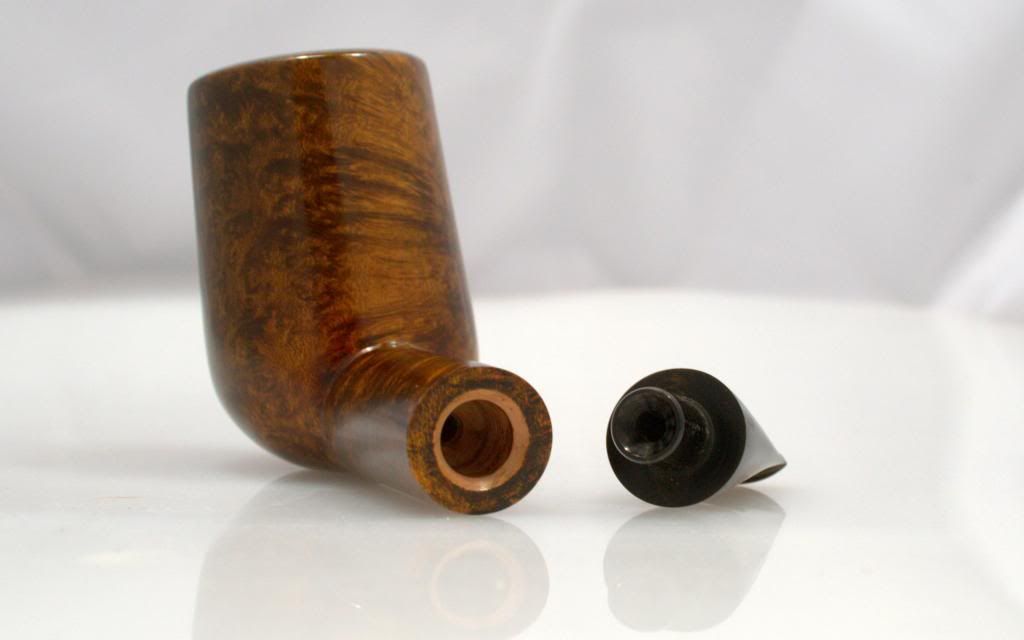
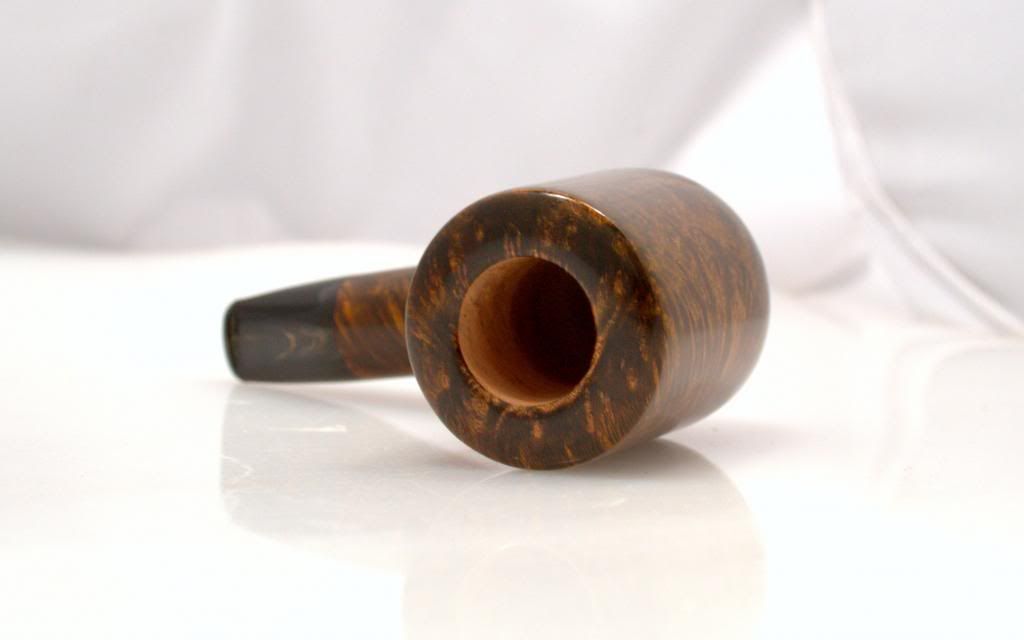
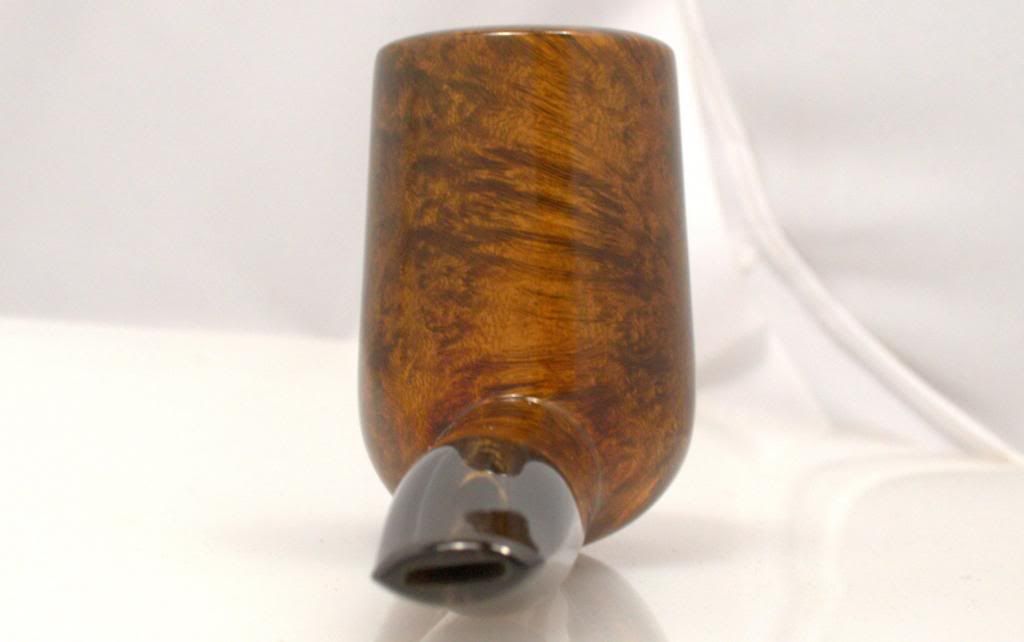
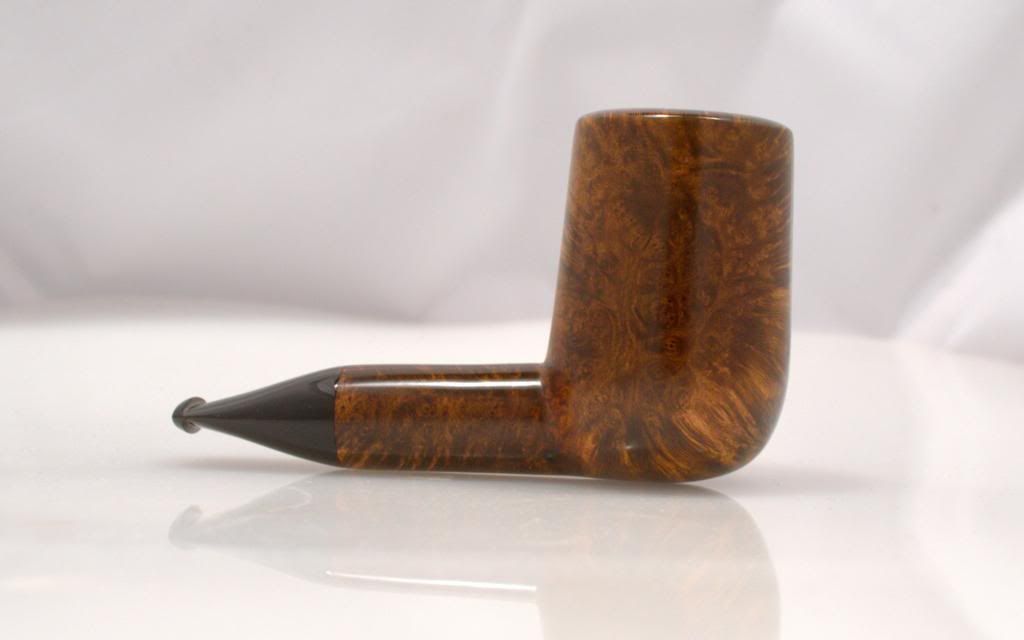
Here is one I finished up today. I would appreciate any feedback you have to offer. The stummel had a few flaws, so I stained a little darker than I normally would have. The stem is buffalo horn. It was much easier to work than anticipated. I addressed some issues that were brought up at the meet-up in Columbus. The slot is much narrower and neater now, as well as A dome on the top rather than a bevel. I know the stain is a little uneven, if you see any other issues be sure to point them out. Thanks for looking!
Image
Image
Image
Image
Image
User avatar
baweaverpipes
The Awesomer
Posts: 947
Joined: Tue Dec 19, 2006 8:07 am
Location: Franklin, Tennessee
Contact:

Re: nosewarmer stack

Post by baweaverpipes »

Horn gets slimy and a yucky taste. Rad finds it delicious.
There's a bit of meat left on the heel, it should be flush with the shank.
User avatar
Ocelot55
Posts: 1639
Joined: Thu Nov 10, 2011 12:31 pm
Location: Columbus, OH
Contact:

Re: nosewarmer stack

Post by Ocelot55 »

Joe, it's obvious there is some skill involved here, but I'm not a fan of the overall proportions. From a technical standpoint there are several items. The first and most glaring in the bottom line resulting in a light gap when sitting on a flat surface. There are a couple of waves on the top of the shank line as well. A question about the stem: Is the tenon also horn? It's hard to tell from the photo. Most folks use a more stable material for a tenon when working with horn. I have a feeling a horn tenon would be a nightmare with a lot of expansion and contraction as well as being brittle.

So, overall I think this one is pretty good. The devil is in the details.
User avatar
Joe Hinkle Pipes
Posts: 804
Joined: Tue Feb 15, 2011 1:39 am
Location: Lafayette Indiana
Contact:

Re: nosewarmer stack

Post by Joe Hinkle Pipes »

Bruce, I wasn't aware that horn gets slimy. Or that rad likes it that way. I'm just glad you dont have an awful nickname for me.
Jesse I know the shape is love or hate (mostly hate?) but I had made A similar pipe about a month ago and it got the better of me, so I had to finish one for my own enjoyment. Why is it you never notice things like the bowl bulge and shank wave until you are editing the photos? I think this is my overall best pipe to date as far as attention to detail goes. I improved the things i wanted to, but shaping took one big step back. But if pipemaking was easy I would have given up by now. there is always something you feel like you could improve on next time. So on to the next block. Thanks for the feedback guys, if anything else jumps out at you about this pipe let me know. I wasn't totally thrilled about the dome on the top, but like I said, next time...
User avatar
Ocelot55
Posts: 1639
Joined: Thu Nov 10, 2011 12:31 pm
Location: Columbus, OH
Contact:

Re: nosewarmer stack

Post by Ocelot55 »

Solomon_pipes wrote:Why is it you never notice things like the bowl bulge and shank wave until you are editing the photos?
This man speaks the truth! :lol:
LatakiaLover
Posts: 3121
Joined: Sun Sep 02, 2007 4:29 am
Location: Kansas City, USA
Contact:

Re: nosewarmer stack

Post by LatakiaLover »

Ocelot55 wrote:
Solomon_pipes wrote:Why is it you never notice things like the bowl bulge and shank wave until you are editing the photos?
This man speaks the truth! :lol:
The most important thing a newly minted Perfection Chaser pipe maker can do to get better fast:

Resist the urge to be "Finished at last!" with a pipe. Instead, after shaping is complete, put it out of sight for a few days or a week while working on something else. Then, take it out to see all the things that familiarity, tunnel vision, and fatigue blinded you to while working on it the first time. Fix those things, rinse, and repeat until nothing new appears. When that happens, take brightly lit photos of the pipe from all angles, and examine them closely. Fix the STILL new shit that seems to magically appear in the photos. Then, and only then, proceed to the color and final finish steps.

(Don't worry, eye development happens fairly fast if you work at it with exercises like the above. After a while you don't even need to do them. You start seeing stuff instantly and correct it in mid-flight, so that you hit the bullseye---or very nearly---every time.)
Last edited by LatakiaLover on Thu Apr 24, 2014 8:43 pm, edited 1 time in total.
UFOs must be real. There's no other explanation for cats.

User avatar
Joe Hinkle Pipes
Posts: 804
Joined: Tue Feb 15, 2011 1:39 am
Location: Lafayette Indiana
Contact:

Re: nosewarmer stack

Post by Joe Hinkle Pipes »

I'm going to try this George. I have A tendency to rush the finishing process to see how the finished product looks. Then I go back and re-sand the shitty stain job. I've noticed that if I am shaping one pipe and finishing another, I seem to have more patience with the finishing process which is exactly what is needed in the pursuit of perfectionism.
wdteipen
Posts: 2817
Joined: Sat Mar 29, 2008 1:05 pm

Re: nosewarmer stack

Post by wdteipen »

Other than what's already been mentioned, the only thing I see wrong is that you domed the rim instead of beveled it. :twisted:
Wayne Teipen
Teipen Handmade Briar Pipes
http://www.teipenpipes.com
LatakiaLover
Posts: 3121
Joined: Sun Sep 02, 2007 4:29 am
Location: Kansas City, USA
Contact:

Re: nosewarmer stack

Post by LatakiaLover »

wdteipen wrote:Other than what's already been mentioned, the only thing I see wrong is that you domed the rim instead of beveled it. :twisted:
https://www.youtube.com/watch?v=Gh9JrY_su1k
UFOs must be real. There's no other explanation for cats.
User avatar
d.huber
Posts: 2691
Joined: Mon Dec 12, 2011 9:28 pm
Location: Durham, NC
Contact:

Re: nosewarmer stack

Post by d.huber »

wdteipen wrote:Other than what's already been mentioned, the only thing I see wrong is that you domed the rim instead of beveled it. :twisted:
Oooooooh he done it now!

George is right. A few days ago my eyes adjusted and I can see a new level of suck in my work. The good thing is that I can now fix those things. The hard part is figuring out how.

Sent from my SCH-I535 using Tapatalk
http://www.dshpipes.com

"Strive for excellence, not for what someone else accepts."
-Tyler Beard
User avatar
Sasquatch
Posts: 5147
Joined: Tue Jan 13, 2009 1:46 am

Re: nosewarmer stack

Post by Sasquatch »

d.huber wrote:
wdteipen wrote:Other than what's already been mentioned, the only thing I see wrong is that you domed the rim instead of beveled it. :twisted:
Oooooooh he done it now!

George is right. A few days ago my eyes adjusted and I can see a new level of suck in my work. The good thing is that I can now fix those things. The hard part is figuring out how.

Sent from my SCH-I535 using Tapatalk
Fantastic. Should save us all quite a bit of trouble. :thumbsup:
ALL YOUR PIPE ARE BELONG TO US!
pipedreamer
Posts: 1056
Joined: Mon Jan 07, 2013 6:25 pm

Re: nosewarmer stack

Post by pipedreamer »

George is right. :thumbsup:
User avatar
Joe Hinkle Pipes
Posts: 804
Joined: Tue Feb 15, 2011 1:39 am
Location: Lafayette Indiana
Contact:

Re: nosewarmer stack

Post by Joe Hinkle Pipes »

wdteipen wrote:Other than what's already been mentioned, the only thing I see wrong is that you domed the rim instead of beveled it. :twisted:
I said I domed the rim. i didn't say I liked it. lol
Post Reply