PITH 2020!
-
miscoipipes
- Posts: 36
- Joined: Wed Jan 14, 2015 4:16 pm
- Location: Canada
Re: PITH 2020!
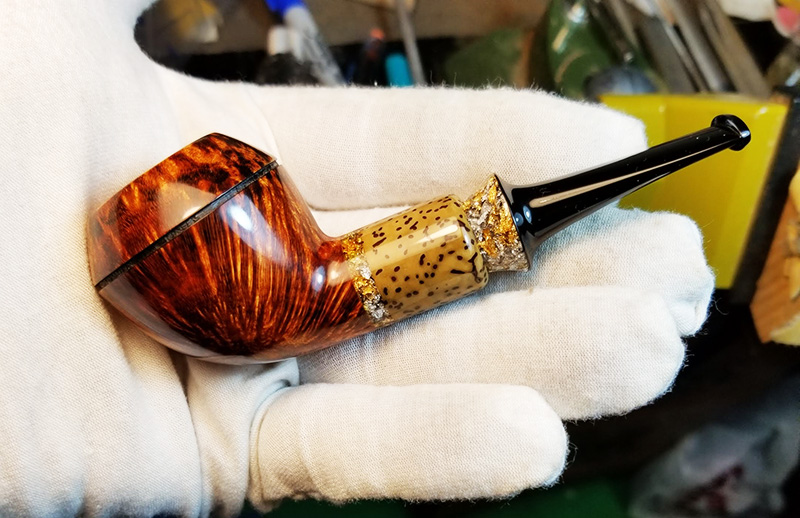
Here is my first attempt for a Rhodesian...
Re: PITH 2020!
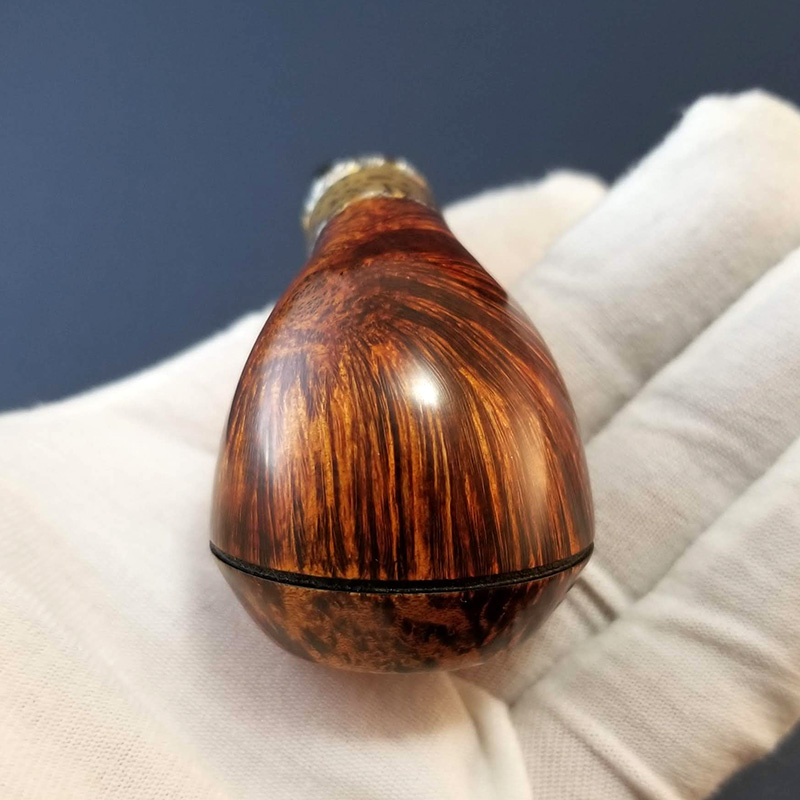
Okay I’m struggling with this shape a little. A small crack developed in the mortise on the shank. I just wanna use this as a practice pipe now but should I even bother or move on to the next?? Also I know the shape is like a horny Rhodesian lol but I will gladly take advice. Please.
- Attachments
-
- 2B437368-CBF7-40E1-976A-80F4277CAD4B.jpeg (74.8 KiB) Viewed 3718 times
-
- 80C9841D-CCBF-4CB4-8C5D-09D917D015E6.jpeg (100.53 KiB) Viewed 3718 times
-
KurtHuhn

- Site Admin
- Posts: 5326
- Joined: Thu Nov 23, 2006 8:00 pm
- Location: United States/Rhode Island
Re: PITH 2020!
I'd finish that pipe. Use it as practice and keep it for yourself if it doesn't turn out well enough to include. That small flaw is an eyesore, but personal pipes don't have to be pretty to be a learning experience.nboothe87 wrote: ↑Thu Mar 12, 2020 3:09 pm Okay I’m struggling with this shape a little. A small crack developed in the mortise on the shank. I just wanna use this as a practice pipe now but should I even bother or move on to the next?? Also I know the shape is like a horny Rhodesian lol but I will gladly take advice. Please.
Also, you could put a ring on that shank if you have a lathe. Chuck it "the wrong way" with a pin gauge, or pin that you make, and cut it down to accept a ring. It's simple, though frightening if you've done it before, process.
-
KurtHuhn
- Site Admin
- Posts: 5326
- Joined: Thu Nov 23, 2006 8:00 pm
- Location: United States/Rhode Island
Re: PITH 2020!
The leopard and gold remind of my Italian wife's aunties' house decor and clothing choices.miscoipipes wrote: ↑Thu Mar 12, 2020 10:47 am Here is my first attempt for a Rhodesian...
1.jpg2.jpg
Seriously though, with pipes (and most crafts), less is often more.
-
LatakiaLover
- Posts: 3124
- Joined: Sun Sep 02, 2007 4:29 am
- Location: Kansas City, USA
- Contact:
Re: PITH 2020!
This ^^^^
Good examples of elegant simplicity:
https://www.google.com/search?q=site%3A ... 2045&hl=en
UFOs must be real. There's no other explanation for cats.
-
miscoipipes
- Posts: 36
- Joined: Wed Jan 14, 2015 4:16 pm
- Location: Canada
Re: PITH 2020!
I know... I know )) I had to try this. It was a good practice for me + this pipe was sold out in an hour 
The next one I will try to stick to elegant simplicity as close as possible. Thanks for your advice (KurtHuhn and LatakiaLover), really appreciate it! Love this forum for the honest opinions
The next one I will try to stick to elegant simplicity as close as possible. Thanks for your advice (KurtHuhn and LatakiaLover), really appreciate it! Love this forum for the honest opinions
Re: PITH 2020!
A little video on my YouTube of starting a Rhodesian for this PITH. I may do a couple more before the dead line depending on how this one comes out. To be honest if the grain is flawless it may go up for sale.
https://youtu.be/F6x46JPKR-8
https://youtu.be/F6x46JPKR-8
Greatness is the closest thing to perfection. I am good, I am Humble.
Re: PITH 2020!
Jason, Thank you for that video. I gives me some more ideas to use when I get my chuck set up and start using my lathe for pipes.
I hope to be at least half the person my dogs thinks I am.
AKA Terry
AKA Terry
Re: PITH 2020!
For inspiration, I thought that I would post this little Rhodesian made by Jedidiah Sandahl, Jeremiah’s son. I beleive that Jedidiah was 8 or 9 years old at the time.
DocAitch


DocAitch
"Hettinger, if you stamp 'hand made' on a dog turd, some one will buy it."
-Charles Hollyday, pipe maker, reluctant mentor, and curmudgeon
" Never show an idiot an unfinished pipe!"- same guy
-Charles Hollyday, pipe maker, reluctant mentor, and curmudgeon
" Never show an idiot an unfinished pipe!"- same guy
Re: PITH 2020!
Inspiration? That means I performing a little lower than an 8 year old.
-
miscoipipes
- Posts: 36
- Joined: Wed Jan 14, 2015 4:16 pm
- Location: Canada
Re: PITH 2020!
I tried to create my first classic squat bulldog. A lot of mistakes made and a lot of new things learnedLatakiaLover wrote: ↑Thu Mar 12, 2020 8:03 pmThis ^^^^
Good examples of elegant simplicity:
https://www.google.com/search?q=site%3A ... 2045&hl=en
Due to a briar flaw this is my new shop pipe so I did not sand the tobacco chamber. I also didn't want to spend too much time fixing many small things. I just marked them in my head to avoid same mistakes on the next bulldog
Thanks guys for pushing me forward, appreciate it!
- Attachments
-
- 5.jpg (27.6 KiB) Viewed 3574 times
-
- 4.jpg
- (51.08 KiB) Not downloaded yet
-
- 3.jpg
- (53.63 KiB) Not downloaded yet
-
- 2.jpg
- (94.58 KiB) Not downloaded yet
-
- 1.jpg
- (51.57 KiB) Not downloaded yet
Last edited by miscoipipes on Mon Mar 23, 2020 12:17 am, edited 1 time in total.
-
LatakiaLover
- Posts: 3124
- Joined: Sun Sep 02, 2007 4:29 am
- Location: Kansas City, USA
- Contact:
Re: PITH 2020!
Since ebonite is harder than wood, use Scotch Magic tape (the matte kind) stretched tight over the places near the stem that need protection when sanding to avoid "sag":
UFOs must be real. There's no other explanation for cats.
-
miscoipipes
- Posts: 36
- Joined: Wed Jan 14, 2015 4:16 pm
- Location: Canada
Re: PITH 2020!
Thanks a lot, George!LatakiaLover wrote: ↑Mon Mar 23, 2020 12:16 am Since ebonite is harder than wood, use Scotch Magic tape (the matte kind) stretched tight over the places near the stem that need protection when sanding to avoid "sag":
I rewatch all you videos many times - a LOT of brilliant information.
The funny thing is I have Scotch Magic tape (bought it after your advise in one of your videos) but I did not use it hoping to be a Great-Wizard-with-Magic-Hands... stupid enough
With this pipe I understood many things especially how difficult is to make a proper straight line and how easily you can make a straight line not straight anymore. Well, lesson learned: It is better to take your time and avoid mistakes than try to fix them and make things worse. I used Menzerna pre polish on the stem as a first compound and this rounded the sharp peaks on the top and bottom of the stem. I guess I have to sand with finer grid sandpaper and use Menzerna medium very lightly to keep the sharp points intact?
I will keep going and try to make the next one closer to a proper bulldog.
Re: PITH 2020!
I need some help. I've attempted 3 bulldog/Rhodesian type pipes. All straights. All the first three I've attempted on a lathe. The first one was a clunky imperfect bulldog that I finished but it is a shop pipe at best. The second one got tossed because I drilled the airway too low and by the time I got the chamber depth down to it the amount of briar below the chamber was too thin. The third pipe turned out pretty well, probably my best pipe to date. But the thickness under the chamber is probably marginal.
Looking at the designs that I'm attempting to copy it seems like the heel of the stummel sweeps back fairly sharply and _that_ is why there is not much room for a deep chamber. Not sure if that is inherent in the stummel shape of bulldogs and Rhodesians in general or just the ones that have caught my eye.
I did read that Bo Nordh's design (copied by Geiger (BoDog) and Vermont Freehand) was flawed by not having enough material under the chamber and got too hot.
So two questions:
1. What is the minimum amount of material you can leave under the chamber?
2. If you are using a lathe and need to drill the airway hole on a different axis from the mortise, what is the proper workflow? Do you drill mortise first and then the airway? If so, how do you adjust the stummel in your chuck after the mortise is drilled and do that accurately? Or do you just freehand the airway?
Last edited by n80 on Mon Mar 23, 2020 8:55 pm, edited 1 time in total.
-
KurtHuhn
- Site Admin
- Posts: 5326
- Joined: Thu Nov 23, 2006 8:00 pm
- Location: United States/Rhode Island
Re: PITH 2020!
A dirty secret in pipe making circles is that the airway on a straight pipe doesn't need to be on the same axis as the mortis and shank. In this case you can adjust the angle the same way as you do on bent pipes - carefully.
I generally do mortis, airway, then chamber - however, that is not a hard and fast rule. Whatever combo works for you is what you should use. The thing you're looking for is repeatability.
I generally do mortis, airway, then chamber - however, that is not a hard and fast rule. Whatever combo works for you is what you should use. The thing you're looking for is repeatability.
-
seamonster

- Posts: 380
- Joined: Fri Feb 21, 2014 12:43 am
- Location: Portland, OR
Re: PITH 2020!
Another thing to think about is the shape of your chamber bit. I've been using a much pointier shape which gives me more meat below the chamber.
Sent from my bloopty-bloop, using hooty-hoo.
Sent from my bloopty-bloop, using hooty-hoo.
instagram.com/seamonster_workshop/
Re: PITH 2020!
That is apparently how the Geigers got past Bo Nordh's problem.seamonster wrote: ↑Mon Mar 23, 2020 8:49 pm Another thing to think about is the shape of your chamber bit. I've been using a much pointier shape which gives me more meat below the chamber.
Sent from my bloopty-bloop, using hooty-hoo.
Kurt, I have VF jaws on my chuck which means there is not a single precise point of contact for accurately changing that angle. On the last pipe every time I tried to line it up on the axis of the airway (after drilling the mortise) it seems like the end of the shank was rotating in a small arc and I never could get it to rotate on the desired airway axis. I guess it will just take a lot more fiddling to get the pipe in the right position. I ended up drilling the last airway freehand. It hit the mark just right but I consider that luck rather than skill and have no confidence that I could do that consistently.
-
LatakiaLover
- Posts: 3124
- Joined: Sun Sep 02, 2007 4:29 am
- Location: Kansas City, USA
- Contact:
Re: PITH 2020!
Not more fiddling, just a chuck with pins:n80 wrote: ↑Mon Mar 23, 2020 9:02 pmI have VF jaws on my chuck which means there is not a single precise point of contact for accurately changing that angle. On the last pipe every time I tried to line it up on the axis of the airway (after drilling the mortise) it seems like the end of the shank was rotating in a small arc and I never could get it to rotate on the desired airway axis. I guess it will just take a lot more fiddling to get the pipe in the right position. I ended up drilling the last airway freehand. It hit the mark just right but I consider that luck rather than skill and have no confidence that I could do that consistently.
https://rawkrafted.com/tools/chucks/bri ... with-pins/
UFOs must be real. There's no other explanation for cats.
-
seamonster
- Posts: 380
- Joined: Fri Feb 21, 2014 12:43 am
- Location: Portland, OR
Re: PITH 2020!
I've had a similar issue with those Jaws in a Nova chuck.... If the block isn't dead square, the chuck had too much flex. Currently I'm having much better luck with the chuck Premel is carrying....
but here's how I got around it:
Try and square the chuck as well as possible first. then when you make your layout lines, use a ruler that is a half inch wide to draw parallel lines with your drill marks (the chuck is an inch wide, so the parallel lines will allow you to line up the outside edges of the chuck). Find the center point on the end of the block and use a blunted pin, similar to what you would use for freehand drilling, in your Jacobs chuck in the trail stock to add alignment. Drill the mortise. then, but a center drill or other pin with a wide angle point in the tail stock, loosen the chuck a smidge, just enough to tap the block, the cone in the tailstock keeps the mortise hole aligned.
you can also use Brad point bits to drill both mortise and airway. The little spur makes a little poke that you can use to align centers....
Sent from my bloopty-bloop, using hooty-hoo.
instagram.com/seamonster_workshop/
-
seamonster
- Posts: 380
- Joined: Fri Feb 21, 2014 12:43 am
- Location: Portland, OR
Re: PITH 2020!
Yup, that's the chuck. Kinda spendy, but if you can float it, worth every penny..... the one downside is I would prefer the pin holes to be a little closer to the tip of the chuck. As is, I've found that on small bowls, I've been able to turn less than I would have been able to if the holes had been further out....LatakiaLover wrote:
Not more fiddling, just a chuck with pins:
https://rawkrafted.com/tools/chucks/bri ... with-pins/
Sent from my bloopty-bloop, using hooty-hoo.
instagram.com/seamonster_workshop/